Mercado Pago payments for WooCommerce Plugin
Offer to your clients the best experience in e-Commerce by using Mercado Pago as your payment method.
The official Mercado Pago plugin allows you to process payments for your online store, allowing users to finalize their purchase with their preferred payment method.
To install it, you don’t need to have technical knowledge: you can follow the step by step of how to integrate it. from our developer website and start selling today.
Warning about v6.0.0: when updating, if you have made custom layout changes to your checkout, it is possible that some of those customizations become misconfigured. If you have a separate store environment just for testing, please update there first in order to visualize and test the changes.
What to do with the Mercado Pago Plugin?
- Activate Checkout Pro to offer logged-in payments with money in Mercado Pago account, saved cards and off means.
- Offer payments without the need of having a Mercado Pago account, through the Custom Checkout for cards and off means, such as cash, bank transfer and PIX (only in Brazil).
- Automatically convert the currency of your products: from Mexican pesos to U.S. dollars and vice versa.
- Sell in installments and offer the current promotions in Checkout Pro or apply your own discount coupon in Custom Checkout.
- Test your store before going into production with our Sandbox environment.
- Receive the money from your sales on the same day.
- IMPORTANT: At the moment the Mercado Envios service is deactivated.
- Mercado Pago customers can use already stored cards For your customers who use Mercado Pago to buy without having to fill in card details at the store’s checkout.
Adapted to your business
Prepared for any type of store and category: electronics, clothing, kitchen, bazaar, whatever you want!
Just focus on selling and we’ll take care of the security: keep your store’s payments protected with our fraud prevention and analysis tool.
Boost your sales with Mercado Pago payments for WooCommerce!
Sell more with the paid market
Leave your details to talk to our team of experts and understand how to sell more (for now only available for Brazil).
Installation
Minimum Technical Requirements
- WordPress version
- Compatibility and dependency of WooCommerce VXX
- LAMP Environment (Linux, Apache, MySQL, PHP)
- SSL Certificate
- Additional configuration: safe_mode off, memory_limit higher than 256MB
Install the module in two different ways: automatically, from the “Plugins” section of WordPress, or manually, downloading and copying the plugin files into your directory.
Automatic Installation by WordPress admin
1. Access “Plugins” from the navigation side menu of your WordPress administrator.
2. Once inside Plugins, click on ‘Add New’ and search for ‘Mercado Pago payments for WooCommerce’ in the WordPress Plugin list
3. Click on “Install.”
Done! It will be in the “Installed Plugins” section and from there you can activate it.
Manual Installation
1. Download the [zip] (https://github.com/mercadopago/cart-woocommerce/archive/master.zip) now or from the o WordPress Module [Directory] (https://br.wordpress.org/plugins/woocommerce-mercadopago/)
2. Unzip the folder and rename it to ”woocommerce-mercadopago”
3. Copy the “woocommerce-mercadopago” file into your WordPress directory, inside the “Plugins” folder.
Done!
Installing this plugin does not affect the speed of your store!
If you installed it correctly, you will see it in your list of “Installed Plugins” on the WordPress work area. Please enable it and proceed to your Mercado Pago account integration and setup.
Mercado Pago Integration
- Create a Mercado Pago seller account if you don’t have one yet. It’s free and takes only seconds!
- Get your credentials, they are the keys that uniquely identify you within the platform.
- Set checkout payment preferences and make other advanced settings to change default options.
- Approve your account to go to Production and receive real payments.
Configuration
Set up both the plugin and the checkouts you want to activate on your payment avenue. Follow these five steps instructions and get everything ready to receive payments:
- Add your credentials to test the store and charge with your Mercado Pago account according to the country where you are registered.
- Approve your account in order to charge.
- Fill in the basic information of your business in the plugin configuration.
- Set up payment preferences for your customers.
- Access advanced plugin and checkout settings only when you want to change the default settings.
Check out our official documentation for more information on the specific fields to configure.
Screenshots

RECEIVE THE MONEY FROM YOUR SALES ON THE SAME DAY

This is what the Checkout Pro looks like in your store. You can choose between a modal experience or a redirect experience.

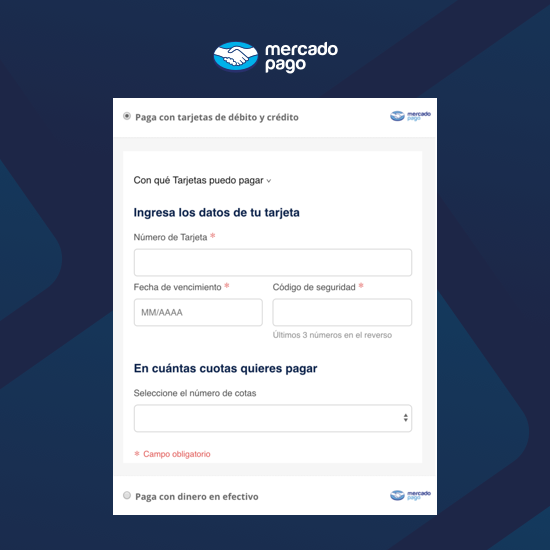
This is what the Customized Checkout looks like in your store. You can activate payments with cards and also cash.

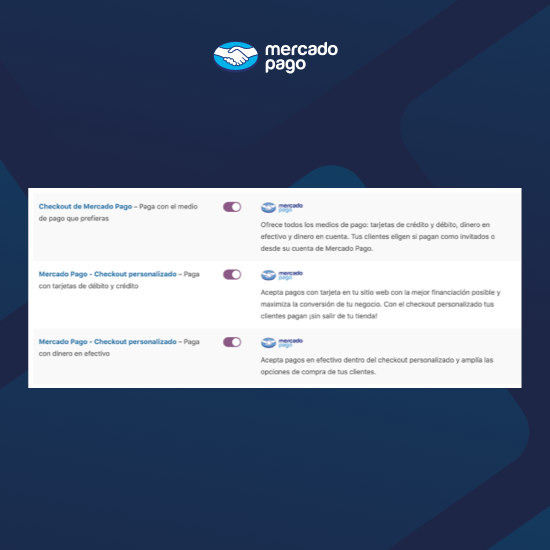
Once you install the Mercado Pago Plugin, you will find the 3 checkouts available in the Payment settings in WooCommerce. You can activate them simultaneously or choose one of them. Remember that they must be configured before enabling them.

To configure it, follow the step by step indicated in each Checkout. Remember that you can review the official documentation of our plugin on the Mercado Pago developer website.

ACCEPT ALL PAYMENT METHODS
FAQ
In our developer website you will find the step by step of how to integrate the Mercado Pago Plugin in your online store.
You must have an SSL certificate, connecting your website with the HTTPS protocol.
If you need to check the protocol configuration, test it here.
Finally, remember that the plugin receives IPN (Instant Payment Notification) notifications automatically, you don’t need to configure it!
Remember that to test the Checkout Pro you must log out of your Mercado Pago account, as it is not possible to use it to sell and buy at the same time.
Please note that with the Test Environment enabled, the Checkout Pro does not send notifications as does the Custom Checkout.
The configuration of sending emails must be done from the WooCommerce administrator. The Mercado Pago Plugin only contemplates sending transactions made in the Checkout Pro.
If you have already reviewed the documentation and have not found a solution, you can contact our support team through their contact form. Please note that we guarantee a response within {7 days} of your query.
PIX is a payment method that exists only in Brazil.
To enable PIX as a payment method in the Custom Checkout of your store, you need to have your key registered in Mercado Pago. See how to do it.
After registering the key, log into the WooCommerce administrator and navigate to the Payments section.
Look for the option Pague com PIX, configure it and activate PIX.
You can set up a time limit for customers to pay after they receive the code, among other settings.
Changelog
- Added:
- Added validation on user permissions to download plugin logs.
- Increased plugin wordpress tested version to the latest available.
- Fix:
- Addressed an issue where discount and commission calculations were not being shown correctly on order details.