
Ultimate Maps by Supsystic Plugin
Ultimate Maps by Supsystic is the best Google Maps alternative. It includes OpenStreetMap (OSM), Bing Maps, MapBox and Thunderforest maps services
Supsystic Ultimate Maps plugin was developed after the changes in Google maps pricing policy. According to the new rules, using Google maps is becoming too expensive for websites with large traffic. Therefore, Supsystic team provides users with the Google Maps alternatives:
* Bing maps
* OpenStreetMap or OSM
* Leaflet maps
* Mapbox
* Thunderforest
Ultimate Maps Plugin Features
- Google Maps alternatives: Bing Maps, Leaflet, Mapbox, Thunderforest
- Online Ultimate Maps builder
- Unlimited markers with description, links, images, videos and more
- Markers categories
- Fully responsive
- 100% customizable
- Add map via shortcode or PHP code
- Maps and Markers Import and Export
- Map with Exposition slider
- KML layers Import and
- Map Markers Clustering
- Maps Themes and Styles
- Ultimate Maps markers with slider mode
- Shapes
- Linked markers
- More Ultimate Maps Exampes
Create Ultimate Maps with unlimited markers on the WordPress website or blog in a minute. Integrated with Bing maps, OpenStreetMap or OSM: Mapbox, Thunderforest, Leaflet. Best Google Maps alternative WordPress plugin. Fully customizable, user-friendly and responsive. Map markers with any media: video and text descriptions. Easy to add into a page via shortcodes or use Ultimate Maps widget. An ultimate solution to display a map on the contact page, routes, real estates, delivery areas and more. Use a map on your website to help your clients in discovering your location.
Video tutorial how to set up Ultimate Maps by Supsystic
Ultimate Maps Plugin Support
If you have any problem or custom feature request for the Ultimate Maps by Supsystic, please let us know!
Google Maps Easy by Supsystic
Prefer to use a Google Maps? Create Google Maps in a minute with our Google Maps Easy WordPress plugin.
Google Map markers with any media, location, video and text descriptions. Easy to add google map with shortcode, open it in a popup or use google map widget. A great solution to display google map on the contact page, routes, real estates, delivery areas and more.
Installation
To install an Ultimate Maps plugin via FTP, you need
- Download the Ultimate Maps plugin
- Unarchive plugin ultimate-maps-by-supsystic.zip
- Copy the folder with Ultimate Maps plugin
- Open the ftp \wp-content\plugins\
- Paste the plug-ins folder in the folder
- Go to admin panel => open item “Plugins” => activate Ultimate Maps plugin.
Screenshots
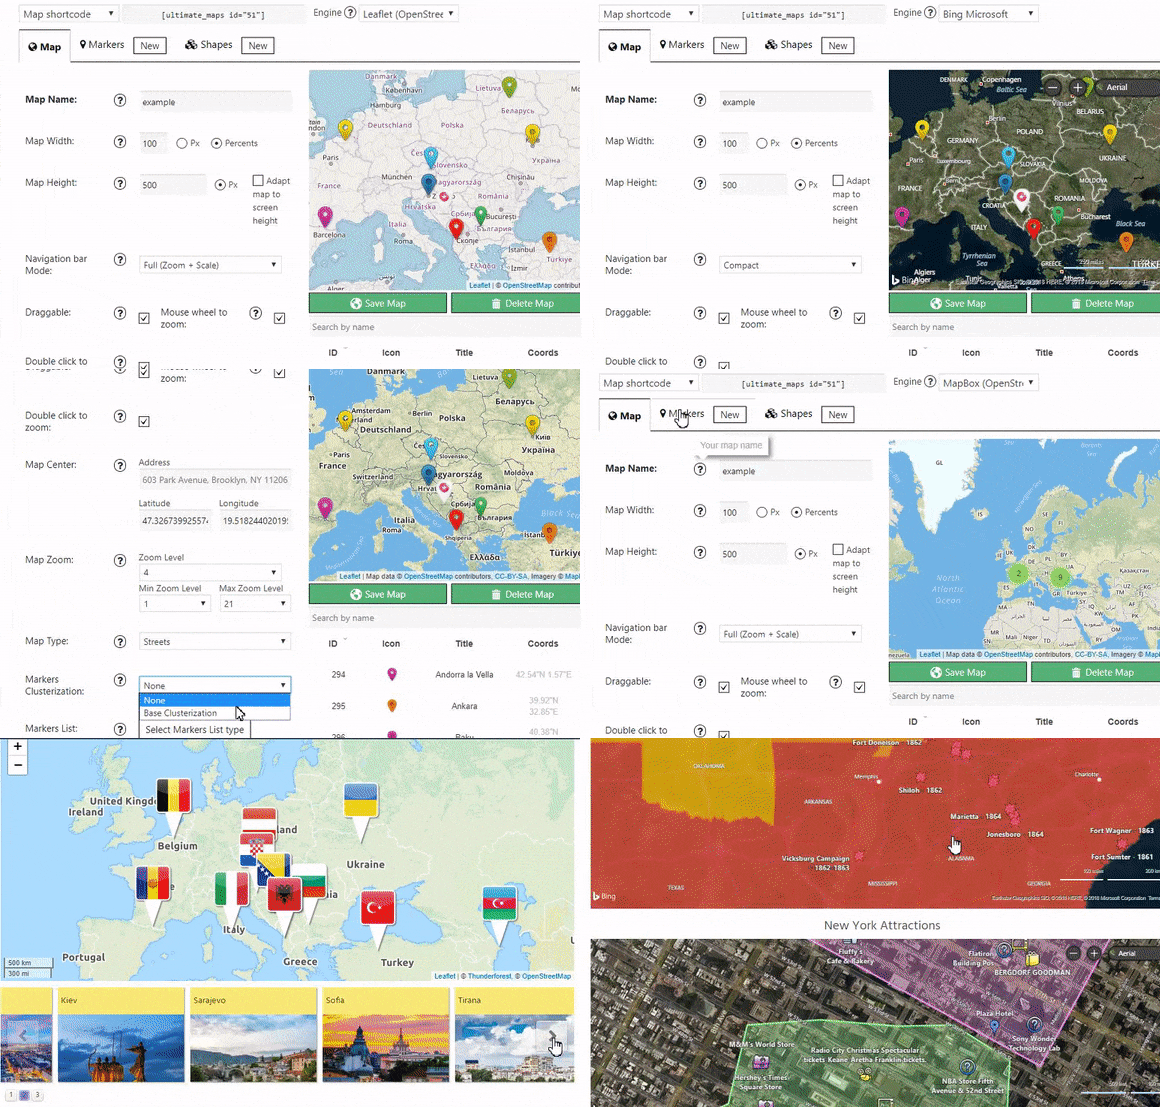
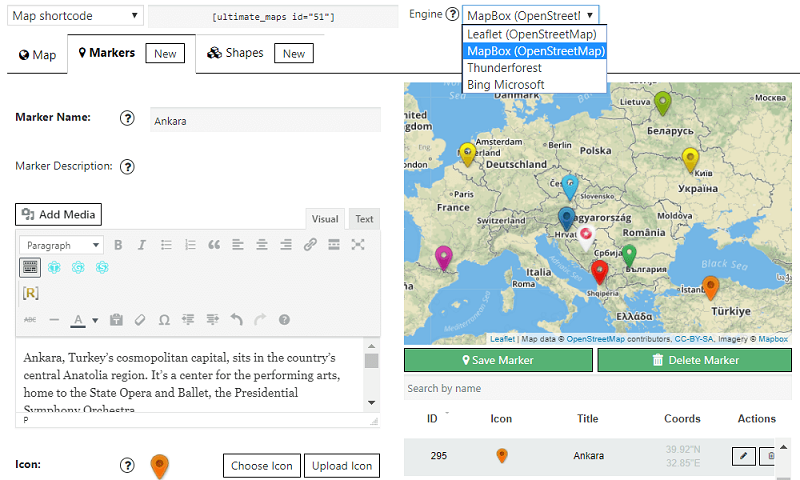
Switch the map engine in one click
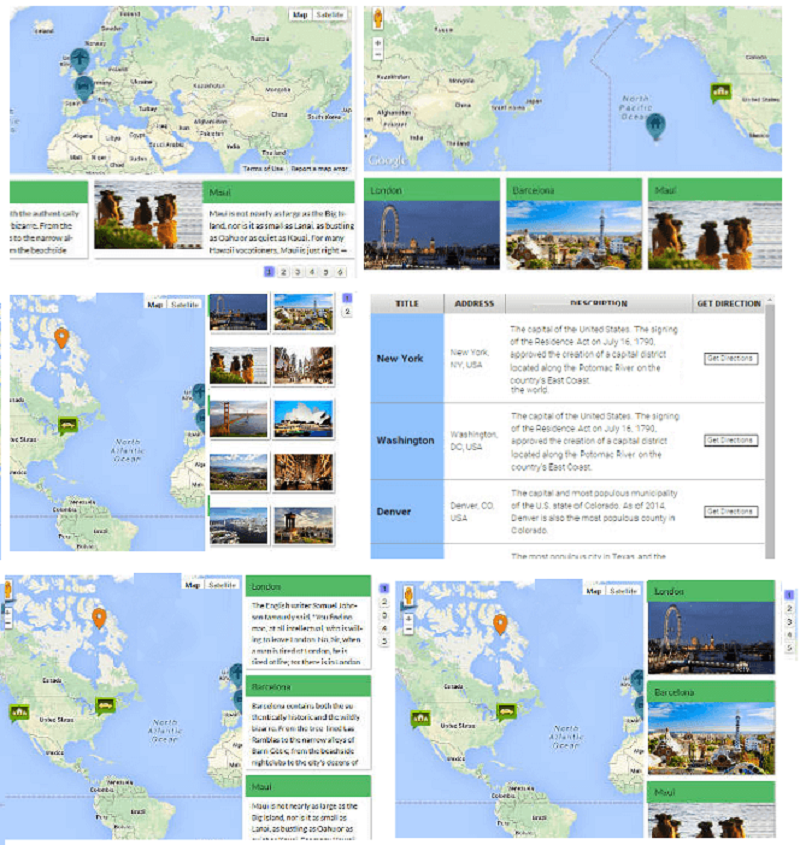
Map with different marker lists - display all map markers - as a list below your map. This will help your users get more info about your map
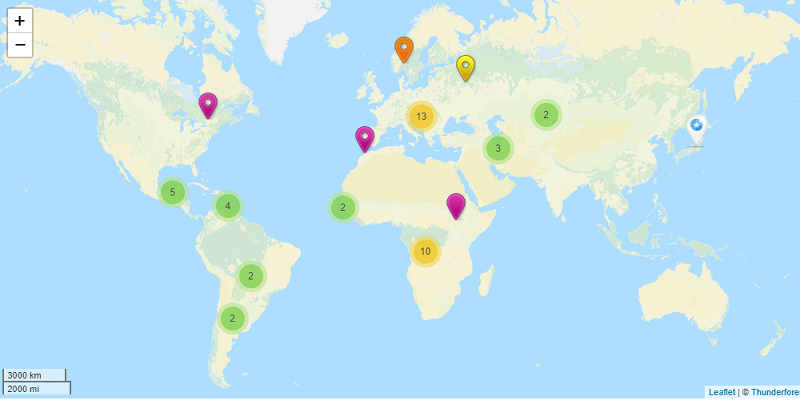
Map markers clustering
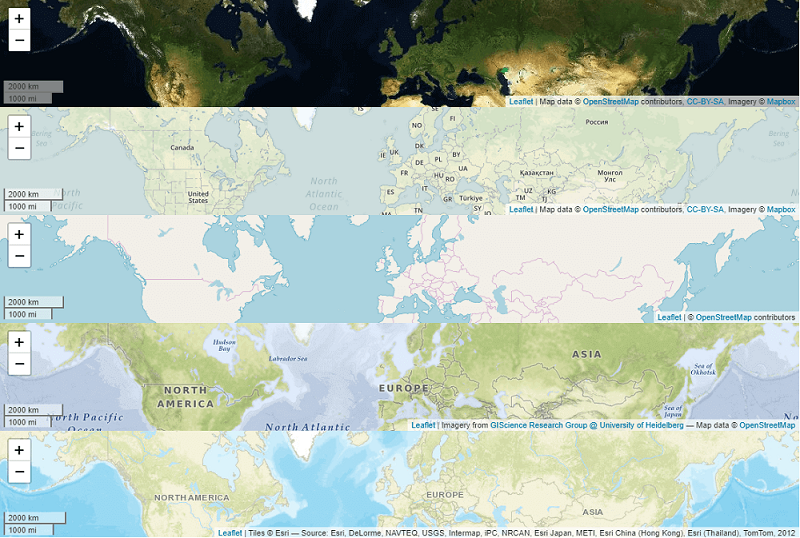
Ultimate Maps stylization
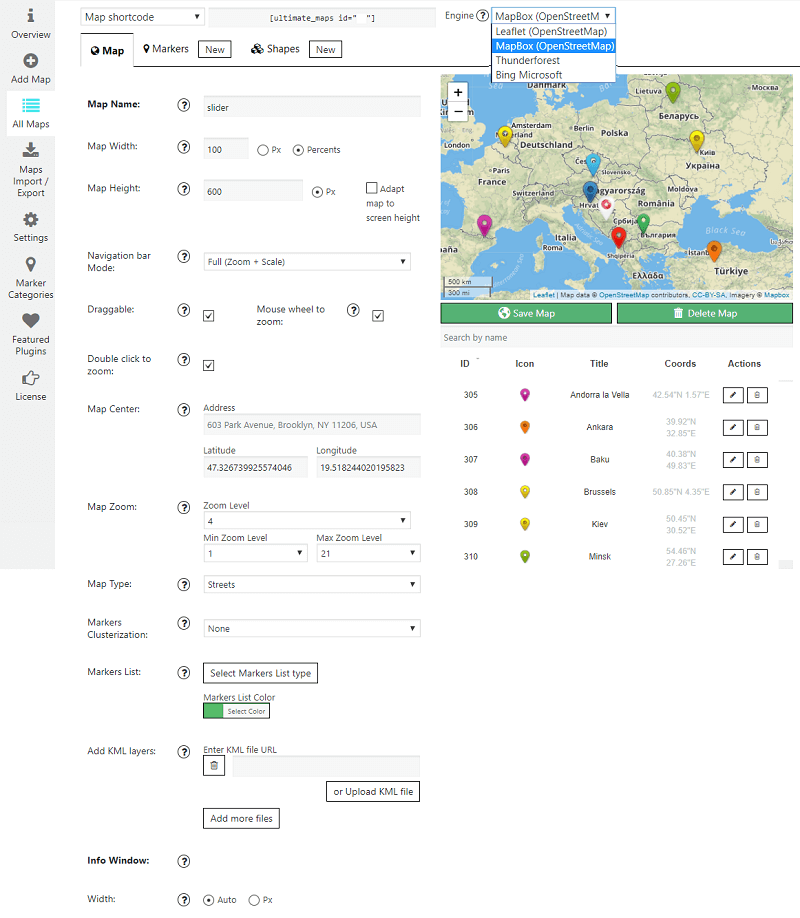
Ultimate Maps WordPress plugin admin area. Map settings
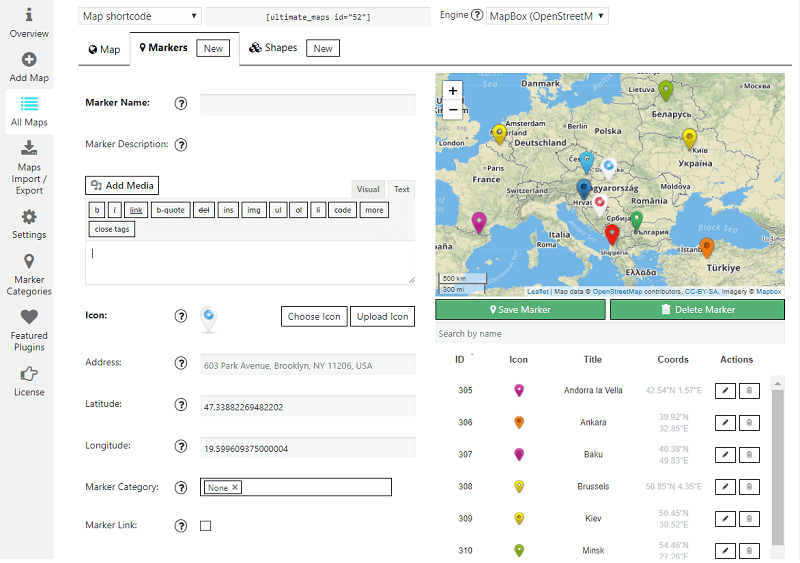
Ultimate Maps WordPress plugin admin area. Markers settings

Ultimate Maps WordPress plugin admin area. Shapes settings (pro)
FAQ
Plugin integrated with Bing Maps, Leaflet, Mapbox, Thunderforest
Step 1: Creating Ultimate Map
* On the left navigation menu click “Add Map”.
* Enter the name of the map.
* Click “Save Map” button.
Step 2: Customizing the Map
You can find the Main Settings section on the Map tab. It allows you to establish:
* Map name
* Map width
* Map height
* Navigation bar Mode
* Additional Navigation Options
* Map type
* Markers Clusterization
* Markers List (Pro)
* Add KML layers (Pro)
* Info window
After every map option change – with Ultimate Maps, plugin, you can immediately see the result in a live preview in the right top corner.
Step 4: Creating/Editing Markers
* Click “Add New Marker” button – in the center of the map will appear a marker. Google Maps New Markers
* Set the name of a marker.
* Set the address of the marker – start typing and then choose the address from the list. Or you can just click on a point on the map.
* Set additional maps markers configuration: add marker description – besides text, you can attach images, links and videos;
* Select the icon for the marker – you can choose it after click “Choose icon” button;
Save marker.
Step 5: Copy and paste the shortcode into your post or page
Look more detailed information in our tutorial Getting Started.
You can add a map in the site content via shortcode or PHP code. PHP code and shortcode are in a dropdown list above the plugin tabs.
- PHP code can be inserted at any place of the page code – in order to display exactly in this place, for example in the header or footer of the page. Besides, it can be inserted in the code of template of the theme – to display on all pages.
- Copy and paste the shortcode into your post or page and Ultimate Maps plugin will automatically create the map on your page using the settings you choose.
With an Ultimate Maps, you can add a widget with a map to your page. Go to Appearance -> Widgets in the WordPress navigation menu. Find the Ultimate Maps in the list of available widgets. Drag the Ultimate Maps widget to the widget area, which you need. Choose the map for a widget and configure the settings – Widget Map width and height. Click “Save”.
You can add layers into a map in 2 ways: enter KML file URL or upload KML file.
All types of objects support markers, points, lines, figures, etc.
More info about KML Layers settings and example of Map with KML layers you can find here.
On the left navigation menu click “New Map”.
1. Enter the name of the map.
2. Open “Marker” tab in the map settings.
3. Enable “Marker Link” option in the marker settings.
4. Paste link in the field under the option.
5. Enable the option “Open in new window”, if you want the link to be open in a new window.
Create linked markers for your map to easy connection with full information about the place you have marked.
For this go to Marker Categories tab of Ultimate Maps plugin. Here the following settings are is available:
* Add Category
* Edit Category
* Delete Category
* Search by Title
To create a new category click ‘Add Category’ button. In a new window you can establish:
* Category Title – type your category name inside the field
* Background Color – tick needed color for marker icon background
* Cluster Icon – Upload Icon you like or back to Default Icon variant for your markers category
You also can create Subcategories – choose Parent Category when creating Category, and they will be displayed as a tree. While replacing a parent category, child ones will be moved too.
When you have created the marker on the Marker Tab, scroll down till you find Markers Category, set the one you created for a current marker and click Save Marker button.
Plugin clusters the markers and shows the number of items in each cluster, and as we zoom it adjusts the clusters based on the current view.
To add the clustering to the map is very simple:
* Move to the Map tab settings.
* On the Markers Clusterization menu pick Base Clusterization.
* Set the Cluster Area Size – the grid size of a cluster. The higher the size – the more area of capture the markers to the cluster.
Example of the Map clustering option you can find here.
If you want a unique design for your maps, we have a big number of map themes. Pick a style of map theme variety according to your taste and wishes and make website special! Everything that you need is:
1. Select the Map engine: Bing, Thunderforest, Mapbox, Leaflet.
2. Enter the name of the map.
3. Choose any of a big number of map theme (different for each Map engine) in Map Type drop-down list.
After every map theme change – you can immediately see the result in a live preview in the right top corner.
4. Click “Save” button.
Check an Example of the Map Stylization here.
- Photo Gallery by Supsystic
- Pricing Table by Supsystic
- Contact Form by Supsystic
- Data Tables Generator by Supsystic
- Slider by Supsystic
- Social Share Buttons by Supsystic
- Coming Soon by Supsystic
- PopUp by Supsystic
- Digital Publications by Supsystic
- Backup by Supsystic
- Membership by Supsystic
- Newsletter by Supsystic
- Live Chat by Supsystic
- Translate by Supsystic
Changelog
1.2.18 20.03.2024
- Add expertise level for AC form
1.2.17 23.01.2024
- Add nonce fixes
- Add security fixes
1.2.16 11.01.2024
- Add terms for AC form
- Add wp_kses and esc functions for security
1.2.15 13.12.2023
- Fixes for lovelink
1.2.14 14.09.2023
- Add features for love link
1.2.13 21.07.2023
- Add missing js.map file
1.2.12 06.07.2023
- Add support WP 6.2
- Fixes for control contributions
- Update leafletjs library to latest version
- Stability map improve
- Changed overview ads
1.2.11 08.11.2022
- Add support WP 6.1
- add ac renew scenario
- Minor fixes
1.2.10 30.08.2022
- Add support WP 6.0
- Add support PHP 8.1
1.2.9 25.03.2022
- Add fix for maps
- Add maptiles
- Remove unsupported map styles
1.2.8 06.12.2021
- Fix for mod.php
- Fix issue with Activation
1.2.7 22.06.2021
- Minor fixes
1.2.5 06.04.2021
- Clone option fix
1.2.4 26.03.2021
- Add support WP 5.7
- Add fix for OVH gateway
1.2.3 19.03.2021
- Add fix for UMS
1.2.2 12.03.02.2021
- Fixed marker categories
1.2.1 09.03.02.2021
- Fix for “Show All maps”
- Fix for media descriptions
1.2.0 07.03.02.2021
- Major update
- Fixes for DB query
1.1.18 15.02.2021
- Security fixes
- Major update to DB query
- Remove bootstrap
1.1.17 10.02.2021
- Security fixes
1.1.16 09.02.2021
- add fix for sqli
- Security fixes
1.1.13 09.12.2020
- Add security fixes
1.1.12 29.09.2020
- Add fix for WP 5.5
- Add fix for MapBox
- Remove CDN files ( GDPR)
1.1.11 23.06.2020
- Add color for marker category
- Add support for PHP 7.4
- Add dialog before delete icon
1.1.10 23.01.2020
- Add column width for marker list with table
- Fix for shortcode
- remove phpmailer code
= 1.1.9=
* Minor fixes
1.1.8
- Add https fix for leaflet skin
- Remove fix for https WhiteBlack
1.1.7
- Add shortcode support for map address
- Add fix for title on hover
1.1.6
- Add fix for broken icons
- Add feature open marker popup by mouse hover event
- Add fix for title on hover
1.1.5
- Remove CSS padding in mobile version
- Added support for customize cluster icon color (border, background, text)
1.1.4
- Minor issues fix
- Add 4 options for draggable for leaflet, mapbox, bing. Front and preview.
1.1.3
- Minor issues fix
- Small fixed for group get level func
- Fixed mrker category parent list
1.1.2
- Change slimscroll version issue
- Check slimscroll issue
- Fix popup img
- Fix marker link
- Fixed roles capabilities for ums issue
1.1.1
- Add marker list category style issue
- Fixes for new wp translation
- Minor issues fix
1.1.0
- Fix bing kml problem after shape and after add marker
- Fix issue with width
- Fixes for Bing Engine
- Add fix for Black and White leaflet design
- Add fix for CSS
- Remove unfiltered_uploads for KML
- Fix KML upload
- Fix shape textarea height
- Add hide POI option
- Add markers from frontend
- Fix error after change map type
- Add styles to marker frontend form
- Fix error after frontend marker add
- Remove notice when group map delete
- Set timeout to frontend marker form load
- Add style fixes markers lists
- Check open marker infowindow with clasterization
- Fix frontend makers map load
- Fix Adapt map to screen height
- Remove error after add circle shape on bing map issue
- Fix bing kml problem error
- Minor issues fix
1.0.9
- Readme file update
- Scrinshots update
- Additional improvements to slider markers list view
- Possibility to Show Info Window by Default right after Map Load
- Add checkbox hide without img and before map slider design for
- Added feature for slider to show over the map
- Minor issues fix
1.0.8
- Additional admin area improvements
- Fix issues with changing Min and Max Zoom
- Deutsch translation added
- Improve click on Marker List items
1.0.7
- Admin area interface improvements
- Fix issue with click on Markers on frontend for OpenStreetMaps Engines
- Language files added
1.0.6
- Fix issue with position of icons for OpenStreetMaps when zooming
- Minor issues fix
1.0.5
- Fix issue with “floating” markers for Bing Maps
- Additional admin area design improvements (dialog queue improve)
- Improve KML Layers functionality
- Bing figures added
1.0.4
- KML Improvements
- Shapes added
1.0.3
- Fix issue with disable Dragging in an admin area
- Fix issue with disabling Mouse Wheel Zoom in an admin area
- Markers Lists
- KML Layers
1.0.2
- Fix issue with Markers Description
1.0.1
- First release