
Simple Sales Tax Plugin
Simplify sales tax calculations, reporting, and filing by connecting your WooCommerce store to TaxCloud.
Simple Sales Tax integrates your WooCommerce store with TaxCloud to automate sales tax calculations, reporting, and filing.
With affordable service fees and support for product level tax exemptions and tax exempt customers baked in, Simple Sales Tax is the most capable and cost effective sales tax automation solution for WooCommerce.
Key Features:
- Affordable — TaxCloud’s competitive pricing provides the best value in the industry.
- Accurate sales tax calculations — Calculate sales tax in real time for every state, county, city, and special jurisdiction in the US. Rates are updated automatically so you never have to worry.
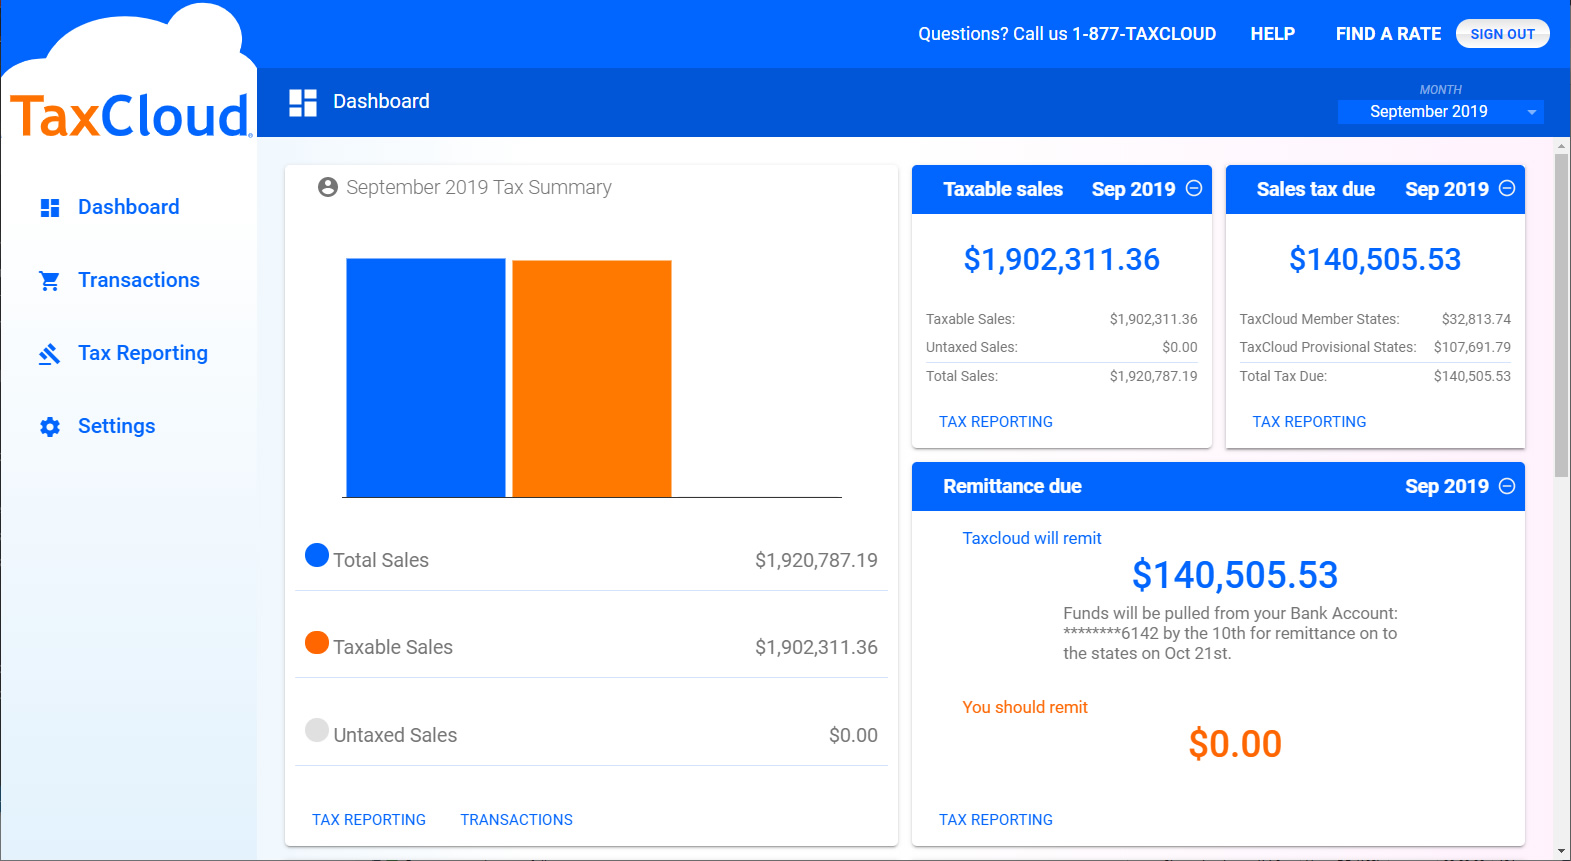
- Advanced reports — Cut your sales tax prep time significantly with TaxCloud’s advanced, return-ready reporting.
- Exemption certificates — Optionally enable tax exemptions and collect exemption certificates from exempt customers.
- Product level exemptions — Handle product-level exemptions by assigning an appropriate Taxability Information Code (TIC) to each of your products.
- Multi-state support — Whether your business has presence in dozens of states or just one, Simple Sales Tax has you covered.
Other Notable Features:
- Marketplace integration — Simple Sales Tax supports popular WooCommerce marketplace plugins, including Dokan, WCFM Marketplace, and WC Vendors.
- Recurring payments — Simple Sales Tax is fully compatible with the WooCommerce Subscriptions extension by Prospress and will automatically calculate the sales tax for recurring payments.
- Multi-destination shipments — Simple Sales Tax supports multi-destination shipments created with the WooCommerce Shipping Multiple Addresses extension.
- Customer support — Simple Sales Tax is backed by TaxCloud’s world class support team.
Supported WooCommerce Extensions
Simple Sales Tax is fully compatible with the following WooCommerce extensions:
Need us to add compatibility with another extension? Drop us a line at go@taxcloud.com.
Translation
If you would like to translate Simple Sales Tax into your language, please submit a pull request with your .po file added to the “languages” directory or email your completed translation to bporcelli@taxcloud.com.
Thanks in advance for your contribution!
Installation
Step 1: Create a TaxCloud Account
If you have not yet registered for TaxCloud, click here to get started. Registration can be completed in minutes and is entirely free.
Step 2: Configure your TaxCloud account
Now that you have created your TaxCloud account, there are a few important matters to take care of. Please log in to your TaxCloud account and complete all of the items below.
- Add your website. While logged in, go to Settings -> Stores & Websites. If your store is not listed on this page, you will need to add it by clicking “Add Store” and following the on-screen prompt.
- Select a default TIC for your website. To ensure that your customers are taxed correctly, you will want to set a default Taxability Information Code (TIC) for your website. To do so, click the “Modify Settings” button for your store on the “Stores & Websites” page.
- Add business locations. If your business has a physical presence in the United States, it is imperative that you register your business locations, including stores, warehouses, and distribution facilities, with TaxCloud. To do so, navigate to Settings -> Locations and click “Add Location.”
- Select your tax states. Navigate to Settings -> Manage Tax States. You will be presented with a map of the United States. Click the map to highlight those states where you would like to collect sales tax.
Step 3: Install and Activate Simple Sales Tax
To install Simple Sales Tax, log in to your WordPress dashboard, navigate to the Plugins menu, and click “Add New.”
In the search field type “Simple Sales Tax,” then click “Search Plugins.” Once you’ve found our plugin, you can view details about it such as the point release, rating, and description. Most importantly of course, you can install it! Just click “Install Now,” and WordPress will take it from there. Finally, click “Activate” to finish the installation process.
Step 4: Delete Existing Tax Rates
If there are one or more rates in your WooCommerce tax rate tables, you will be presented with a notice like this when you log in to WordPress. In most situations you should click the “delete” link to delete all existing tax rates, since your customers will be charged double sales tax otherwise. The only situation in which you should choose to keep your existing WooCommerce tax rates is if they are for tax types that are not handled by TaxCloud and Simple Sales Tax.
Step 5: Configure Simple Sales Tax
- Navigate to WooCommerce > Settings > Integrations > Simple Sales Tax in the WordPress dashboard.
- Enter your TaxCloud API ID and API Key in the relevant fields, then click “Verify Settings” to validate your API credentials. You can find your API ID and API Key under Settings -> Stores & Websites in the TaxCloud dashboard. After entering and validating your credentials, click Save changes to import your business locations from TaxCloud.
- Under Address Settings, you should now see a list of your TaxCloud locations in the Shipping Origin Addresses field. Select all of the addresses you ship your products from.
- If you have tax exempt customers like schools, churches, or wholesale purchasers, enable tax exemptions and fill out the fields under the Exemption Settings heading.
- Optionally change the default settings under Display Settings and Advanced Settings. Do not change Advanced Settings unless you understand the consequences!
- Click Save changes to finalize your changes.
Step 6: Configure Your Products
If you sell products that do not fall into the category indicated by your site’s Default TIC, you will need to assign appropriate TICs to these products. For your convenience, Simple Sales Tax provides three methods by which you can do this:
- Category-level TIC assignment: To assign a TIC to all products in a category, navigate to Products > Categories and select the category in question. Click the button next to “Taxability Information Code,” make your selection, and click “Save Changes.”
- Bulk TIC assignment: To assign a TIC to a group of products, start by navigating to the Products screen and ticking the checkbox next to each product. Next, select “Edit” under “Bulk Actions” and click “Apply.” You will then see an option to set a TIC for the selected products.
- Product-level TIC assignment: To assign a TIC to a single product, edit the product and scroll until you see the “Product Data” meta box. Under the “General Tab”, select the correct TIC, and then update the product to save your changes.
Step 6b: For multi-state businesses only
If you ship items from more than one business location, you also need to indicate the shipping origin addresses for each of your items, i.e. the locations from which they will be sent. This is important because a handful of states use the origin address to determine the sales tax rate to apply.
By default, all products in your store will be configured to ship from the Shipping Origin Addresses you’ve selected on the Simple Sales Tax settings page. If you need to change the default origin addresses for a product, you can do so on the Edit Product screen under Product Data > Shipping > Origin addresses.
Step 7: Testing
Now that Simple Sales Tax is installed, you should perform several test transactions to ensure that everything is working properly. To do so, add some items to your cart and go through the checkout process to make sure sales tax is calculated and applied. After checking out, don’t forget to go to the WooCommerce -> Orders page to mark your test order as “completed.” It is imperative that you complete at least one test order.
While testing, you may review your transactions by logging in to TaxCloud and navigating to the “Transactions” tab.
Step 8: Go Live!
Now that you have tested your website and verified that Simple Sales Tax is working properly, it is time to switch your TaxCloud account from test mode to live mode. To do so, log in to TaxCloud and you should see the “Go Live Advisor” and click “Go Live” – if you don’t see a Go Live button, you should see instructions on what needs to be done in order to complete your account setup.
Please feel free to contact us if you need help with any step of this process.
Screenshots

The Simple Sales Tax plugin settings page

Setting a Taxability Information Code (TIC) for a product

Admins can check an order's status in TaxCloud and view the applied exemption certificate (if any) from the WooCommerce Edit Order Screen

Tax exempt customers can manage their exemption certificate(s) from the checkout page


FAQ
Please consult the TaxCloud Pricing page for details on the cost of TaxCloud.
Yes! Simple Sales Tax is fully compatible with the official WooCommerce Subscriptions extension.
Simple Sales Tax supports WooCommerce 3.0+ and WordPress 4.5+.
Yes! Simple Sales Tax supports Dokan 2.9.11+, WCFM Marketplace 6.5.0+, WC Vendors 1.5.8+, and WC Marketplace 3.4.0+. When a supported marketplace plugin is installed, Simple Sales Tax will calculate the tax for each seller’s shipment separately and sum the results to present a single tax total to the customer. Sellers can also set an appropriate Taxability Information Code (TIC) for each of their products through the seller dashboard so products that qualify for exemptions or reduced rates are taxed correctly.
Currently we only support the use case where the marketplace acts as the seller of record and collects sales tax on behalf of all sellers through a single TaxCloud account. We believe that this is the best way to handle sales tax compliance in the marketplace setting – especially for marketplaces based in the U.S. – but if you would like us to add support for more advanced use cases, please leave us a message at go@taxcloud.com.
Changelog
See Releases.