
Front End Users Plugin
A customizable front end user management plugin for membership sites. Use shortcodes for registration, login, restricting access, membership fees, etc
Front-End Only Users is a user management and membership plugin that allows for front-end user registration and login, and for admins to restrict access to portions of their websites to certain users. No need to give access to your WordPress dashboard (unless you want to).
Includes Gutenberg blocks for the following features: register, login, logout, user search, user list, edit account, forgot password and confirm forgot password!
Front End User Key Features
- Customizable membership fields for front-end user registration
- Pure CSS-styled front-end login form, user registration form and edit profile form
- Front-end users supports all input types for fields, allowing you to create a custom user profile
- Front-end user input-based redirects
- Front end user notifications: Fully customizable set of user emails. Create as many unique email messages as you want and then assign the message of your choice to specific actions.
Simply insert the user registration shortcode below on any page to create a user registration form, allowing visitors to sign up as users on the front end of your site. User level selection is also available on registration.
[register] Alternatively, you can use the included Gutenberg blocks. Just search for the feature you want (e.g. “login” or “register”) and add the block to the page.
The front end users are separate from the standard WordPress users, so they have no access to the back end of your site. You can restrict access of different pages to specific users. Also, user management is simple and effective. Additionally, there is a bulk user import feature, via spreadsheet, to make user management and getting started with front-end users even easier.
Ideal for restricted content, membership, dating sites and more!
Front-End Only Users is completely customizable using CSS and is easily personalized. The available registration shortcode, login shortcode and other user shortcodes, can be used to insert registration forms, login forms, edit profile forms and many more forms on any page of your website. You can also make use of shortcodes for content restriction, to restrict access to frontend users who are logged in.
[login] Insert the login shortcode above on any page to display a login form, allowing front end users to log in to access restricted content.
[restricted]Content to restrict goes here[/restricted] Any content placed between the restricted shortcodes above will only be shown to users who are logged in. Further options are available to restrict access to only those who have a specific value for a custom user field.
Create different user fields in the registration form for members to fill out and customize content based on their profiles. User shortcodes are available to display front-end user profiles or allow visitors to perform a user search. Customize forms with CSS to suit your user management needs using the Admin panel.
Type any shortcode name and help (ex:[login help) in any WordPress page to get a complete list of the shortcode’s attributes.
Front End User Additional Features
- Personalize the experience of your site with the [user-data] shortcode
- UTF-8 support
- Front end user features: user registration form, login form, edit user profile form, account management, user listings or searches, user profiles and more!
- Back end user management features: add new fields, add new users, email settings and options
- One-click installer to quickly set up the basic front end user pages and functionality
- Available public functions for total control and conditional behavior (some programming experience suggested)
If you have existing members that you’d like to import into the plugin or if you’d like to export your current users to perform bulk updates, no need to worry. Front-End Only Users has a helpful user import feature. If you have a lot of users that you need to add into the system, you can easily perform a user import from a spreadsheet, to get all users into the plugin in one shot.
Front-End User Premium Features
The premium version of the Front-End Only Users plugin comes with several features that will allow you to enhance your user management and content restriction. This includes the ability to set different user roles / user levels for specific content restriction, to require administrator approval for registrations, to restrict pages based on level, to customize notification emails and more!
Need to set up a paid subscription? Front-End Only Users includes paid membership features that can be broken down by user level, so that different pay user levels can have different restricted access on your site. The included custom user role features allow you to restrict access to different portions of your site to different frontend user groups. These access levels provide a user management experience that makes it easy to set up a paid membership site, monetize your content and segment your users!
- PayPal & Stripe integration: Ability to charge users a one-time, annual, or monthly membership fee through PayPal or Stripe
- Create discount codes for the payments
- Front-End user emails: Email all of the users on your site, or email subsets of users on your site
- Ability to integrate WordPress users, so that WP users can create profiles, access restricted content, be given a specific frontend user level within this plugin, etc.
- User Levels: Ability to create different user levels and to specify a default user level for users to be set to when they register (created on the “Levels” tab). Different user level groups can have access to different user content, allowing for easy and effective user management.
- Let users choose their level on registration (useful with paid memberships)
- Require admin approval of frontend users
- Different registration forms depending on user level, option to let users select their own level
- Add a captcha to the registration form
- Send front end user groups to different pages after login with our customizable user login shortcode
- Front end user WooCommerce integration: Autofill WooCommerce fields for logged-in users
- Front-end user MailChimp integration: Makes it so new front end users are automatically added to your MailChimp list/contacts
- Email confirmation: Require users to confirm their email address before they can log in.
- Ability to restrict pages: Gives you the option of restricting pages to groups of users in the sidebar of the page editor.
- Admin Approval of Users: Require users to be approved by an administrator in the WordPress back-end before they can log in.
- User Statistics: This feature allows you to gather information about frontend users and how they are using your site, as well as to see what pages each user has visited.
- Front end user import via spreadsheet and user export to spreadsheet
** We are pleased to offer a free 7-day trial of the premium version of Front-End Only Users, which you can use to test out all the features before buying the premium version! **
A complete list of the plugin shortcodes can found on our FAQ page, here: https://wordpress.org/plugins/front-end-only-users/faq/
For further information and purchasing options, please visit our WordPress user management plugin homepage.
Front End User Additional Languages
Thanks to the generous contribution of many of those who use our front-end only users plugin, we’re able to include translation files for the following languages:
- Brazilian Portugese (Thanks to Humberto W.)
- Dutch
- French (Thanks to Olivier B.)
- German (Thanks to Mikkael G.)
- Italian (<href=”http://lineapixel.it”>Thanks to Christian P.)
- Russian
- Spanish (Mexican, thanks to Jorge N.)
- Swedish (Thanks to Martin H.)
For help and support, please see:
- Our FAQ page, here: https://wordpress.org/plugins/front-end-only-users/faq/
- Our installation guide, here: https://wordpress.org/plugins/front-end-only-users/installation/
- Our documentation, here: https://www.etoilewebdesign.com/support-center/?Plugin=FEUP&Type=FAQs
- Our tutorial videos, here: https://www.youtube.com/playlist?list=PLEndQUuhlvSolfe-rIpI3eK_TmfeEDPeH
- The Front-End Only Users support forum, here: https://wordpress.org/support/plugin/front-end-only-users
Installation
- Upload the ‘front-end-only-users’ folder to the ‘/wp-content/plugins/’ directory
- Activate the plugin through the ‘Plugins’ menu in WordPress
or
- Go to the ‘Plugins’ menu in WordPress and click ‘Add New’
- Search for ‘Front-End Only Users’ and select ‘Install Now’
- Activate the plugin when prompted
Getting Started
Please note that you can type ‘help’ after any shortcode (in the admin) and it will display a list of that shortcodes available attributes and what each attribute does. (A conflict with some themes makes it so that you may need to be in Text/HTML mode, and not Visual, for this to work.) For example:
[register help
User registration:
- Go to the ‘Fields’ tab and create/edit the fields you want in your registration form
- Place the [register] shortcode in the content area of any page you’ve created
- If desired, enable the “Create WordPress User” to have a WordPress user account automatically created and linked on registration (premium)
- Enable admin approval and email notifications (premium)
Logging in and out:
- Use the [login] shortcode to display a login form on a page
- Placing the [logout] shortcode on a page makes it so that, when a user visits that page, they are automatically logged out
- Use the [login-logout-toggle] on a page to display a login form if someone isn’t logged in, and a logout button if someone is logged in
To manually create a user:
- Click on ‘F-E Users’ in the WordPress admin sidebar menu
- Click on the ‘Users’ tab. The ‘Add New User’ area will be on the left side.
- Fill in the appropriate fields
- Click the ‘Add New User’ button
Restricting content:
- Any text, etc. placed in between the [restricted] and [/restricted] shortcodes will only show to logged-in users
- Use the ‘Front-End Users’ box at the top right of the page create/edit screen to restrict that page to a specific user level
User profile, user lists, user data and user search:
- Place the [edit-profile] shortcode on a page to allow logged-in users to edit their profile information
- Place the [user-list] shortcode on a page to display a list of users, which you can, if desired, restrict to only certain users
- The [user-data] shortcode allows you to insert specific information about a user on a page
- Use the [user-profile] shortcode (premium) to create a user profile page. Please note that this page acts as a template of the user profile. It requires a user ID in the URL to properly display profile information. This usually happens through linking from the [user-list] shortcode or some other linking.
- Place the [user-search] shortcode on a page to display a user search form
One-Click Installer
- We have also made available a one-click installer, which allows you to get all of the pages you need to create a complex membership site up in minutes
- This can be enabled in the ‘Dashboard’ tab by clicking the ‘Open One-Click Installer’ button
- Watch our tutorial video for more information, here: https://www.youtube.com/watch?v=dCNlsqYbqKw.
Customize your front-end users experience by making use of the many available settings and options, including user login time, WordPress user account linking, sign-up emails, crypt, email confirmation (premium), user admin approval (premium), user activity tracking (premium) and more.
For a list of specific features, see the Front-End Only Users description page here: https://wordpress.org/plugins/front-end-only-users/.
For help and support, please see:
- Our FAQ page, here: https://wordpress.org/plugins/front-end-only-users/faq/
- Our documentation, here: https://www.etoilewebdesign.com/support-center/?Plugin=FEUP&Type=FAQs
- Our tutorial videos, here: https://www.youtube.com/playlist?list=PLEndQUuhlvSolfe-rIpI3eK_TmfeEDPeH
- The Front-End Only Users support forum, here: https://wordpress.org/support/plugin/front-end-only-users
Screenshots

Simple registration page with custom user fields

Login page

Registration page with social login enabled

Restricted page with content preview

Sample user listing page showing all users who specified their "Gender" as "Male" displayed

User search page where visitors can search for users with a specific first name

Forgot password first page in two-step confirmation process

Payment page as part of registration
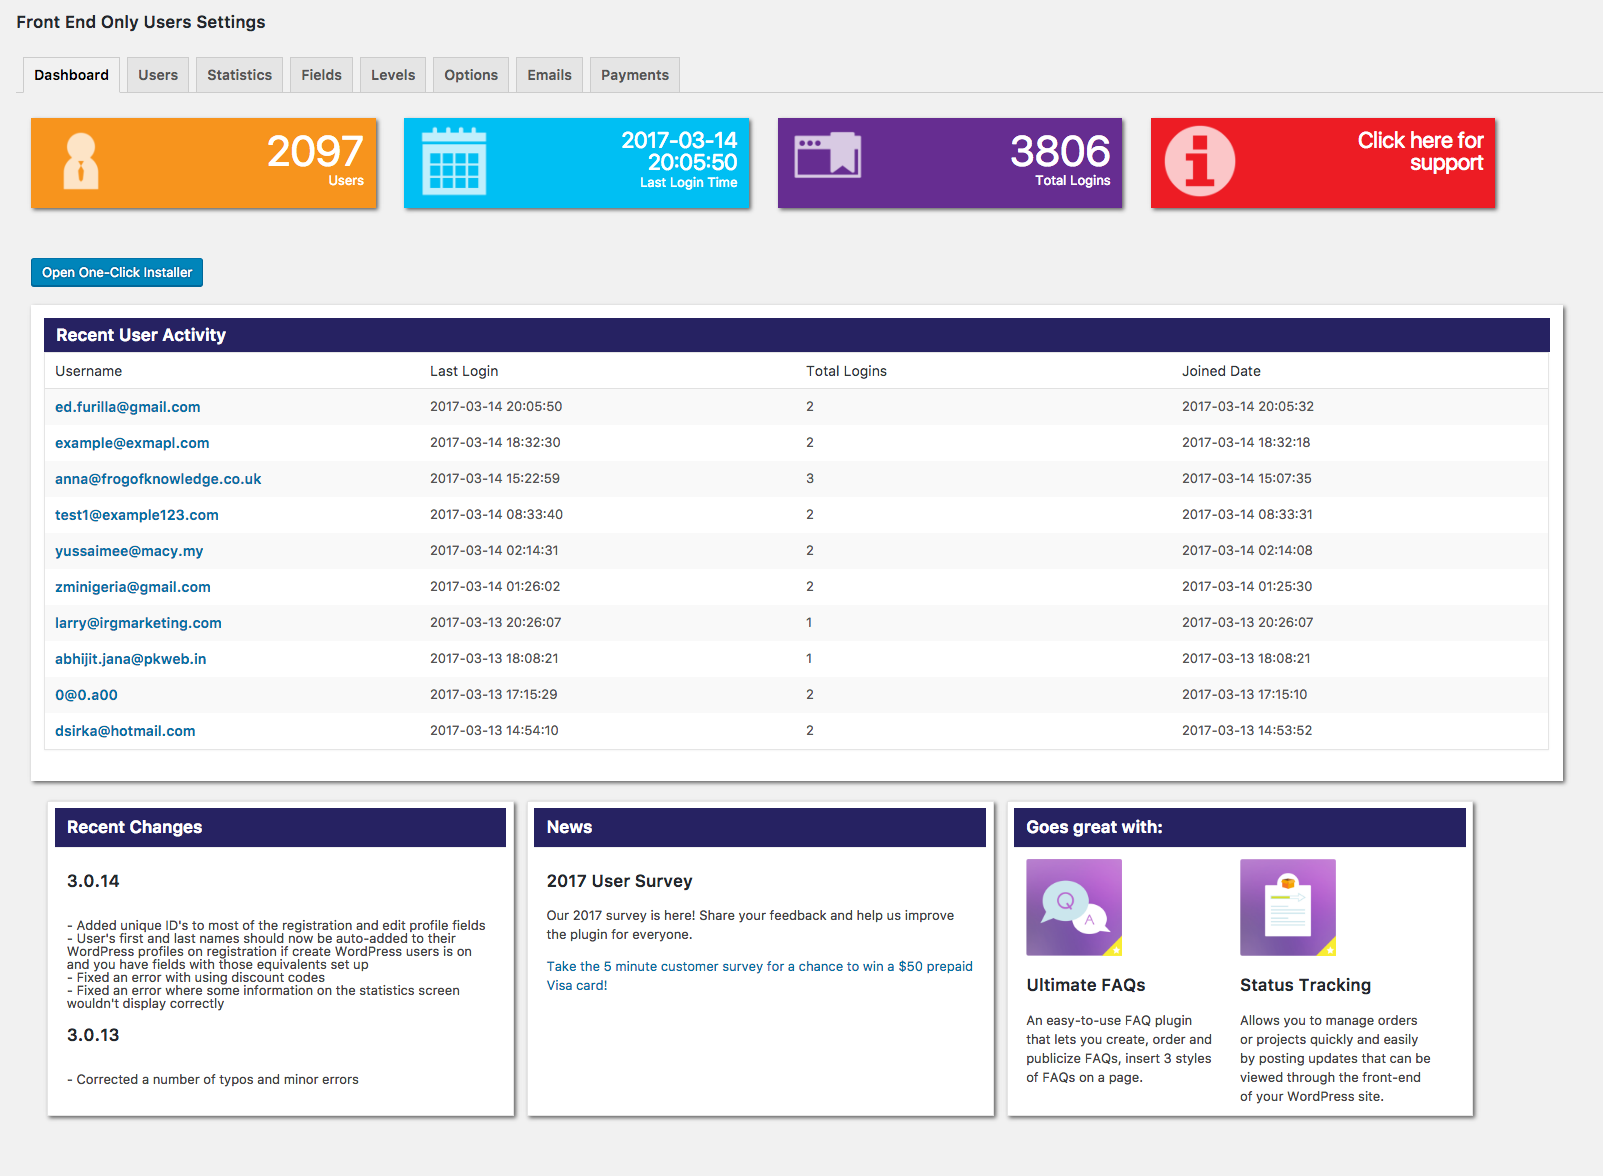
The "Dashboard" admin screen showing recent user activity

The "Statistics" overview admin screen, showing most visited content and recent user activity
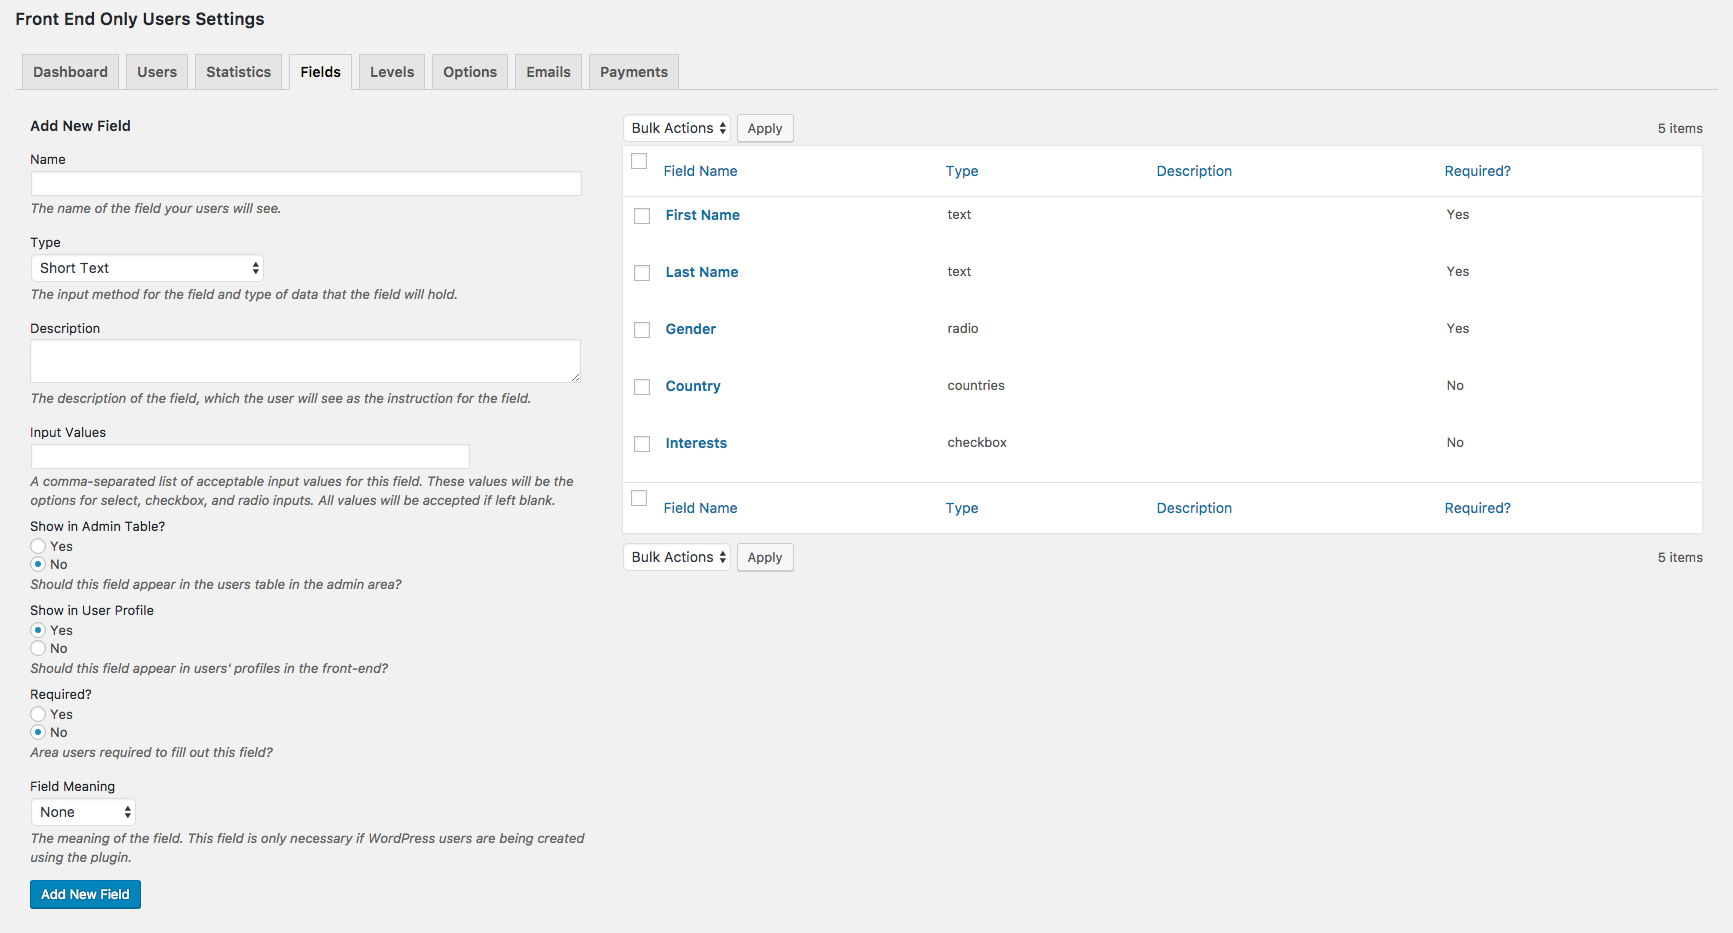
The "Fields" admin screen, where you can create and edit fields

The "Levels" admin screen, where you can create and edit user levels

The "Basic" section of the "Options" admin screen

The "Premium" section of the "Options" admin screen

The "Payment" section of the "Options" admin screen, showing the customizable options

The "Commerce" section of the "Options" admin screen

The "Labelling" section of the "Options" admin screen

The "Styling" section of the "Options" admin screen.

The "Emails" admin screen, where you can modify the different emails that the plugin can send out

The "Payments" admin screen, showing recent payments, amount paid, next payment date and discount code used
FAQ
- Register Form: [register]
- Login Form: [login]
- Logout Form:[logout]
- Toggle:[login-logout-toggle]
- Edit Profile Form: [edit-profile]
- Edit Account Information: [account-details]
- Restricted Content: [restricted][/restricted]
- Inserting User Information: [user-data]
- User Search Form: [user-search]
- User List: [user-list]
- User Profile: [user-profile] (Premium shortcode)
- Forgot Password: [forgot-password]
- Confirm Forgot Password: [confirm-forgot-password]
Type the shortcode name and help (ex:[login help) in any WordPress page to get a complete list of the shortcode’s attributes.
On the admin page, go to the “Fields” tab. After creating fields, you can drag and drop them to change their order.
You can use the [restricted] shortcode to block sections from non-logged in users, as well as to block other sections from logged-in members.
To block content from non-logged in visitors, you’d simply wrap the content in [restricted][/restricted] tags:
[restricted]Content goes here[/restricted]
To block a portion of content from logged in users, it would looks like:
[restricted block_logged_in=’Yes’]Content goes here[/restricted]
For either tag, you can suppress the message that appears for blocked users if you want to hide content seamlessly by adding “no_message=’Yes'” so:
[restricted no_message=’Yes’]Content goes here[/restricted]
You need to add the following attributes to your [login] or [register] shortcodes: ‘redirect_field’: the field the redirect is based off of (ex. Gender) and ‘redirect_array_string’: a comma separated list of pages to redirect to (ex. Male => http: //ManPage.com, Female => http: //WomanPage.com)
You can use the [user-data field_name=’First Name’] shortcode, assuming that you called your field “First Name” for a user’s first name.
Click on the user you want to approve to see their details and there should be a radio button at the top of the page to approve the user.
To restrict content to a certain level(X) your shortcode would be: [restricted level=’X’]…content[/restricted]
For all levels above “X” level: [restricted minimum_level=’X’]…content[/restricted]
For all levels below “X” level: [restricted maximum_level=’X’]…content[/restricted]
You can add the attribute ‘redirect_page’ to the register tag to send newly registered users to a new page: [register redirect_page=’http://www.example.com’]
Check the “Options” page, and make sure that ‘Login Time’ isn’t blank. If it’s blank, then you’re only logged in for a second. Anything non-blank and higher than 0 should solve the problem.
You can add the attribute [no_message=’Yes’] to your shortcode, so it would look something like this: [restricted field_name=’Name’ field_value=’Alex’ no_message=’Yes”/restricted]
You could add the [user-data] tag to your header file and wrap it in restricted tags so that only logged in users can see it.
To add the confirmation link to the email, you need to include the shortcode [confirmation-link] inside the body of your e-mail.
You would want to create a separate page with the [forgot-password] shortcode, and then another page with the ‘confirm-forgot-password’ shortcode on it. For the [forgot-password] shortcode, you would then add an attribute ‘reset_email_url’ with a value set to whatever URL you’re using for the [confirm-forgot-password] shortcode.
Content can be restricted using the [restricted][/restricted] tag. Any content between the opening and closing tags will only be visible to those who are logged in. To redirect a user when the user in not logged in you would want to use the [login redirect_page=’url’] shortcode where the url is the login page you want to redirect to.
You can customize the plugin by adding code to the “Custom CSS” box on the “Options” page. For example, if you want the button to be red you might try adding:
.ewd-feup-submit.pure-button.pure-button-primary {background: red;}
If you have the premium version, all colors, fonts, sizes, etc. can be customized through the “Styling” area of the “Options” tab.
A great place to start learning about how to translate a plugin is at the link below: http://premium.wpmudev.org/blog/how-to-translate-a-wordpress-plugin
Once translated, you’ll need to put the translated mo- and po- files directly in the lang folder and make sure they are named properly for your localization.
If you do translate the plugin, other users would love to have access to the files in your language. You can send them to us at Contact@EtoileWebDesign.com, and we’ll be sure they’re included in a future release.
- PayPal integration: Ability to charge users a one-time, annual, or monthly membership fee through PayPal
- Ability to integrate WordPress users, so that WP users can create profiles, access restricted content, be given an FEUP level, etc.
- Access to the one-click installer, which lets you create all of the pages necessary for a membership site with one click
- Email confirmation: Require users to confirm their e-mail address before they can log in.
- Admin Approval of Users: Require users to be approved by an administrator in the WordPress back-end before they can log in.
- User Levels: Ability to create different user levels and to specify a default user level for users to be set to when they register (created on the “Levels” tab)
- Statistics: This feature allows you to gather information about users and how they are using your site.
For more questions and support you can post in the support forum:
https://wordpress.org/support/plugin/front-end-only-users
Take a look at the plugin documentation:
http://www.etoilewebdesign.com/wp-content/uploads/2015/04/FrontEndOnlyUserPluginDocument.docx.pdf
Video 1 – Installation and Setup
Video 2 – Basic Shortcodes and Attributes
Video 3 – Advanced Shortcodes and Attributes
Video 4 – Options
Video 5 – Widgets
Video 6 – Public Functions
Video 7 – One-Click Installer
Changelog
3.2.28 (2024-07-16)
- Tested with WordPress 6.6.
3.2.27 (2023-11-07)
- Tested for WordPress 6.4 compatibility/support.
3.2.26 (2023-08-08)
- Tested for WordPress 6.3 compatibility/support.
- Updated deprecated block category declaration.
3.2.25
- Fixed an issue with logout not logging out.
- Removed a PHP notice related to the track page load feature.
- Admin security updates.
3.2.24
- Updating blocks for compatibility with WordPress 6.2.
3.2.23
- Fixed an issue in which enabling Stripe payments in this plugin was interfering with Stripe payment functionality in other plugins.
- Fixed an issue with an incorrect redirect URL in the forgot password email.
- Tested with PHP 8.1 and updated several instances of deprecated function use.
3.2.22
- Fixed a potential conflict with the Stripe payment feature that could happen if Stripe payments were enabled elsewhere (e.g. another plugin) in your WordPress install.
- Fixed an issue in which emails wouldn’t send if the “Admin Email” option was left blank (it now uses the ‘admin_email’ option for the site instead in that case).
- Eliminated several notices.
3.2.21
- Fixed an issue causing the import to not work in some instances.
3.2.20
- Tested with WordPress 6.0.
3.2.19
- Remove debugging information from live version
3.2.18
- Fix for user export not working
3.2.17
- Fixed an issue causing the Level Sign Up Fields checkboxes to not save correctly on the level details (admin) page
- Fixed an issue with the feedback notice dismissal
- Small CSS styling update
3.2.16
- Additional corrections and updates
3.2.15
- Updated version of bootstrap and PHPSpreadsheet
- Removing integration with social networks
- Added some additional escaping
3.2.14
- Fixes an XSS issue that was reported to us.
3.2.13
- Corrects an issue where the cookie was not being retained after login, which was affecting only a handful of users.
3.2.12
- Corrects recent issue causing the feedback notice to not dismiss correctly
3.2.11
- Fixes the “Select a level to sign up” labelling option not saving issue
3.2.10
- Fixed an issue causing the reset code input field to not function correctly in the password reset confirmation step.
3.2.9
- Corrected/eliminated several PHP notices.
- Enhanced upgrade process.
3.2.8
- Added a labelling option for the level select text in the registration form
3.2.7
- Added the “Membership Fees Paid” element to spreadsheet import and export
- Fixed an issue causing notification emails to not be sent when bulk admin approving users
3.2.6
- Update for the admin dashboard
3.2.5
- Removing placeholder text from the admin
3.2.4
- Updating widgets file to remove deprecated create_function
3.2.3
- Corrected an issue that was causing the “Skip All” button to not work in the tutorial that displays on plugin activation.
3.2.2
- Updated the review ask pop-up
3.2.1
- Added option to skip the tutorial that shows when the plugin is first activated
- Corrected issue that was causing the review request to pop back up even after a review had been left or feedback sent
3.2.0
- This is a big update with many new features, corrections, revised admin styling, etc., so please take caution and test before updating on a live site (or wait a few days before updating in case some minor corrective updates need to be put out)
- Added in easy-to-use Gutenberg blocks for the following features/shortcodes: register, login, logout, user search, user list, edit account, forgot password, confirm forgot password
- The Options pages have a brand new and easy-to-use design!
- Completely redesigned user create/edit screen. More intuitive, allowing you to more quickly and efficiently create and edit users.
- Redesigned “Emails” tab in the plugin admin, making it more clear and easy to use
- Added in new option to specify a redirect URL for when users confirm their email address
- Added in option to specify the currency symbol and currency symbol placement for Stripe payments
- Added in the ability so specify multiple, comma-separated values for the display_field attribute in the user search block/shortcode.
- Added in several new labelling options
- Added back in a one-click installer feature
- All font size options now automatically apply a unit of ‘px’ if you do not specify a unit
- Switched from using PHPExcel to the new PHPSpreadsheet for importing and exporting
- Styling updates to front-end forms
- Corrected issue in which, for the table in the Users tab, certain columns weren’t sorting correctly when you clicked on the column heading
- Corrected issue with discounts codes not being applied
- Removed the Facebook and Twitter login add-ons (if you were using these options, you may want to consider not updating at the moment)
- Removed unused/unnecessary files
- Generated new .pot file
3.1.25
- Added in the option to use OR logic when using the “restricted” shortcode with a checkbox field
3.1.24
- User meta data filter now only called when “Include WordPress Users” or “Create WordPress Users” is set to “Yes”
3.1.23
- Fixed an error where bulk admin approval emails wouldn’t send as expected
3.1.22
- Added the ability to list multiple values in the “field_value” attribute of the “restricted” shortcode
- Added a span tag around the captcha failed text that gets returned
- Fixed an error with the shortcode builder for the user-profile shortcode
3.1.21
- Fixed an error that could cause a warning to display on the registration page
3.1.20
- Updated the free trial button
3.1.19
- We’re doing a big Front-End Only Users admin area styling update, first up is the dashboard!
3.1.18
- Fixed spreadsheet import of users so that WordPress users get created if that option is selected
- Added in an Italian translation
3.1.17
- Fixed a PayPal IPN issue
- Fixed an issue where having blank mergefields would cause mailchimp integration not to work
- Added a warning about using the include WordPress users, to let admins know that WordPress users have to be manually deleted from the plugin to reverse the setting
3.1.16
- Added in an option to specify a number of free trial days when using PayPal recurring payments
3.1.15
- Added in integration with the Ultimate WP Mail plugin
3.1.14
- Minor styling updates
3.1.13
- Fixed an issue with default user levels
- Fixed an issue with $0 level payments
3.1.12
- Added in escaping functions in a couple of shortcodes that were missing them
3.1.11
- Added nonces to a couple of admin forms that were missing them
3.1.10
- Maintenance release to elimindate a tonne of notices, please be CAREFUL upgrading on production sites as many files were updated
- Fixed an error and improved the information displayed on the user stats page
- Fixed an issue with what profile fields were available in the signup form depending on the user’s selected level
3.1.9
- Fixed an error where duplicate entries not affecting performance were being created in the users database when WordPress integration was enabled
3.1.8
- Fixed the user creation success message
3.1.7
- Added back in a missing JavaScript file that was preventing users from being deleted in one way
3.1.6
- Minor update to make Mailchimp integration compatible with older versions of PHP
3.1.5
- Added in Mailchimp integration
- Fixed an issue where user fields weren’t being replaced in emails
- Fixed login form alignment issues for some themes
- Fixed a couple of other minor things
3.1.4
- Restores an overwritten discount code file
3.1.3
- Fixed an error in the output of the shortcode helper for the “user-profile” shortcode
3.1.2
- Fixed another set of issues with the new emails
3.1.1
- Fixed an issue where a number of emails weren’t being sent out
3.1.0
- Added in a new emailing system, so that almost all of the emails sent out by the plugin can be customized
- Added in a new feature, which lets you send out emails to all or a subset of users who have registered on your site
3.0.19
- Added in email, telephone and url field types which automatically become links on a user’s profile
3.0.18
- Updated the text domain of the plugin, to use the improved WordPress standard
3.0.17
- Minor admin CSS update
3.0.16
- Minor CSS admin update
3.0.15
- Users that are assigned a particular level are now displayed when clicking on that level
- Added “order_by” and “order” attributes to the “user-list” and “user-search” shortcodes
- “Integer” type sign up fields are now set to input type=”number”
3.0.14
- Added unique ID’s to most of the registration and edit profile fields
- User’s first and last names should now be auto-added to their WordPress profiles on registration if create WordPress users is on and you have fields with those equivalents set up
- Fixed an error with using discount codes
- Fixed an error where some information on the statistics screen wouldn’t display correctly
3.0.13
- Corrected a number of typos and minor errors
3.0.12
- Fixed a Firefox issue with user tracking
3.0.11
- Fixed an issue where the level of a user was being reset when using the “account-details” shortcode
- Minor CSS update
- Updated the version of PHPExcel included with the plugin
3.0.10
- Fixed an error where a user’s level would be reset whenever they edit their profile
- Fixed a problem where users couldn’t leave checkbox-type fields blank after making a selection
- Minor Dashboard fix
3.0.9
- Fixed a small Dashboard error that a number of users were experiencing
3.0.8
- Minor Dashboard update
3.0.7
- Fixed an error where using the trial in this plugin reset the trials for a number of our other plugins
3.0.6
- Corrected the return variable for the Get_User_Level_Name public function
3.0.5
- Introducing a free new premium 7-day trial feature, which users can choose to test out before buying the premium version
3.0.4
- Added a new “Get_User_Level_Name” method for the FEUP_User class, available for public use
3.0.3
- Fixed a couple of errors with the [user-search] shortcode involving blank fields and no results
3.0.2
- Added in a new modern looking dashboard tab
- The code to process Stripe payments is only included now if Stripe is selected as your payment gateway
3.0.1
- Fixed an error where [join-date] wasn’t displaying correctly in the admin approval email
3.0.0
- Added in Stripe payments as a payment option. We would HIGHLY recommend running test payments to make sure this works correctly on your system before relying on it for actual payments.
- Added in the option to have separate registration forms for different user levels.
- Added in a shortcode helper to help new users get their sites up and running more quickly. Can be switched on and off via the options page.
2.9.13
- Fixed an output buffering error
2.9.12
- Fixed a naming function conflict
2.9.11
- Fixed a function naming conflict
2.9.10
- Fixes fields being marked required when they aren’t, and an unclosed div tag
2.9.9
- Added the ability use the login and logout forms for only WordPress users, as well as FEUP users
= 2.9.8
– Fixed an error message that was coming up
2.9.7
- Updated the PHPExcel version included with the plugin to (hopefully) work with PHP7
2.9.6
- Fixed an error where users weren’t displaying in the users table
2.9.5
- Field filtering update
2.9.4
- Fixed an error with user sorting
2.9.3
- Fixed an error where full page restriction wasn’t displayed for posts
2.9.2
- Updated another button missing text
2.9.1
- Fixed an error where the “Confirm Forgot Password” submit button was blank
2.9.0
- Changed the “Create WordPress Users” feature so that WP usernames are set to emails
- Added in the FEUP user data to the WP “Users” page if that option is selected
- Added in a new field type for labels
- Added in a “required” symbol for fields which are required
2.8.7
- Fixed an error where Facebook emails weren’t being collected anymore after a Facebook API update
2.8.6
- Minor CSS update
2.8.5
- Fixed an error where “Login Options” couldn’t be all deselected
2.8.4
- Fixed a problem with the redirect_array_string attribute after a change to how attributes are extracted. The values now need to be separated by an equals sign (=) instead of by a greater than or equals sign (=>)
2.8.3
- Added an attribute to the “forgot-password” shortcode to return a message if the username entered doesn’t exist
- Fixed an error where the login-logout-toggle and login/logout widget weren’t redirecting correctly on login
2.8.2
- Fixed another minor error with level payments
2.8.1
- Fixed an error where level payments weren’t possible from the registration page
2.8.0
- Huge update, if you run in to trouble, please try downgrading first to see if it’s an update issue
- Added the ability to register using Facebook or Twitter instead of creating a username and password
- Added the ability to also create a WordPress user on registration, so that the plugin can also be used to log in to WordPress accounts that are created using the plugin
- Added tracking for page loads as well as the current link tracking
- Updated the link tracking, so that it should work better for images and attachments
- Added 2 new translations
- Fixed a couple of small errors
2.7.8
- Fixed a broken link
2.7.7
- Fixed a label which was not saving correctly
2.7.6
- Fixed a field editing and adding error
2.7.5
- Added in a few new labelling options
- Forced the limit to be positive when not set
2.7.4
- Fixed the warning message that is appearing when adding or editing fields
- Updated the dutch translation of the plugin
2.7.3
- Fixed a labelling error that reported
2.7.2
- Fixed another premium/non-premium issue
2.7.1
- Fixed another premium/non-premium issue
2.7.0
- Fixed a number of premium/non-premium issues
2.6.19
- Minor CSS update
2.6.18
- Added in a tonne of premium labelling options
2.6.17
- Minor CSS update
2.6.16
- Added a new “user-data” widget, to be able to add user data into parts of a site that are hard to use shortcodes for
- Added Account_Expiry as a possible value for the field_name attribute
- Fixed a bug where picture fields didn’t have an upload button on the registration form
2.6.15
- Results for the “user-list” shortcode should now come back sorted
- CSV files can now be used for user uploads
2.6.14
- Updated the forgot_password function, so that passwords are reset correctly for sites not using crypt
2.6.13
- Changed the video in the help pointers to the tutorial series
- Found another missing picture-type field in the “Users” tab
2.6.12
- Fixed the same page problem for “restricted” tags, when there was also a login or logout on the same page
- Fixed picture fields in the front and back ends
- Removed extra text from the [user-profile] shortcode
2.6.11
- Extended the “help” shortcode command to the “Visual” editor
2.6.10
- Added a title field to the login-logout widget
- Added the ability to mark emails as confirmed in the admin user area
- Made the membership fees paid and account expiration date editable for admins
2.6.9
- Changed the way overflow is handled on the “Users” table, so that a scrollbar is automatically added when the table overflows
- Updated the way the PayPal “price” field is set
- Fixed the PayPal receipt number not showing
2.6.8
- Did a better job fixing the logic issue with the “block_logged_in” attribute 🙂
2.6.7
- Fixed a logic issue with the restricted shortcode for the block_logged_in attribute
2.6.6
- Emails should now be sent out when users are uploaded via spreadsheet
- Fixed a problem where emails weren’t set out when users were entered via the admin interface in certain situations
2.6.5
- Minor CSS update
2.6.4
- Added a new textarea to set the admin sign up email message
- Added “Payments” to the submenu
- Added a line to clarify the use of one of the fields on the “Emails” tab
- Fixed an error where admin emails weren’t going out when bulk admin approvals happened
2.6.3
- Minor CSS update
2.6.2
- Fixed an error with the password strength checker when tracking is enabled
2.6.1
- Made a number of UI improvements to make it easier to manage users and more difficult to mis-click
= 2.6.0=
– Finished the “Level” payments feature, making it possible to let users upgrade to paid memberships to access higher tiered content. We’ve done quite a bit of testing with it, but it’s more complicated than memberhsip payments, so let us know if you come across anything that doesn’t seem to make sense.
2.5.4
- Fixed a couple of small emailing errors for the “Admin Email on Registration” and “Email on Admin Approval” fields
2.5.3
- Added a color picker to color fields for the plugin’s styling options
2.5.2
- Fixed an error where admin approval emails wouldn’t go out in some cases when username was set to email
2.5.1
- Removed the use of closures for legacy versions of PHP, so the plugin should be compatible with unsupported (pre-version 5.3.0) PHP installs
2.5.0
- Added a tonne of new user statistics information to the user details and statistics areas
- Added a short set of introduction pointers for new users
- Fixed a small display error
2.4.8
- Tweaked how email confirmation links get added
2.4.7
- Removed pagination on the “Fields” tab, so that fields can be ordered no matter how many there are
2.4.6
- Warning! Complete overhaul of the e-mails system for order updates. IMPORTANT – If you’re using the plugin in production, the plugin is switching from native SMTP e-mailing to using the pluggable wp_mail function, which means that options can now be set using a third party plugin (ex: https://wordpress.org/plugins/wp-mail-smtp/)
- Added a help function for the shortcodes. Type the shortcode name and help (ex:[login help) in any WordPress page to get a complete list of the shortcode’s attributes.
2.4.5
- Minor CSS update
2.4.4
- Fixed a few bugs with the user-search and user-listing shortcodes
- Several minor changes
2.4.3
- Minor css update
2.4.2
- Payment setting update
2.4.1
- Fixed an update status message
= 2.4.0
– Very large update, tonnes of new features so be carefule integrating the new version into live sites (note all previous versions are available at https://wordpress.org/plugins/front-end-only-users/developers/)
– Added support for WordPress users to be able to create profiles and log in
– Added PayPal integration, so that you can charge a membership fee
– Added a minimum password length option
– Added a profile picture custom field type
– Added a strength indicator for user passwords
– Fixed the “Country List” field type
– Fixed a few small errors
2.3.6
- Added a new public function, EWD_FEUP_Get_All_Users, which can be used by other plugins as well as in your own functions or template files
- Added in an optional parameter array for the FEUP_User class, so that you can get a user object for any user, instead of only for users who are currently logged in
2.3.5
- Added in an attribute so that the “restricted” tag can be used to hide content from logged in users
- Fixed the “forgot-password” shortcode error that was occuring when captcha was enabled
2.3.4
- Styling options update
2.3.3
- Minor CSS update
2.3.2
- Minor CSS update
2.3.1
- Minor CSS update
2.3.0
- Major change to the structuring of the plugin options
- Added a large number of styling options for the plugin
- Fixed some of the layout issues for a few different shortcodes (careful when upgrading if you’ve used Custom CSS to style)
- Made the one-click installer more prominent
2.2.16
- The tracking javascript is only added now when the tracking option is enabled
- Minor spreadsheet uploads update
2.2.15
- Reformatting of the “Options” tab to make it easier to find the desired option
- Small CSS fixes
2.2.14
- Fixed a problem where non-optioned values could be saved in fields
2.2.13
- Added the ability to include multiple fields in the display_field attribute for the user-list tag
2.2.12
- Actual fix for the spreadsheet uploads error
2.2.11
- Fixed an error that made user-list return blank when a field was entered for the display_field attribute
2.2.10
- Loosened the type checking for spreadsheet uploads
2.2.9
- Added a couple new attributes to the [user-list] shortcode
- Changed a few default options for new installs
2.2.8
- Added a new “Captcha” premium option for registration and forgot-password forms
- Fixed a couple of small errors
2.2.7
- Small CSS update
2.2.6
- Added a beta version of a new feature, the One-Click installer, which creates all of the pages needed for the plugin in one click
- Fixed small errors with the forgot-password and confirm-forgot-password shortcodes
- Added in the missing section of the account-details shortcode
2.2.5
- Small fix for users running older versions of PHP
2.2.4
- Added WooCommerce integration to autofill fields for logged in users
- Fixed an error with one of the functions in the PHP user class
2.2.3
- CSS update that moves the plugin away from using Yahoo’s Pure CSS (WARNING: if you’re using your own custom CSS with this plugin, the selectors in the shortcodes are being changed)
2.2.2
- Added a bunch of new attributes for the user-search shortcode
- Fixed errors with user-search
- Fixed errors with user-list
- Fixed a registration error
2.2.1
- Fixed an error with the “user-profile” shortcode
- Fixed an error where a user’s level got reset to the default level when they edited their profile
2.2.0
- Added an option to send an e-mail to the user once they’ve been approved
- Added a new shortcode “user-profile” which can be used to display user’s profiles
- Updated the “user-list” shortcode to make it possible to display profiles
- Updated the “user-search” shortcode to make it possible to display profiles
2.1.4
- Fixed an error in the “Statistics” tab
2.1.3
- Added more summary content to the “Statistics” tab
- Now displaying a table of link clicking activity, if tracking option is activated
2.1.2
- Added in a new “login-logout-toggle” shortcode
- Added in a new “login-logout-toggle” widget
- Fixed an email on registration error
- Added in event tracking, more options coming soon!
2.1.1
- Added the ability to import users from a spreadsheet
2.1.0
- Added the ability for premium users to restrict access to entire pages
2.0.3
- Fixed a small display error
2.0.2
- Fixed a potential error on the Emails page
2.0.1
- Fixed a potential upgrade error
- Fixed a notice on the Dashboard page
2.0.0
- Too many changes to list, be careful when upgrading on a live site as there will likely be some un-caught bugs
- Added a “Statistics” tab, to track user statistics
- Added a premium version, which earlier users have complete access to
- Improved e-mail options and settings
1.26
- Fixed a display error for the options added in version 1.25
1.25
- Added an option to use e-mails as a username
- Added a new encryption option type
- CAREFUL UPGRADING for those using the plugin in production
- Changed the password reset option
1.24
- Updated to the latest version of pure.css
1.23
- Fixes a critical error with the login checking
1.22
- Added in a forgot password form
- Fields that have “Show in Front End?” set to “No” will no longer display in the “Edit Profile” form
1.21
- Added the ability to require users to confirm their e-mail before logging in
- Added bulk approval of users
- Added bulk user level setting
- Fixed an error with apostrophes in user fields
- Eliminated a number of PHP notices
1.20
- Added the ability to export all users to Excel
- Added confirmation before deleting a user
- Added a button to delete all users from the database
- Fixed an error with a missing tag in the account-details shortcode
- Fixed a link error on the dashboard page
1.19
- Allow a different SMTP username, instead of it needing to be the admin e-mail address
1.18
- Fixed a number of notice errors
1.17
- Fixed a registrations e-mail bug
- Fixed the error where being logged in meant you couldn’t edit another user in the admin area
1.16
- Implemented user levels
- Fixed a registration bug
- Added tracking for user login times
- Fixed a bug so that users can be clicked from the dashboard
- Fixed a user page bug which limited the number of users that could be displayed
1.15
- Added a translation for Brazilian Portugese
- Fixed a compatibility error
- Fixed a spelling mistake
1.14
- Fixed a registration bug
- Fixed a bug which did stopped admins from being unable to “unapprove” a user
1.13
- Added “plain_text” as an attribute for the [user-data] tag
- Required fields should now actually be required on register and edit profile forms
- When a user is deleted, all of the associated user fields are now deleted as well
1.12
- Added the attribute “no_message” to the [logout] shortcode
- Fixed 2 registration errors
- Fixed an error that stopped the [account-details] shortcode from working
- Fixed an error to make translation possible
- Fixed an error where “omitted fields” in the edit profile form were being overwritten as blanks
1.11
- Fixed a small error with edit-profile
- Added language support
- Added Russian language files
1.10
- [edit-profile] now accepts the attribute “omit_fields”, a comma-separated list of fields to not appear in the edit profile form
1.9
- [register] file was edited to remove PHP warning
1.8
- Edited a number of files to remove PHP warnings
1.6
- Tiny change
1.5
- Added “sneak peak” attributes to the [restricted] shortcode; you can now set attributes for either sneak_peak_characters or sneak_peak_words within the shortcode
- Added the ability to redirect based on a user field; to use it, see the plugin page
1.4
- Fixed a naming conflict error
1.3
- Shortcodes inside of [restricted][/restricted] tags should now work
- Added 3 new methods to the “EWD_FEUP” class to access User_ID, Username and any custom field
- Fixed a bug that prevented e-mail settings from being saved
- Fixed a bug that was causing a conflict with the options of a handful of other plugins
1.2
- Fixed a database error for new installs
1.1
- Fixed an error with sign-up e-mails
- Fixed an error with “Admin Approval”