CW Image Optimizer Plugin
Reduce image file sizes and improve performance using Linux image optimization programs.
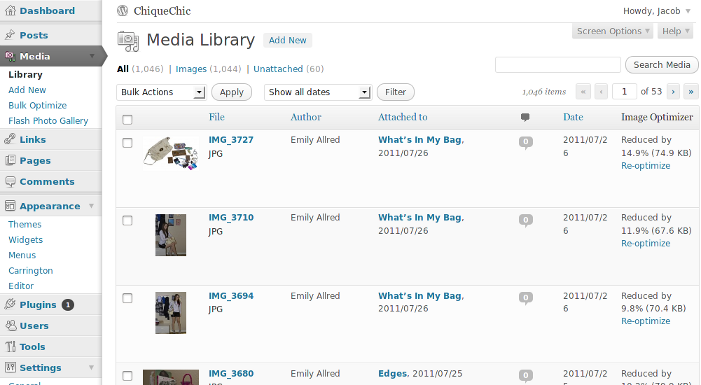
The CW Image Optimizer is a WordPress plugin that will automatically and losslessly optimize your images as you upload them to your blog. It can also optimize the images that you have already uploaded in the past.
Because CW Image Optimizer uses lossless optimization techniques, your image quality will be exactly the same before and after the optimization. The only thing that will change is your file size.
The CW Image Optimizer plugin is based on the WP Smush.it plugin. Unlike the WP Smush.it plugin, your files won’t be uploaded to a third party when using CW Image Optimizer. Your files are optimized using the Linux littleutils image optimization tools (available for free). You don’t need to worry about the Smush.it privacy policy or terms of service because your images never leave your server.
Why use CW Image Optimizer?
- Your pages will load faster. Smaller image sizes means faster page loads. This will make your visitors happy, and can increase ad revenue.
- Faster backups. Smaller image sizes also means faster backups.
- Less bandwidth usage. Optimizing your images can save you hundreds of KB per image, which means significantly less bandwidth usage.
- Super fast. Because it runs on your own server, you don’t have to wait for a third party service to receive, process, and return your images. You can optimize hundreds of images in just a few minutes.
Contact and Credits
Written by Jacob Allred at Corban Works, LLC. Based on WP Smush.it.
Installation
- Install littleutils on your Linux server (step-by-step instructions are below).
- Upload the ‘cw-image-optimizer’ plugin to your ‘/wp-content/plugins/’ directory.
- Activate the plugin through the ‘Plugins’ menu in WordPress.
- Done!
Installing littleutils: Ubuntu 11.04 (32-bit)
These instructions were tested with littleutils 1.0.27 and Ubuntu 11.04 (32-bit, desktop edition).
- Download the latest version of littleutils to your Download directory
- Open a terminal window (Applications -> Accessories -> Terminal)
- Move the download to a better location: sudo mv ~/Downloads/littleutils-1.0.27.tar.bz2 /usr/local/src/
- Use the root user account: sudo su
- Install dependencies: apt-get install gifsicle pngcrush lzip libpng12-0 libpng12-dev libjpeg-progs p7zip-full
- Uncompress littleutils: cd /usr/local/src && tar jxvf littleutils-1.0.27.tar.bz2 && cd littleutils-1.0.27
- Configure and install littleutils: ./configure –prefix=/usr && make && make install && make install-extra
Installing littleutils: CentOS 6.0 (32-bit)
These instructions were tested with littleutils 1.0.27 and CentOS 6.0 (32-bit, “Basic server” configuration).
- Log in as the root user.
- Enable the rpmforge repository: cd /usr/local/src/ && wget http://packages.sw.be/rpmforge-release/rpmforge-release-0.5.2-2.el6.rf.i686.rpm && rpm -i rpmforge-release-0.5.2-2.el6.rf.i686.rpm
- Install dependencies: yum install gcc libpng libpng-devel gifsicle pngcrush p7zip lzip
- Download the latest version of littleutils: cd /usr/local/src; wget http://downloads.sourceforge.net/project/littleutils/littleutils/1.0.27/littleutils-1.0.27.tar.bz2?r=http%3A%2F%2Fsourceforge.net%2Fprojects%2Flittleutils%2F
- Uncompress littleutils: tar jxvf littleutils-1.0.27.tar.bz2 && cd littleutils-1.0.27
- Configure and install littleutils: ./configure –prefix=/usr && make && make install && make install-extra
Troubleshooting
littleutils is installed, but the plugin says it isn’t. If you are confident that it is installed properly, then go to the plugin configuration page and disable the installation check.
It is also possible that your binaries aren’t accessible to your web server user. You can link these binaries using the following commands:
ln -s /usr/local/bin/opt-jpg /usr/bin/opt-jpg
ln -s /usr/local/bin/opt-png /usr/bin/opt-png
ln -s /usr/local/bin/opt-gif /usr/bin/opt-gif
ln -s /usr/local/bin/tempname /usr/bin/tempname
ln -s /usr/local/bin/imagsize /usr/bin/imagsize
ln -s /usr/local/bin/gifsicle /usr/bin/gifsicle
ln -s /usr/local/bin/pngcrush /usr/bin/pngcrush
ln -s /usr/local/bin/pngrecolor /usr/bin/pngrecolor
ln -s /usr/local/bin/pngstrip /usr/bin/pngstrip
Screenshots
FAQ
Can I use CW Image Optimizer with a Windows server?
No, CW Image Optimizer only supports Linux.
Do I have to have littleutils?
Yes, CW Image Optimizer will not work if littleutils isn’t installed. This plugin expects opt-jpg, opt-png, and opt-gif to be in the PATH.
Changelog
1.1.10
- Fix exec check on some systems.
1.1.9
- Updated littleutils instructions.
1.1.8
- Fixed undefined variable errors caused by absolute path code.
- Fixed undefined index errors that were happening for some file types.
1.1.7
- Made it easy to skip the check for littleutils. You can now do this from a settings page.
- Added a check for exec(). Some PHP installations have this function disabled, which will prevent this plugin from working.
1.1.6
- Made it possible to skip the check for littleutils binaries. This is useful on systems where the “which” command doesn’t work as expected.
1.1.5
- Fixed PHP warnings in bulk optimization code when an image didn’t have any additional sizes.
1.1.4
- Removed extra call to mime_content_type()
1.1.3
- Added an additional method of determining MIME type for those that are missing mime_content_type()
1.1.2
- Plugin works on Macs, too.
- Added screenshots.
- Added donate link.
- Fixed link to plugin homepage.
1.1.1
- Fixed versioning error.
1.1.0
- Added warnings when image optimization binaries are missing.
- Don’t display optimization link if unsupported MIME type.
1.0.2
- Added a warning when the plugin is activated on a non-Linux server.
1.0.1
- Updated readme.txt to conform to WordPress standards.
1.0.0
- First edition

