Contact Form Email Plugin
Contact form with visual form builder. Contact form that sends the data to email, to a database list and to CSV / Excel files.
Contact Form to Email features:
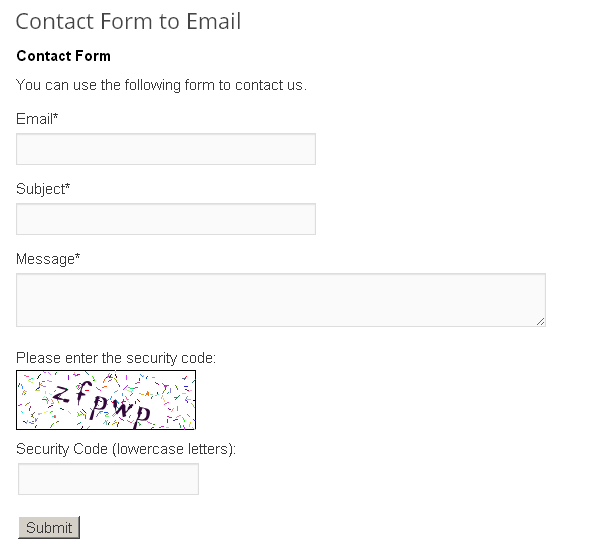
► Email delivery & notifications ► Saves messages into database ► Export to Excel / CSV ► Printable list of messages ► Visual drag and drop form builder ► Anti-spam captcha ► Field validation ► Printable reports ► One-click contact form ► Classic and ajax submission available ► Automatic email reports ► Supports GDPR compliant forms ► ... and more features (see below) The Contact Form to Email is a powerful and easy WordPress plugin to create contact forms and send their data email addresses.
Contact Form to Email also saves the contact form data into a database, provides printable reports and the option to export selected data to CSV/Excel files.
Contact Form to Email Main Features:
- Email delivery / notifications: The contact form data is sent by email to one or more email addresses. It also supports the configuration of auto-replies to the user who filled the contact form.
- Form data saved into the database: Avoid losing submissions and keep a record of the received contact form messages.
- Printable list of messages: Get the list of contacts received from the contact form within a selected date range and print it.
- Export data to CSV/Excel: Export the contact form data to a standard format that can be used by other applications. Export the email addresses and other contact form data using date and text search filters.
- Automatic reports: Provide automatic reports of the contact form usage and data entered into the form. Report of daily submissions and accumulative hourly report. Printable reports for specific fields into the contact form. Helps you to understand your data.
- Automatic email reports: Automatic reports sent to the indicated email addresses on a regular period.
- Form Validation: Set validation rules for each contact form field. Keep your data clean.
- Anti-spam protection: Built-it captcha anti-spam protection. No need to rely on external services for the contact form anti-spam protection.
- Drag and drop contact form builder: A basic and easy to use contact form builder for customizing the form fields and form validation.
- Customizable email messages: Specify the text of the contact form email notifications. Supports both plain text emails and HTML formatted emails.
- Multi language support: The contact form builder allows to enter the field labels and validations in any language. It supports special characters.
- Classic and Ajax submission: After clicking the submit button the user can be redirected to a “thank you” page or a “thank you” message can be displayed in the same form page without having to refresh it. This can be configured in the settings.
- Enable/Disable notifications: Both email notifications to administrators and email confirmation to users can be optionally enabled or disabled form the settings area.
Contact Form to Email – More features
There are also commercial versions of the Contact Form to Email with other features not listed here that can be get at https://form2email.dwbooster.com/download
Commercial version can be converted in a payment form / booking form with integration with mulitple payment gateways: PayPal Standard, PayPal Pro, Stripe, Authorize.net, Skrill, Mollie / iDeal, TargetPay / iDeal, SagePay, RedSys TPV and Sage Payments. Payments are SCA ready (Strong Customer Authentication), compatible with the new Payment services (PSD 2) – Directive (EU).
Commercial version also features a ultra-powerful visual form builder, file upload fields, conditional logic, multi-page forms, WooCommerce integration, Mailchimp integration, Clickatell and Twilio SMS integration, iCal attachments, signature fields to sign with the mouse or directly in the touchscreens, etc…
Contact Form to Email Messages List
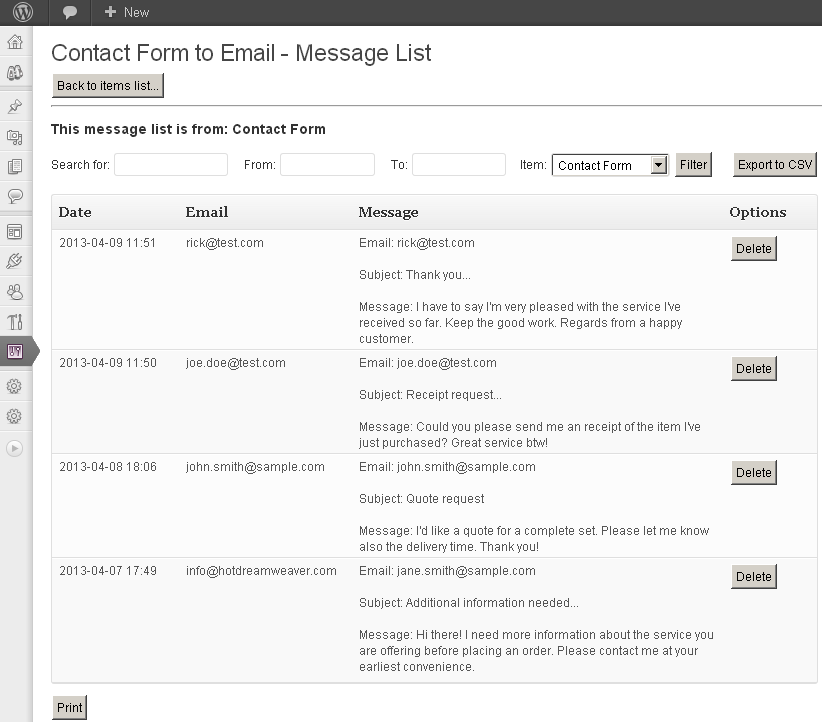
The messages list helps to check the past contact form submissions and print or export them. Includes a search/filter form with the following options:
- Search for: Search for a text into the contact form messages.
- From … to: Date interval to be included in the list/reports.
- Item: You can have more than one contact form. Select here if you want to get the results of a specific contact form or from all contact forms.
- Filter: Shows the list according to the selected filters/options.
- Export to CSV: Export the CSV data according to the selected filters/options.
The CSV file will contain a first row with the field names and the next rows will contain one contact form submission per row, with one for field on each column. This way you can easily import the data from other applications or just select the columns/fields that you need (example: select only the emails). A CSV file can be opened and managed using Excel.
The list of contact form messages is shown below the search area. A print button below the list provides the messages list in a printable format.
The Contact Form Reports
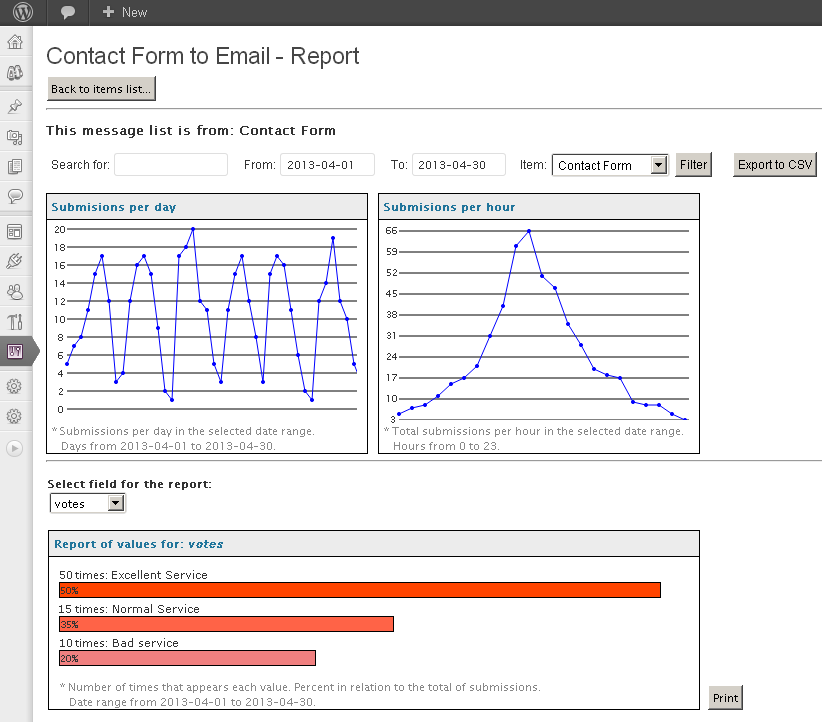
The reports section lets you analyze the use of the contact forms and the data entered into them. The first section of the reports is a filter section similar to the one that appears in the messages list page. Below the filters section there are three graphical reports:
Submissions per day: The report will display in point-lines graphic how many contact form submissions have been received each day in the selected date range. This report can be used to evaluate the contact form peaks and measure the impact of marketing actions.
Submissions per hour: The report will display in a point-lines graphic how many contact form messages are received on each hour of the date; this is for the total messages in the selected date range. This report can be used for checking peak hours and focus the support service on those hours.
Report of values for a selected field: Select any of the contact form fields and other information fields (like date, IP address, hours) to get a report of how many times each value have been entered or selected. This is very useful if you form is used as a poll to get feedback from users, it makes easy to generate a report on selectable contact form fields. This report can be used also to study the most common data entered in the contact form and get a better idea of your customer’s profile and needs.
A print button at the end of the page can be used to print the report of the values for the selected contact form field in a printer-friendly format.
Automatic Email Reports
The Contact Form to Email plugin allows the setup of two types of automatic (periodical) Email reports:
Global Email Reports: Can be setup below the list of forms. This report sends a report with the new submissions of all forms every the specified number of days.
Form Email Reports: Can be setup on the settings page of each form. This report sends a report with the new submissions of the related form every the specified number of days.
The reports are attached in a CSV / Excel file into the emails. In both cases the destination email addresses, email subject, email text and the report’s interval can be specified. More info available in the section “Other Notes”.
Language Support
The Contact Form to Email plugin is compatible with all charsets. The troubleshoot area contains options to change the encoding of the plugin database tables if needed.
Translations are supported through PO/MO files located in the Contact Form to Email plugin folder “languages”.
Multiple translations are already included in the plugin.
Contact Form to Email Updates
New features has been published in the current Contact Form to Email version 1.2.7 based on the feedback received and we would like to thank you all the people that have supported the development, provided feedback and feature requests. The plugin is currently over the 630,000 downloads/installations and a new set of updates is already being prepared, any feature requests will be welcome. Thank you!
New: Form Builder
In the latest update a form builder was included to visually add/modify/delete text fields, text-areas and emails with their respective validations.
Opening the contact form messages in Excel: Go either to the “Reports” or “Messages” section. There is a button labeled “Export to CSV”. CSV files can be opened in Excel, just double-click the downloaded CSV file, it will contain the selected contact form submissions, one per line.
Deleting a contact form message: Go to the “Messages” section and use the button labeled “Delete” for the contact form message you want to delete. Each row in that list is a contact form submission.
Get the contact form email from the user: The email used as from is a fixed email specified on the contact form settings, this helps to prevent be classified as spam, however when you hit “reply” over the received email, the user’s email address will appear allow you to easily reply the contact form messages. The header “Reply-to” is used for this purpose.
Customizing the captcha image: The captcha image used in the contact form is 100% implemented into the plugin, this way you don’t need to rely on third party services/servers. In addition to the settings for customizing the captcha design you can also replace the font files located into the folder “contact-form-to-email/captcha/”. The fonts are used as base for rendering the captcha on the contact form.
Contact form email format: The notifications emails sent from the contact form can be either plain-text emails or HTML emails. Plain text emails are preferred in most cases since are easier to edit and pass the anti-spam filters with more probability.
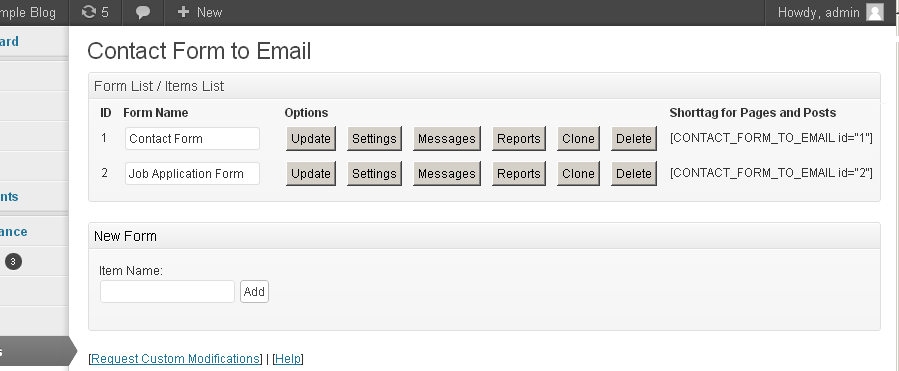
Contact form Clone button: The clone button duplicates a complete contact form with its settings. The contact form messages / emails and statistics aren’t duplicated.
Custom contact form submit button
There is a settings section info each form that allows to specify the label of the submit button.
The class=”pbSubmit” can be used to modify the button styles.
The styles can be applied into any of the CSS files of your theme or add the needed styles into the “Contact Form to Email plugin >> Customization area >> Add Custom Styles” (at the bottom of the page that contains the list of forms)
For further modifications the submit button is located at the end of the file “cp-public-int.inc.php”.
For general CSS styles modifications to the form and samples check this FAQ entry: https://form2email.dwbooster.com/faq#q82
Customizing the automatic email reports
The settings for the email reports (both the global and per form reports) include the following configuration fields:
- Enable Reports?: Option for enabling / disabling the reports.
- Send report every: Indicate every how many days the reports will be sent.
- Send after this hour (server time): Approximate time at which the reports will be sent. This time is based on the server time. Some activity is needed on the website for sending the reports. You can setup a cron for a more exact delivery time.
- Send email from: The “from” email used for the reports. Avoid @aol.com and @hotmail.com “from” addresses to skip the anti-spam filters.
- Send to email(s): The list of emails (comma separated) that will receive the reports.
- Email subject: Subject of the email that will be sent with the Contact Form to Email reports.
- Email format?: Format of the email that will be sent with the Contact Form to Email reports. Can be HTML or Plain Text. In most cases plain text is easier to setup and has less problems with anti-spam services.
- Email Text (CSV file will be attached): Content of the email that will contain the Contact Form to Email reports. The reports will be attached in CSV format into the email.
The contact form database
The messages received via the contact form are stored into the WordPress contact form database table “wp_cftemail_messages”. You can export that data in form of automatic email reports or in CSV/Excel format from the messages list area. If needed you can also query that table directly for further processing of the contact form data.
Importing messages
There is an option to import messages into the Contact Form to Email plugin. That option is located below the messages list and is labeled “Import CSV”.
The messages can be imported in a comma separated CSV file. One record per line, one field per column. Don’t use a header row with the field names.
The first 3 columns into the CSV file are the time, IP address and email address, if you don’t have this information then leave the first three columns empty. After those initial columns the fields (columns) must appear in the same order than in the form.
Sample format for the CSV file:
2013-04-21 18:50:00, 192.168.1.12, john@sample.com, "john@sample.com", "sample subject", "sample message" 2013-05-16 20:49:00, 192.168.1.24, jane.smith@sample.com, "jane.smith@sample.com", "other subject", "other message" From address used for the emails
Into the “Form Processing / Email Settings” section the first settings field is named “Send email “From” and has the following options:
From fixed email address indicated below – Recommended option: If you select “from fixed…” the customer email address will appear in the “to” address when you hit “reply”, this is the recommended setting to avoid mail server restrictions.
From the email address indicated by the customer: If you select “from customer email” then the customer email will appear also visually when you receive the email, but this isn’t supported by all hosting services, so this option isn’t recommended in most cases.
The drag and drop contact form builder
The Form Builder lets you to add/edit/remove fields into the contact form and also to specify the validation rules for your contact form (required fields, email fields, etc…).
The following field types are currently available in the version published at this WordPress directory:
- Single Line Text: Classic one-line text input.
- Email: This field validates that the email address has a valid format.
- Paragraph Text: Classic multi-line (textarea) text input.
In other versions of the plugin the following field are also available: Numeric field with specific validations, Date-picker, Checkboxes, Multiple Choice Radio buttons, Dropdown / Select, Upload file fields, Password, Phone with specific validations, static texts, section breaks and page breaks for multi-page contact forms.
Other features in the contact form builder:
Equal fields validation: Use it for example to confirm if the email or text typed in two different fields are the same. This is valid for “Single Line Text” and “Email” fields.
Dependent fields: Use this feature for show/hide fields (any field type) based in the selection made on other fields (checkboxes, radiobuttons or select/drop-down fields). This feature isn’t fully available in this version since the related fields aren’t included.
Installation
To install Contact Form to Email, follow these steps:
- Download and unzip the Contact Form to Email plugin
- Upload the entire contact-form-to-email/ directory to the /wp-content/plugins/ directory
- Activate the Contact Form to Email plugin through the Plugins menu in WordPress
- Configure the contact form settings at the administration menu >> Settings >> Contact Form to Email
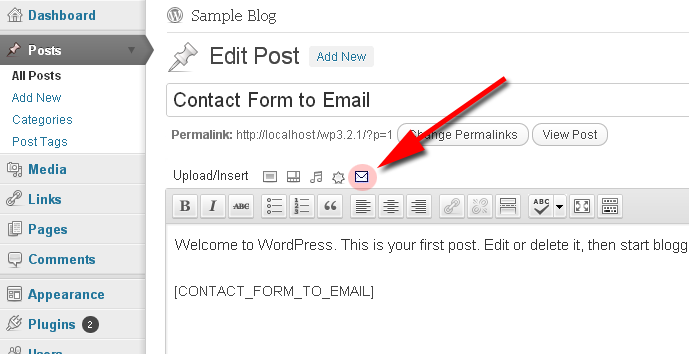
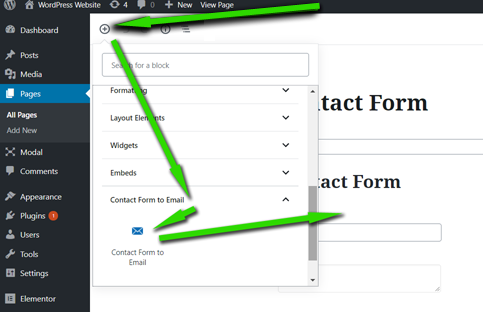
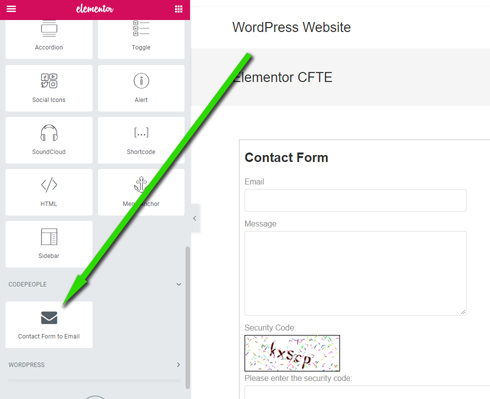
- To insert the contact form into some content or post use the icon that will appear when editing contents
Screenshots
FAQ
A: There is a tag named <%INFO%> that is replaced with all the information posted from the contact form, however you can use also optional tags for specific fields into the contact form.
For doing that, click the desired field into the form builder and in the settings box for that field there is a read-only setting named “Field tag for the message (optional):”. Copy & paste that tag into the contact form message text and after the form submission that tag will be replaced with the text entered in the form field.
The tags have this structure (example): <%fieldname1%>, <%fieldname2%>, <%fieldname3%>, …
More info and supported tags at https://form2email.dwbooster.com/faq#q81
A: Use the tag <%itemnumber%> into the email content. That tag will be replaced by the contact form submission item number.
A: The cause is in most cases a conflict with a third party plugin or with the theme. To fix that, go to the “troubleshoot area” (located below the list of forms in the settings area) change the “Script load method” from “Classic” to “Direct”.
If the problem persists after that modification please contact our support service and we will give you a solution. We will appreciate any feedback to make the contact form avoid conflicts with third party plugins/themes.
A: Use the “troubleshoot area” to change the character encoding. Try first with the UTF-8 option.
A: The free version must be deleted before installing the pro version.
If you are uploading a new version via Plugins – New – Upload and a previous version is still installed, then delete the previous version first. This is a safe step, the plugin’s data and settings won’t be lost during the process.
Another alternative is to overwrite the plugin files through a FTP connection. This is also a safe step.
A: Into the form builder in the administration area, click the “Form Settings” tab. That area is for editing the form title and header text.
It can be used also for different alignment of the field labels.
A: Into the form editor click a field and into its settings there is one field named “Add Css Layout Keywords”. Into that field you can put the name of a CSS class that will be applied to the field.
There are some pre-defined CSS classes to use align two, three or four fields into the same line. The CSS classes are named:
column2 column3 column4 For example if you want to put two fields into the same horizontal line then specify for both fields the class name “column2”.
A: For each contact form you will be able to edit the following settings:
Form Processing / Email Settings:
- Send email “From”: Indicate if the email will be sent from a fixed email address or from the email address entered by the customer. This is explained in more detail in the “Other notes” tab.
- “from” email: The email used as from in the notifications (for fixed “from” addresses).
- Destination emails (comma separated): List of administrators that will receive the email notification.
- Email subject: Subject of the notification email sent after completing the payment.
- Include additional information?: Optional information about the user IP and browser.
- Thank you page (after sending the message): After the completing the payment the user may go back to a page into your website (usually a “thank you” page). Type the page address into this field.
- Email format?: Select if the email will be sent as plain-text or HTML-formatted.
- Message: Content of the notification email that you will receive after each submission of the contact form. Keep the tag , it will be replaced automatically with the form data send by the user.
Form Builder: The drag and drop contact form builder. It’s explained in detail in the “Other notes” tab.
Submit button: To specify the label of the contact form submit button (no need to add it from the visual contact form builder). Contains also other settings and instructions for further customizations to the contact form submit button and contact form CSS styles.
Validation Settings: This area contains the “texts” used for the contact form validations. You can easily translate them to other languages.
Email Copy to User:
- Send confirmation/thank you message to user?: Select if you want to sent the “confirmation/thank you” message to the user.
- Email field on the form: Select here the field that contains the user’s email on the contact form.
- Email subject: Subject of the email sent to the user after payment
- Email format?: Select if the email will be sent as plain-text or HTML-formatted.
- Message: Content of the email sent to the user after payment. The tag will be replaced by the information sent using the contact form, if needed.
Captcha Verification:
- Use Captcha Verification?: Select if the captcha image will be used in the contact form to prevent spam.
- Width: Width of the captcha image.
- Height: Height of the captcha image.
- Chars: How many characters will appear in the captcha image.
- Min font size: Minimum size used for the font (randomized).
- Max font size: Maximum size used for the font (randomized).
- Preview: Preview for checking how the captcha image will look.
- Noise: Amount of noise to make it stronger.
- Noise Length: Length of the noise to modify its look.
- Background: Background color.
- Border: Border color.
- Font: Base font used to render the text. Four options already included.
Automatic Reports. Send submissions in CSV format via email: This area contains many settings to automatically send reports every the specified period of time containing the data of all the contact forms submitted during that period of time. The report settings are explained more in detail in the tab “Other Notes” (see “Customizing the automatic email reports”). Note: All the submissions are stored into the contact form database, so can be easily recovered when needed.
A: Yes, you can add the tag to the email content and that tag will be replaced with the address of the page where the form was displayed and submitted.
A: To modify the whole styles of the contact form fields and labels, add the needed styles into the “Customization area >> Add Custom Styles” (at the bottom of the page that contains the list of forms)
- Change the styles of all the field labels:
color: #00f;
}
- Change the styles of all the input and textarea fields:
border: 2px solid #00f;
}
- Change the contact form submit button:
color: #00f;
font-weight: bold;
}
- Change the “contact form title” and “header description”:
On the other hand to modify only a specific field into the contact form:
Step #1: Into the contact form builder, click a field to edit its details, there is a setting there named “Add CSS Layout Keywords”.
Step #2: You can add a class name into that field, so the style specified into the CSS class will be applied to that field.
Step #3 (Note): Don’t add style rules directly there in the contact form builder but the name of a CSS class.
Step #4: You can place the CSS class either into the CSS file of your template or into the file “wp-content/plugins/contact-form-to-email/css/stylepublic.css” located into the Contact Form to Email plugin’s folder.
Examples: Add a class named “specialclass” into the setting “Add CSS Layout Keywords” and add one of these CSS rules into the mentioned file:
For changing the field label:
.specialclass label { color: #00f; }For changing the input or textarea of the field:
.specialclass input[type=text],.specialclass textarea,.specialclass select { border: 2px solid #00f; }
To get the modifications shown into the public contact form you may have to refresh the page twice or clear the browser cache to be sure that the old CSS styles aren’t still being shown from the cache.
More info at add the needed styles into the “Customization area >> Add Custom Styles” (at the bottom of the page that contains the list of calendars)
A: In all plugin versions you can turn off IP tracking to avoid saving that user info and an “accept terms” / “accept GDPR” field is available.
Changelog
1.3.49
- Compatible with WP 6.6
1.3.48
- PHP updates
1.3.47
- Compatible with WP 6.5
1.3.46
- Tags removed: contact form excel,form to email,form to database,contact form builder,form to csv,form to excel,contact form csv
1.3.45
- Reports improvements
1.3.44
- Additional sanitization
1.3.43
- Additional output escaping
1.3.42
- Anti-spam improvement
1.3.41
- Export update
1.3.40
- Compatible with WP 6.3
1.3.39
- WP 6.2 update
1.3.38
- JS updates
1.3.37
- Captcha update
1.3.36
- PHP 8 updates
1.3.35
- Language updates
1.3.34
- Compatible with WP 6.1
1.3.33
- Better captcha
1.3.32
- Feedback panel update
1.3.31
- Validation fix
1.3.30
- Misc improvements
1.3.29
- Accesibility update
1.3.28
- Compatibility with Elementor
- CSV export improvements
1.3.27
- Compatible with WordPress 5.9
1.3.26
- Additional field sanitization
1.3.25
- Additional field sanitization
1.3.24
- Interface improvement
1.3.23
- PHP compatibility update
1.3.22
- Compatible with WordPress 5.8
1.3.21
- Database structure update
1.3.20
- CSS updates
1.3.19
- Fixed bug when creating new forms
1.3.18
- Compatible with the WordPress 4.7 version
1.3.17
- New invisible antispam captcha protection: honeypot, smart scripts, …
1.3.16
- Compatible with WordPress 5.6
1.3.15
- Fix to jQuery deprecated code
1.3.14
- Compatible with WordPress 5.5
1.3.12
- Code improvements
1.3.11
- Fixed captcha conflict
1.3.10
- Improved form display speed
1.3.09
- Faster form load speed
1.3.08
- Insertion block update
1.3.07
- Fixed conflict with 3rd party optimization plugin
1.3.06
- Compatible with WordPress 5.4
1.3.05
- New hooks and improved CSV formatting
1.3.04
- Interface improvements
1.3.03
- API improvement
1.3.02
- Improved antispam rules
1.3.01
- Fixed bug in global email reports
1.2.99
- Fixed bug in email subject
1.2.98
- Fixed email delivery bug
1.2.97
- Compatiblity updates
1.2.96
- Compatible with WordPress 5.3
1.2.95
- Code improvements
1.2.94
- Update to reports
1.2.93
- Fix to database encoding
1.2.92
- Code improvements
1.2.91
- Allowed better email formating and misc improvements
1.2.90
- Code improvements
1.2.89
- Update for compatibility with WordPress 5.2
1.2.88
- Fixed bug in iconv function
1.2.87
- Compatible with WordPress 5.2
1.2.86
- New feature for editing submissions
- New feature for adding submissions from admin area
1.2.85
- Fixed conflict with Yoast SEO
1.2.84
- Fixed conflict with lazy loading feature of Jetpack
1.2.83
- Fixed data-saving bug
1.2.82
- Fixed bug in email settings
1.2.81
- Fixed bug in message deletion
1.2.80
- Better auto-config and easier publishing process
1.2.79
- Fixed Gutemberg editor conflict
1.2.78
- Major interface update and improvements
1.2.77
- Removed use of CURL
1.2.75
- Added Elementor integration
1.2.74
- Fixed bug in form edition
1.2.73
- Removed empty spaces/line breaks causing script conflicts
1.2.72
- New Gutemberg Block
1.2.71
- Fixes to form builder area
1.2.70
- Improved error detection
1.2.69
- Form builder corrections
1.2.68
- Fixed conflict with loading page plugins
1.2.67
- Gutenberg compatibility updates
1.2.66
- Improved security in custom edition area (XSS and CSRF)
1.2.65
- Fixed conflict with third party plugins
1.2.64
- Added publishing wizard
1.2.63
- Improved messages list
1.2.62
- Improved CSS edition area
1.2.61
- Interface and stats section improvements
1.2.60
- Gutemberg integration update
1.2.59
- Fixed magic quotes issue
1.2.58
- Fixed conflict with Gutenberg editor
1.2.57
- Fix to Gutenberg integration
1.2.56
- New support option
1.2.55
- Compatible with Gutenberg
1.2.54
- Interface improvements
1.2.53
- New activation issue fixed
1.2.52
- Improved errors detection
1.2.51
- Fixed bug in multisite installations
1.2.50
- Database creating encoding fix
1.2.49
- Email reply-to header fix
1.2.48
- SMTP compatibility issue
1.2.47
- GDPR updates and small bug fixes
1.2.46
- Better activation and deactivation process
1.2.45
- Removed unneeded code blocks
1.2.44
- Typo/language fixes
1.2.43
- New admin notices
1.2.42
- Update to avoid issues with ASP extensions
1.2.41
- New features for deleting messages (GDPR-related improvements)
1.2.40
- Fixed captcha reloading issue
1.2.39
- Fixed form builder issue
1.2.38
- Fixed conflict with autoptimize plugin
1.2.37
- Added field for Accept terms / GDPR compliant feature
1.2.36
- Added indicator of form being edited
1.2.34
- Removed use of external Google CDN styles
1.2.33
- Adjustments to make the form GDPR compliant
1.2.32
- Renamed plugin references to avoid conflicts
1.2.31
- Admin interface improvements
1.2.30
- Fixed bug in graphic report
1.2.29
- Modification to blink option
1.2.28
- New feature to report the page where the form was submitted
1.2.27
- Improvements to the submission process to avoid duplicated submissions
1.2.26
- Feature for disabling email notifications when needed
1.2.25
- Added CSS and JavaScript customization panel
1.2.24
- Fixed bug in review panel
1.2.23
- Admin intf modifications
1.2.22
- Fixed conflict with 3rd party plugin
1.2.21
- Fixed layout of graphics in report page
1.2.20
- Fixed bug in ajax submission process
1.2.19
- Compatible with WordPress 4.9
1.2.18
- Filename sanitization improvements
1.2.17
- Ajax submission features
1.2.16
- German translation correction
1.2.15
- Database upgrade code updated
1.2.14
- Added default value for options
1.2.12
- Simpler filename sanitization
1.2.11
- Fixed initialization bug
1.2.10
- Improved messages list and print option
1.2.09
- Filename sanitization
1.2.08
- Validation updates
1.2.07
- Sanitization of “from” email address
1.2.06
- Moved plugin website and links to SSL
1.2.05
- Fixed bug on color selectors for captcha images
1.1.99
- Accessibility updates
1.1.98
- Fixed bugs to report graphics
- Improvements to scripts loading
1.1.97
- Removed used of deprecated mysql_ functions
1.1.96
- Tested and compatible with WordPress 4.8
1.1.95
- Fixed bug that caused error while reusing resources
1.1.94
- Fixes script issue in previous update
1.1.93
- Added new settings and translation fields
1.1.92
- Improved IP address detection to get real user IP address
1.1.91
- Fixed bug in review box
1.1.90
- Major code update, multiple code optimization and security improvements
1.1.89
- Better query sanitization
- Optional feedback option added
1.1.88
- Fixed XSS vulneravility
1.1.87
- Fix to the captcha align in the form builder
1.1.86
- Form builder update to support email type for mobile devices
1.1.85
- Field validations in dashboard to prevent common email config issues
1.1.84
- Minified script to improve form speed
1.1.83
- Included submission ID in CSV file
1.1.82
- Compatible with WP 4.7.3
1.1.81
- Help address update
1.1.80
- Security improvement
1.1.79
- Visualization update
1.1.78
- Documentation updates
1.1.77
- Bug fixed in add contact form feature
1.1.76
- Validation updates
1.1.75
- Fixed broken admin button
1.1.74
- Admin intf update
1.1.73
- Security improvement
1.1.72
- DB improvements
1.1.71
- Fixed typo
1.1.70
- Fixed intf. bug
1.1.69
- DB update
1.1.68
- Instructions update
1.1.67
- Fixes to filename generation
1.1.66
- Compatible with WP 4.7
1.1.65
- Database fix
1.1.64
- Doc link updated
1.1.63
- Database improvements
1.1.62
- Fixed database error on IP v6 networks
1.1.61
- Improved support tracking
1.1.60
- Code optimizations
1.1.59
- French language corrections
1.1.58
- Fix to visualization bug in Firefox
1.1.57
- Interface update
1.1.56
- Roll back to incorrect update
1.1.55
- More fixes for magic quotes issue
1.1.54
- Fixed magic quotes issue
1.1.53
- IP addr database update
1.1.52
- Modified processing of posted data
1.1.51
- New customization form
1.1.50
- Fixed XSS issue. Thank you to Netsparker Ltd (netsparker.com) for the notification.
1.1.49
- Compatible with WP 4.6
1.1.48
- Fixed XSS issue (Thank you to Burak Kelebek for the report)
1.1.47
- Modified admin addr
1.1.46
- Fix on email tags
1.1.45
- Auto-formatting for from email
1.1.44
- Captcha params update
1.1.43
- Mail notice removed
1.1.42
- IP address not included as default to avoid anti-spam issues
1.1.41
- “From” email address corrected
1.1.40
- New documentation
1.1.39
- Removed old versions of Contact Form to Email
1.1.38
- Removed unneeded tag from public from
1.1.37
- Using plugins_loaded instead init
1.1.35
- Fixed bug in throubleshoot area
1.1.34
- jQuery deprecated functions replaced
1.1.33
- Slashes escape fix
1.1.32
- Compatible with WP 4.5
1.1.31
- New filter for file uploads
1.1.30
- Correction to support address
1.1.29
- Added nonces and security improvements
1.1.28
- Added demo pages
1.1.27
- New website & documentation links
1.1.26
- Updated API URLs
1.1.25
- Shortcode paramters sanitization
1.1.24
- Fixed PHP session issues
1.1.23
- Fixed typos in French translations
1.1.22
- Message list updates
1.1.21
- Improved captcha security
1.1.20
- Fixed CSS errors and the submit button style in the new WP themes
1.1.19
- Fixed validation tags
1.1.18
- Removed old styles
1.1.17
- Optimization. Removed code from old/unused behaviors
1.1.16
- Fixed captcha issues
1.1.15
- Fixed insert query
1.1.14
- Tested and compatible with WordPress 4.4
1.1.13
- Form validation is now activated from the form builder
1.1.12
- Updates to admin interface
1.1.11
- Interface modifications
1.1.10
- Support new charsets
1.1.9
- Default settings updated
1.1.8
- Fixed CSV sample format
- Updated support links
1.1.7
- Update to the h2-h1 tags in the admin interface
- Fixed bug with the tabs
- Fixed initialization bug in reports
- Fixed typo in dutch language
- Removed unneeded data from the post process
1.1.6
- Compatible with the latest WordPress 4.2.3
- Update to messages list.
- Better code for captcha image generation.
- Fixed conflict with zLib library
- Update to the captcha generation to add content-length header
1.1.5
- Removed use of esc_sql for numeric values
- Fixed XSS vulnerability
- Fixed bug in translation functions.
1.1.4
- Compatible with the WordPress 4.2.2 version
1.1.3
- Sanitized parameters used in SQL queries.
- Support for large forms.
- Improved translations.
- Compatible with the latest WordPress 4.2.x version
1.1.2
- Compatible with the latest WP versions
- Improved translation code, compatible with the latest WP versions
- New translations
- Auto-detection and auto-solution for captcha image issues in servers with problem with the PHP sessions configuration
- Fixed warning that appeared with PHP safe mode restrictions
- Sanitized GET parameters used in queries
1.01
- Compatible with the latest WP versions
- New automatic CSV report options
- Added functional form builder
- Improved CSS styles to avoid CSS conflicts
- Fixed conflict of the captcha image with some third party plugins
- Fixed bug in pagination links
- New feature for adding submission number into the emails
- Fixed bug with back slashes on submissions
