
Comet Cache Plugin
Author: WP Sharks Author URI: https://cometcache.com Contributors: WebSharks, JasWSInc, raamdev, clavaque Donate link: https://cometcache.
If you care about the speed of your site, Comet Cache is one of those plugins that you absolutely MUST have installed 🙂 Comet Cache takes a real-time snapshot (building a cache) of every Page, Post, Category, Link, etc. These snapshots are then stored (cached) intuitively, so they can be referenced later, in order to save all of that processing time that has been dragging your site down and costing you money.
The Comet Cache plugin uses configuration options that you select from the options panel. See: Comet Cache -› Options in your Dashboard. Once a file has been cached, Comet Cache uses advanced techniques that allow it to recognize when it should and should not serve a cached version of the file. By default, Comet Cache does not serve cached pages to users who are logged in, or to users who have left comments recently. Comet Cache also excludes administrative pages, login pages, POST/PUT/DELETE/GET(w/ query string) requests and/or CLI processes.
Features
- SIMPLE and well-documented configuration (just enable and you’re all set!).
- Options to control the automatic cache clearing behavior for Home and Posts Page, Author Page, Category, Tag, and Custom Term Archives, Custom Post Type Archives, RSS/RDF/ATOM Feeds, and XML Sitemaps.
- URI exclusion patterns (now supporting wildcards too).
- User-Agent exclusion patterns (now supporting wildcards too).
- HTTP referrer exclusion patterns (now supporting wildcards too).
- The ability to set an automatic expiration time for cache files.
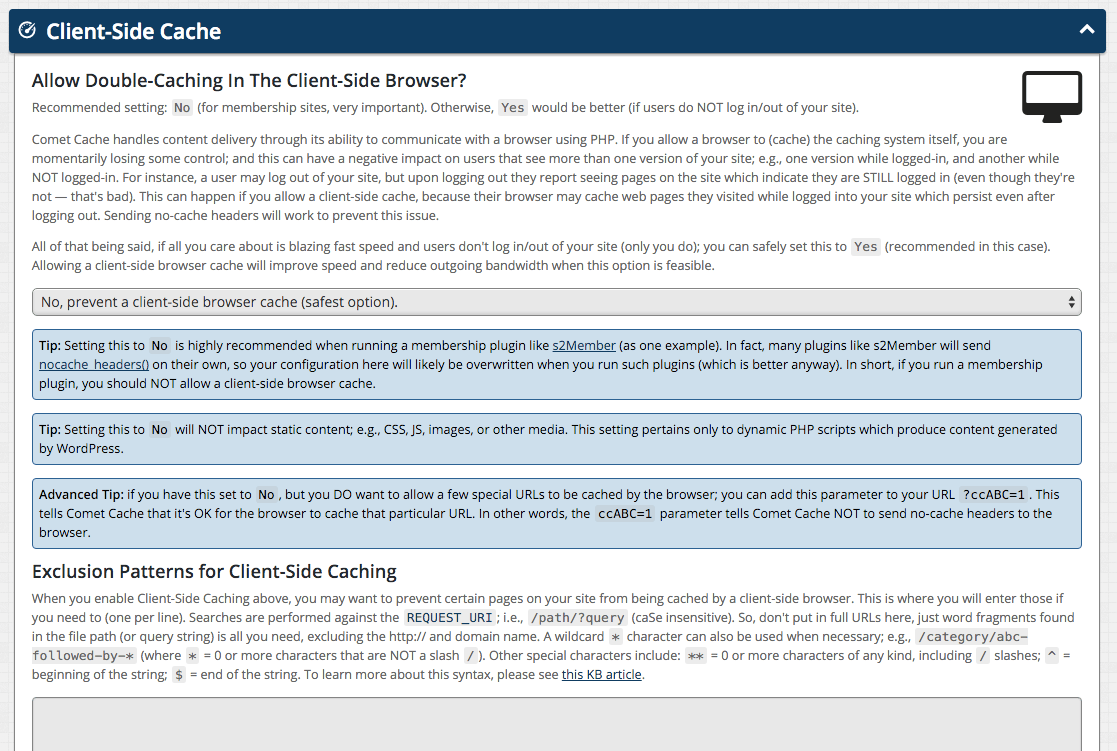
- Client-Side Caching (to allow double-caching in the client-side browser).
- Caching for 404 requests to reduce the impact of those requests on the server.
- RSS, RDF, and Atom Feed caching.
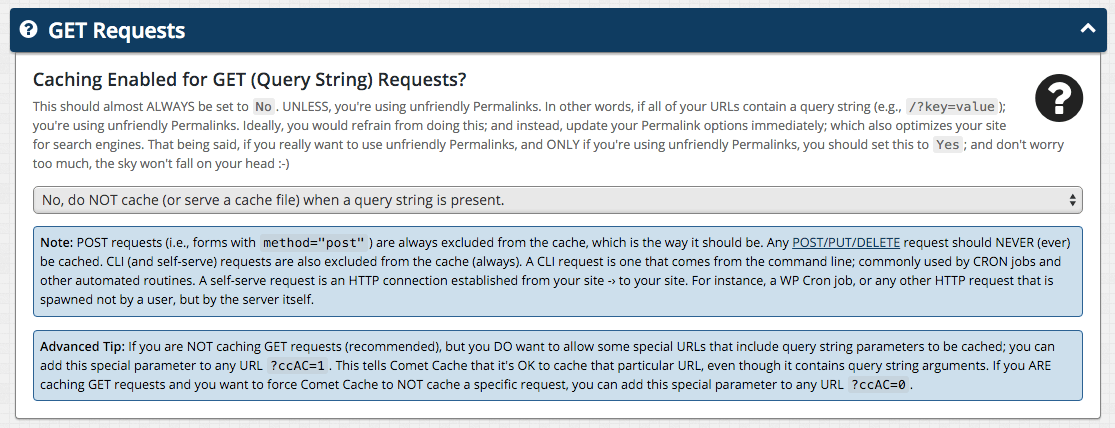
- The ability to cache or ignore URLs that contain query strings (GET Requests).
- Apache Optimizations to enable GZIP Compression.
- WP-CLI Compatibility.
- An Advanced Cache Plugin system for theme and plugin developers.
Pro Features
- The ability to cache logged-in users too! (VERY powerful, particularly for membership sites).
- A new improved “Clear Cache” button in the admin bar (along with an option to enable/disable this feature).
- Options for Automatic and Intelligent Cache Clearing of Posts, Pages, Custom Post Types, Categories, Tags, Links, Themes, Users, and more.
- The ability to disable Dashboard notifications related to automatic clearing/purging on change detections.
- The ability to clear Markdown-related cache files generated by the s2Clean theme for WordPress (if installed).
- The ability to run custom PHP code whenever the cache is cleared.
- The ability to Auto-Clear a List of Custom URLs.
- Clear Cache User Permissions to give other users permission to clear the cache by specifying a list of Roles and/or Capabilities.
- Cache Statistics to help you gain insight into the status of your site cache.
- Import/Export functionality for Comet Cache configuration files.
- A Dynamic Version Salt (customize the caching engine).
- Multisite Host Exclusion Patterns to exclude specific child blogs from being cached in a Multisite Network.
- Mobile Mode that supports creating multiple versions of the cache for sites with adaptive designs.
- HTML Compressor to automatically combine and compresses CSS/JS/HTML code.
- Auto-Cache Engine to pre-cache your site at 15-minute intervals.
- Static CDN Filters to serve some and/or ALL static files on your site from a CDN of your choosing, including support for Multiple CDN Host Names, Domain Sharding, and WordPress Multisite Networks.
- Domain Sharding / Multiple CDN Hosts to work around concurrency limits and make it possible for browsers to download more resources simultaneously.
- Server Load Monitoring to avoid regenerating the cache while the server is very busy by specifying a maximum server load average.
- Cache Statistics and Charts to analyze statistics about the page cache, HTML Compressor cache, PHP OPCache, and server health.
- Apache Optimizations to enable web server GZIP Compression, Leverage Browser Caching, Enforce Canonical URLs, and more.
- An Automatic Updater to update Comet Cache Pro from your WordPress Dashboard.
- Compatibility with ManageWP and InfiniteWP.
- Rockstar support for all Comet Cache features.
TIP: you can preview Pro features in the free version by clicking the “Preview Pro Features” link at the top of your Comet Cache options.
Further Details
So Why Does WordPress® Need To Be Cached?
To understand how Comet Cache works, first you have to understand what a cached file is, and why it is absolutely necessary for your site and every visitor that comes to it. WordPress® (by its very definition) is a database-driven publishing platform. That means you have all these great tools on the back-end of your site to work with, but it also means that every time a Post/Page/Category is accessed on your site, dozens of connections to the database have to be made, and literally thousands of PHP routines run in harmony behind-the-scenes to make everything jive. The problem is, for every request that a browser sends to your site, all of these routines and connections have to be made (yes, every single time). Geesh, what a waste of processing power, memory, and other system resources. After all, most of the content on your site remains the same for at least a few minutes at a time. If you’ve been using WordPress® for very long, you’ve probably noticed that (on average) your site does not load up as fast as other sites on the web. Now you know why!
The Definition Of A Cached File (from the Wikipedia)
In computer science, a cache (pronounced /kash/) is a collection of data duplicating original values stored elsewhere or computed earlier, where the original data is expensive to fetch (owing to longer access time) or to compute, compared to the cost of reading the cache. In other words, a cache is a temporary storage area where frequently accessed data can be stored for rapid access. Once the data is stored in the cache, it can be used in the future by accessing the cached copy rather than re-fetching or recomputing the original data.
Prepare To Be Amazed / It’s Time To Speed Things Up
Comet Cache is extremely reliable, because it runs completely in PHP code, and does not hand important decisions off to the mod_rewrite engine or browser cache; also making Comet Cache MUCH easier to setup and configure.
In addition, Comet Cache actually sends a no-cache header (yes, a no-cache header); which allows it to remain in control at all times. It might seem weird that a caching plugin would send a no-cache header :-). Well, no-cache headers are a key component in this plugin, and they will NOT affect performance negatively. On the contrary, this is how the system can accurately serve cache files to public users vs. users who are logged-in, commenters, etc.
If you care about the speed of your site, Comet Cache is one of those plugins that you absolutely MUST have installed 🙂 Comet Cache takes a real-time snapshot (building a cache) of every Page, Post, Category, Link, etc. These snapshots are then stored (cached) intuitively, so they can be referenced later, in order to save all of that processing time that has been dragging your site down and costing you money.
The Comet Cache plugin uses configuration options that you select from the options panel. See: Comet Cache -› Options in your Dashboard. Once a file has been cached, Comet Cache uses advanced techniques that allow it to recognize when it should and should not serve a cached version of the file. By default, Comet Cache does not serve cached pages to users who are logged in, or to users who have left comments recently. Comet Cache also excludes administrative pages, login pages, POST/PUT/DELETE/GET(w/ query string) requests and/or CLI processes.
Running Comet Cache On A WordPress® Multisite Installation
WordPress® Multisite Networking is a special consideration in WordPress®. If Comet Cache is installed under a Multisite Network installation, it will be enabled for ALL blogs the same way. The centralized config options for Comet Cache, can only be modified by a Super Administrator operating on the main site. Comet Cache has internal processing routines that prevent configuration changes, including menu displays; for anyone other than a Super Administrator operating on the main site.
How To Enable GZIP Compression for Even Greater Speeds
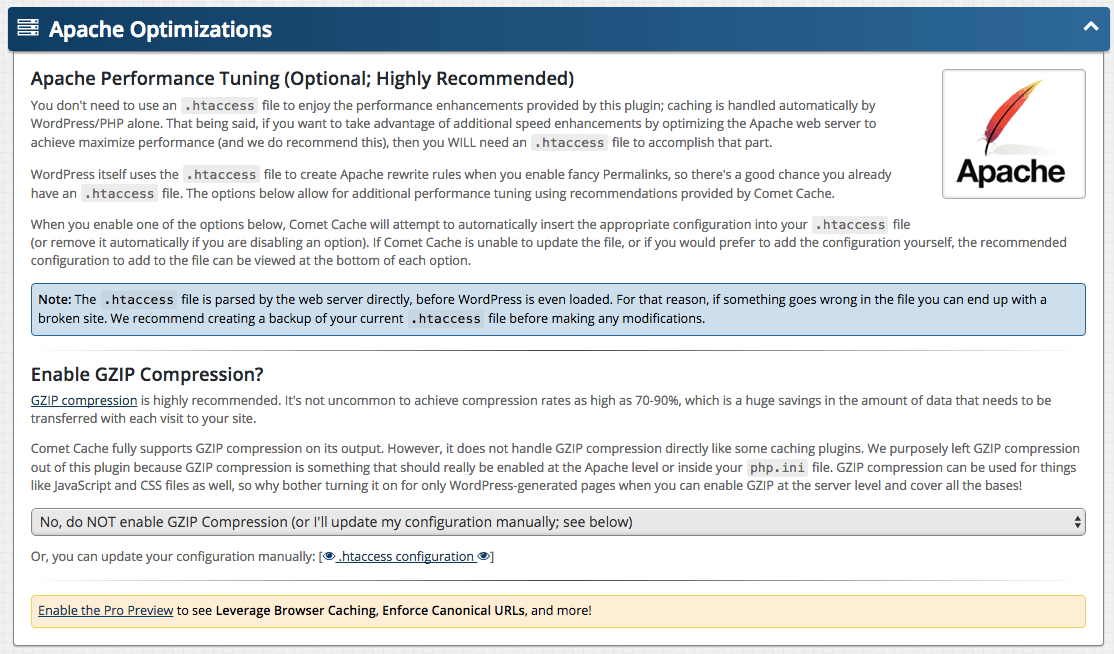
You don’t have to use an .htaccess file to enjoy the performance enhancements provided by this plugin; caching is handled by WordPress®/PHP alone. That being said, if you want to take advantage of GZIP compression (and we do recommend this), then you WILL need an .htaccess file to accomplish that part. This plugin fully supports GZIP compression on its output. However, it does not handle GZIP compression directly. We purposely left GZIP compression out of this plugin, because GZIP compression is something that should really be enabled at the Apache level or inside your php.ini file. GZIP compression can be used for things like JavaScript and CSS files as well, so why bother turning it on for only WordPress-generated pages when you can enable GZIP at the server level and cover all the bases!
If you want to enable GZIP and your site is running on the Apache web server, visit Dashboard -> Comet Cache -> Apache Optimizations -> Enable GZIP Compression?; or to enable GZIP compression manually create an .htaccess file in your WordPress® installation directory (or edit the one that’s already there) and put the following few lines in it. That is all there is to it. GZIP is now enabled!
<IfModule deflate_module> <IfModule filter_module> AddOutputFilterByType DEFLATE text/plain text/html AddOutputFilterByType DEFLATE text/xml application/xml application/xhtml+xml application/xml-dtd AddOutputFilterByType DEFLATE application/rdf+xml application/rss+xml application/atom+xml image/svg+xml AddOutputFilterByType DEFLATE text/css text/javascript application/javascript application/x-javascript AddOutputFilterByType DEFLATE font/otf font/opentype application/font-otf application/x-font-otf AddOutputFilterByType DEFLATE font/ttf font/truetype application/font-ttf application/x-font-ttf </IfModule> </IfModule> If your installation of Apache does not have mod_deflate installed. You can also enable GZIP compression using PHP configuration alone. In your php.ini file, you can simply add the following line anywhere: zlib.output_compression = on
EMERGENCY: If All Else Fails (How-To Remove Comet Cache)
Ordinarily you can just deactivate Comet Cache from the plugins menu in WordPress. However, if you’re having a more serious issue, please follow the instructions here.
- Log into your site via FTP; perhaps using FileZilla.
- Delete this file:
/wp-content/advanced-cache.php - Delete this directory:
/wp-content/plugins/comet-cache/ - Remove this line from your
/wp-config.phpfile:define('WP_CACHE', TRUE);
Comet Cache is now completely uninstalled and you can start fresh 🙂
Pro Features
Comet Cache Pro Features
- The ability to cache logged-in users too! (VERY powerful, particularly for membership sites).
- A new improved “Clear Cache” button in the admin bar (along with an option to enable/disable this feature).
- Options for Automatic and Intelligent Cache Clearing of Posts, Pages, Custom Post Types, Categories, Tags, Links, Themes, Users, and more.
- The ability to disable Dashboard notifications related to automatic clearing/purging on change detections.
- The ability to clear Markdown-related cache files generated by the s2Clean theme for WordPress (if installed).
- The ability to run custom PHP code whenever the cache is cleared.
- The ability to Auto-Clear a List of Custom URLs.
- Clear Cache User Permissions to give other users permission to clear the cache by specifying a list of Roles and/or Capabilities.
- Cache Statistics to help you gain insight into the status of your site cache.
- Import/Export functionality for Comet Cache configuration files.
- A Dynamic Version Salt (customize the caching engine).
- Multisite Host Exclusion Patterns to exclude specific child blogs from being cached in a Multisite Network.
- Mobile Mode that supports creating multiple versions of the cache for sites with adaptive designs.
- HTML Compressor to automatically combine and compresses CSS/JS/HTML code.
- Auto-Cache Engine to pre-cache your site at 15-minute intervals.
- Static CDN Filters to serve some and/or ALL static files on your site from a CDN of your choosing, including support for Multiple CDN Host Names, Domain Sharding, and WordPress Multisite Networks.
- Domain Sharding / Multiple CDN Hosts to work around concurrency limits and make it possible for browsers to download more resources simultaneously.
- Server Load Monitoring to avoid regenerating the cache while the server is very busy by specifying a maximum server load average.
- Cache Statistics and Charts to analyze statistics about the page cache, HTML Compressor cache, PHP OPCache, and server health.
- Apache Optimizations to enable web server GZIP Compression, Leverage Browser Caching, Enforce Canonical URLs, and more.
- An Automatic Updater to update Comet Cache Pro from your WordPress Dashboard.
- Rockstar support for all Comet Cache features.
TIP: you can preview Pro features in the free version by clicking the “Preview Pro Features” link at the top of your Comet Cache options.
Pro Installation
Comet Cache Pro is a wholly contained plugin that does not require Comet Cache Lite to be installed. To install Comet Cache Pro,
- Deactivate and delete Comet Cache Lite, if it is currently installed
- Download Comet Cache Pro from your account at CometCache.com
- From your WordPress Dashboard, go to Dashboard -> Plugins -> Add New and then click on the Upload Plugin button at the top
- Select the Comet Cache Pro zip file you downloaded in step 2 and click “Install Now”
- After the plugin finishes installing, click the “Activate Plugin” link
Once the plugin is active, you can go to Dashboard -> Comet Cache -> Plugin Options -> Enable/Disable and Enable Comet Cache.
Also, to stay updated with the latest version of Comet Cache Pro, be sure to also configure Dashboard -> Comet Cache -> Plugin Updater.
Software Requirements
In addition to the WordPress Requirements, Comet Cache requires the following minimum versions:
- PHP 5.4+
- Apache 2.1+
License
Copyright: © 2016 WP Sharks (coded in the USA)
Released under the terms of the GNU General Public License.
Credits / Additional Acknowledgments
- Software designed for WordPress®.
- GPL License https://codex.wordpress.org/GPL
- WordPress® http://wordpress.org
- Some JavaScript extensions require jQuery.
- GPL-Compatible License http://jquery.org/license
- jQuery http://jquery.com/
- CSS framework and some JavaScript functionality provided by Bootstrap.
- GPL-Compatible License http://getbootstrap.com/getting-started/#license-faqs
- Bootstrap http://getbootstrap.com/
- Icons provided by Font Awesome.
- GPL-Compatible License http://fortawesome.github.io/Font-Awesome/license/
- Font Awesome http://fortawesome.github.io/Font-Awesome/
Installation
Quick Tip: WordPress® can only deal with one cache plugin being activated at a time. Please uninstall any existing cache plugins that you’ve tried in the past. In other words, if you’ve installed W3 Total Cache, WP Super Cache, DB Cache Reloaded, or any other caching plugin, uninstall them all before installing Comet Cache. One way to check, is to make sure this file: wp-content/advanced-cache.php and/or wp-content/object-cache.php are NOT present; and if they are, delete these files BEFORE installing Comet Cache. Those files will only be present if you have a caching plugin already installed. If you don’t see them, you’re ready to install Comet Cache :-).
A note for existing ZenCache users: Comet Cache is the successor to ZenCache and will automatically detect any existing ZenCache options and migrate that options over to Comet Cache. For further details, please see the migration FAQ.
Comet Cache is Very Easy to Install
- Upload the
/comet-cachefolder to your/wp-content/plugins/directory. - Activate the plugin through the Plugins menu in WordPress®.
- Navigate to the Comet Cache panel & enable it.
How will I know Comet Cache is Working?
First of all, make sure that you’ve enabled Comet Cache. After you activate the plugin in WordPress, go to the Comet Cache options panel and enable caching (you can’t miss the big yellow checkbox). Then scroll to the bottom and click Save All Changes. All of the other options on that page are already pre-configured for typical usage. Skip them all for now. You can go back through all of these later and fine-tune things the way you like them.
Once Comet Cache has been enabled, you’ll need to log out (and/or clear browser cookies). Cache files are NOT served to visitors who are logged in, and that includes you too 🙂 Cache files are NOT served to recent commenters either. If you’ve commented (or replied to a comment lately); please clear your browser cookies before testing.
To verify that Comet Cache is working, navigate your site like a normal visitor would. Right-click on any page (choose View Source), then scroll to the very bottom of the document. At the bottom, you’ll find comments that show Comet Cache stats and information. You should also notice that page-to-page navigation is lightning fast compared to what you experienced prior to installing Comet Cache.
Running Comet Cache On A WordPress® Multisite Installation
WordPress® Multisite Networking is a special consideration in WordPress®. If Comet Cache is installed under a Multisite Network installation, it will be enabled for ALL blogs the same way. The centralized config options for Comet Cache, can only be modified by a Super Administrator operating on the main site. Comet Cache has internal processing routines that prevent configuration changes, including menu displays; for anyone other than a Super Administrator operating on the main site.
EMERGENCY: If All Else Fails (How-To Remove Comet Cache)
Ordinarily you can just deactivate Comet Cache from the plugins menu in WordPress. However, if you’re having a more serious issue, please follow the instructions here.
- Log into your site via FTP; perhaps using FileZilla.
- Delete this file:
/wp-content/advanced-cache.php - Delete this directory:
/wp-content/plugins/comet-cache/ - Remove this line from your
/wp-config.phpfile:define('WP_CACHE', TRUE);
Comet Cache is now completely uninstalled and you can start fresh 🙂
Screenshots
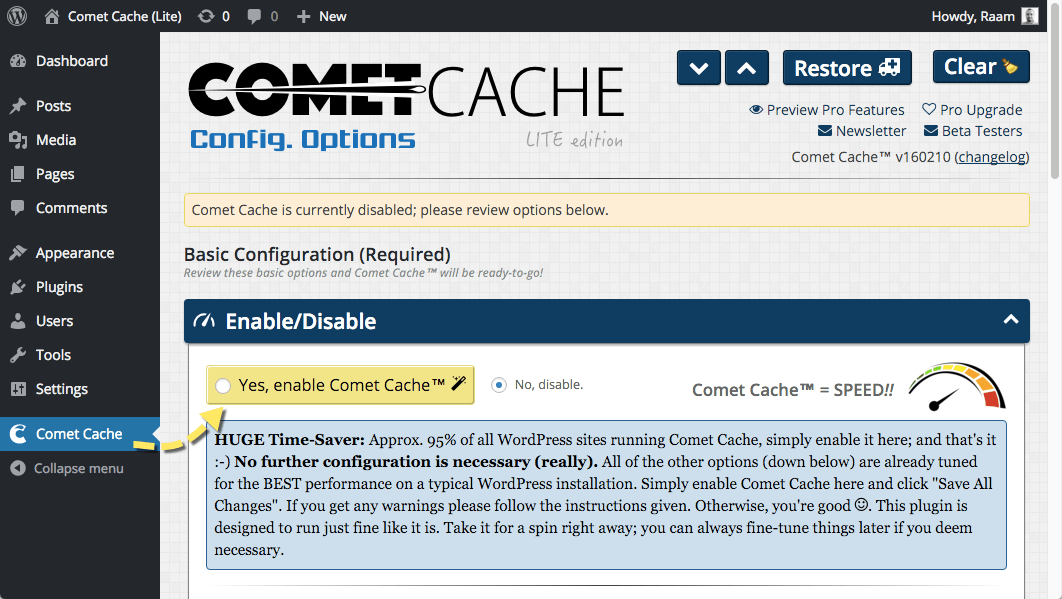
Step 1: Enable Comet Cache
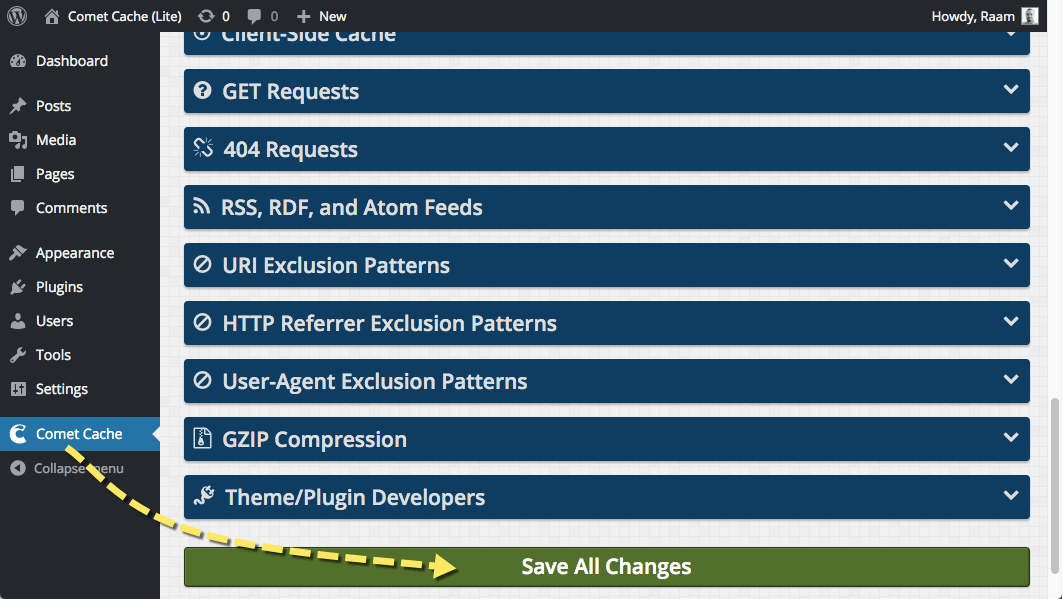
Step 2: Save All Changes; that's it!
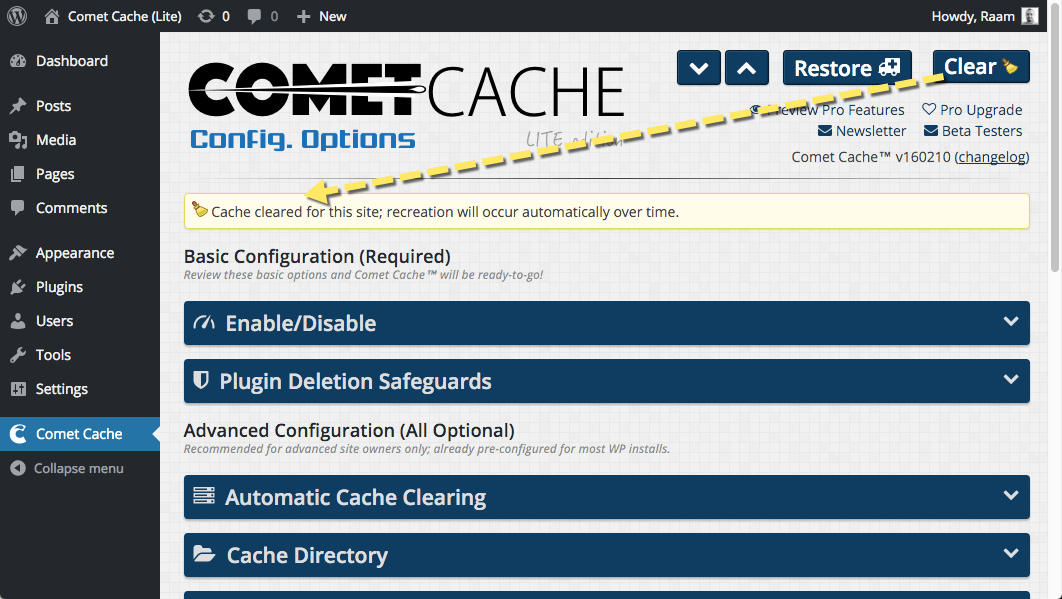
One-click Clear Cache button
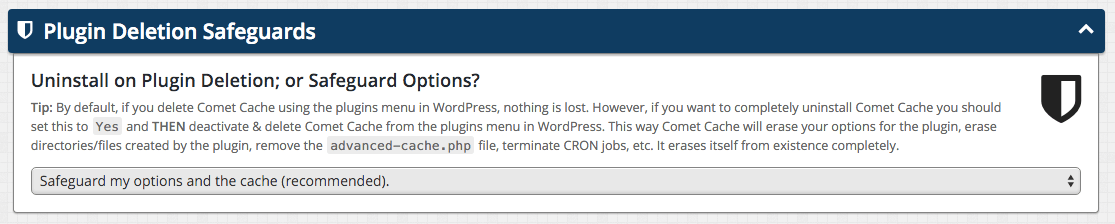
Plugin Deletion Safeguards
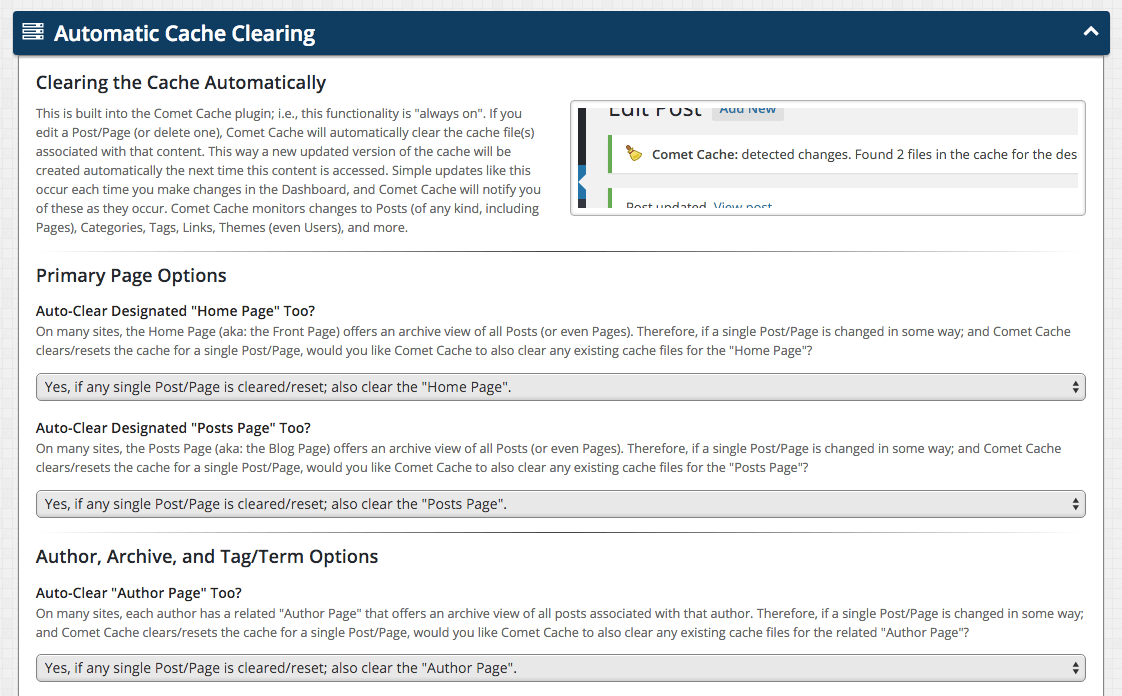
Intelligent and automatic cache clearing

Cache Directory
Cache Expiration Time
Client-Side Cache
GET Requests
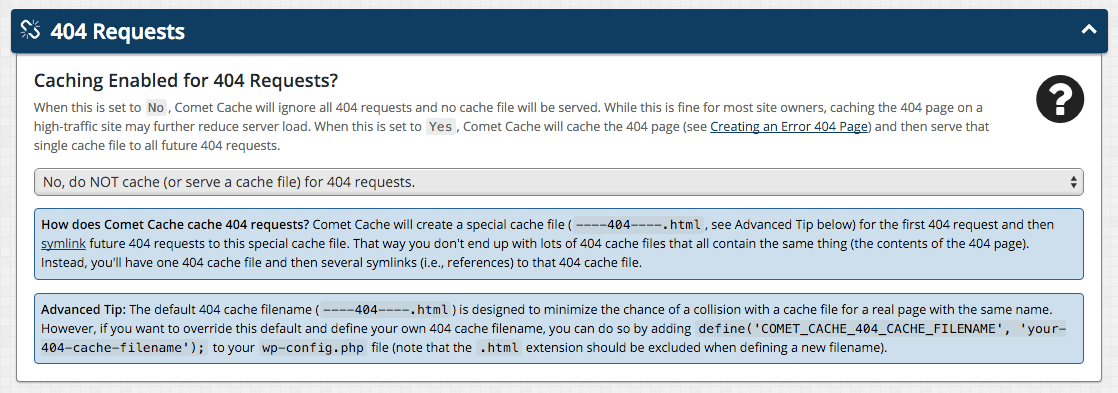
404 Requests
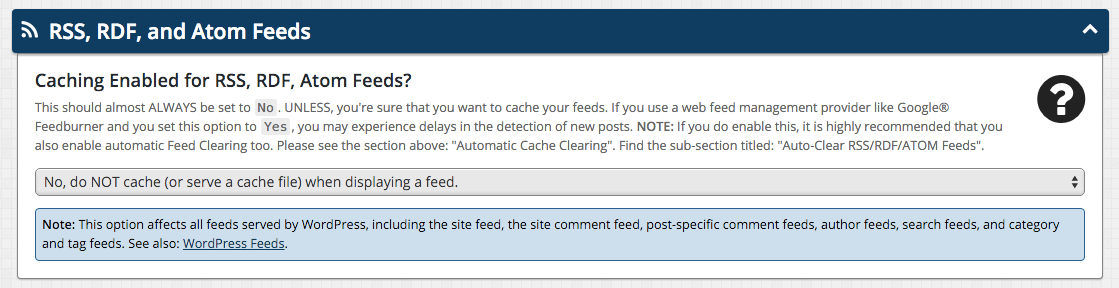
RSS, RDF, and Atom Feeds
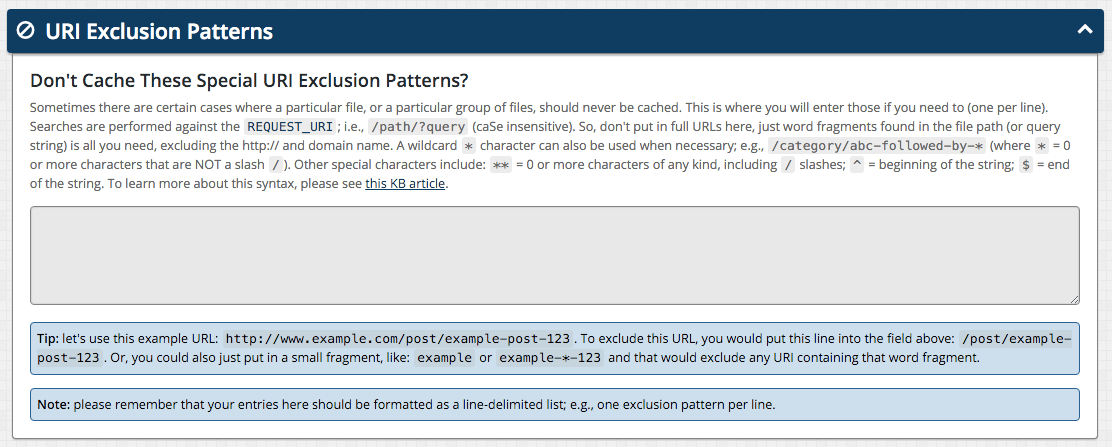
URI Exclusion Patterns
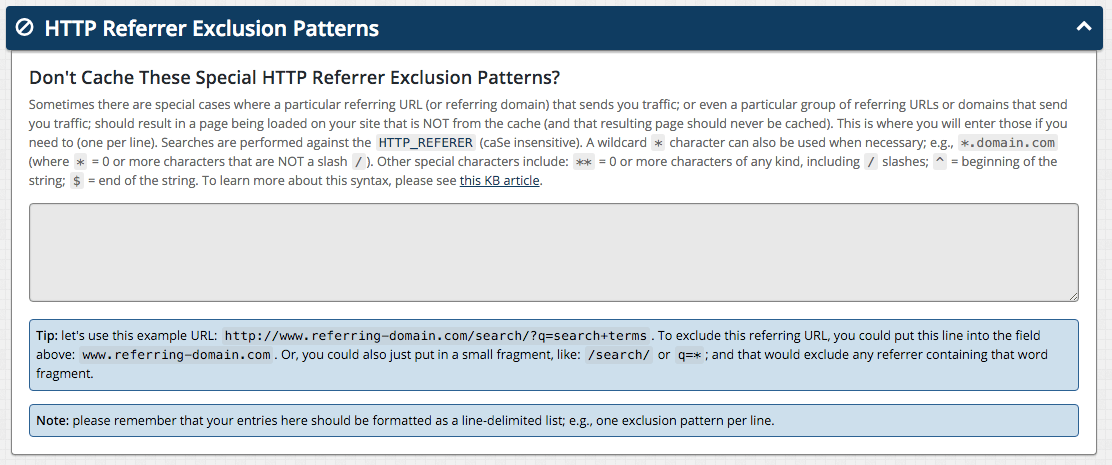
HTTP Referrer Exclusion Patterns
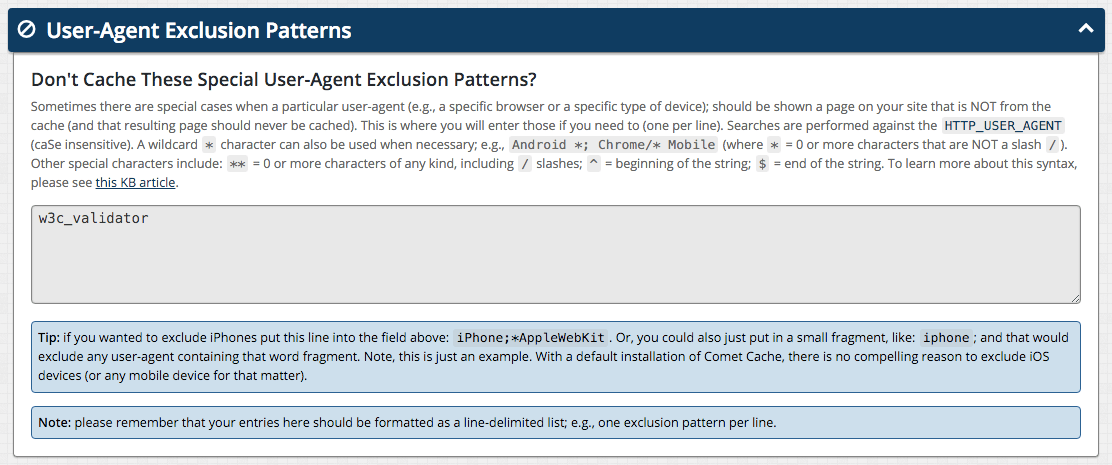
User-Agent Exclusion Patterns
Apache Optimizations
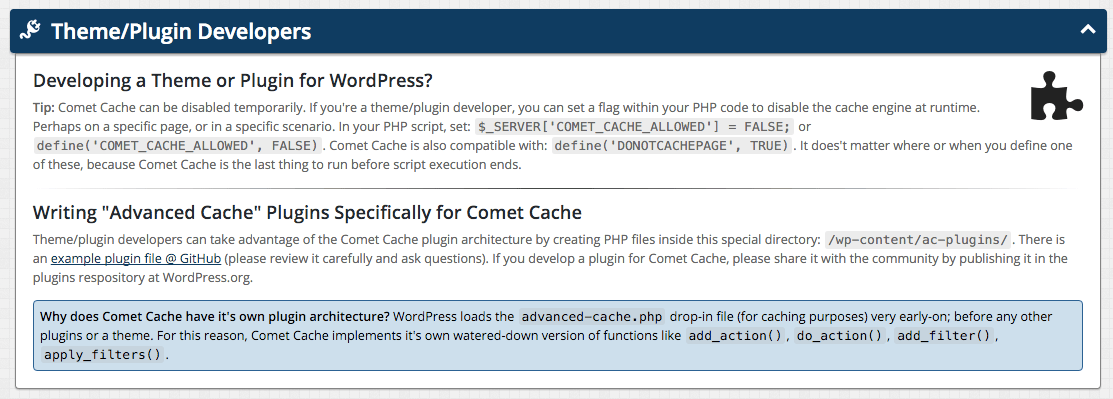
Theme/Plugin Developers
FAQ
Comet Cache is the successor to ZenCache and will automatically detect any existing ZenCache options and migrate those options over to Comet Cache. For further details, please see the migration FAQ.
First of all, make sure that you’ve enabled Comet Cache. After you activate the plugin, go to the Comet Cache options panel and enable it, then scroll to the bottom and click Save All Changes. All of the other options on that page are already pre-configured for typical usage. Skip them all for now. You can go back through all of them later and fine-tune things the way you like them.
Once Comet Cache has been enabled, you’ll need to log out (and/or clear browser cookies). Cache files are NOT served to visitors who are logged in, and that includes you too 🙂 Cache files are NOT served to recent commenters either. If you’ve commented (or replied to a comment lately); please clear your browser cookies before testing.
To verify that Comet Cache is working, navigate your site like a normal visitor would. Right-click on any page (choose View Source), then scroll to the very bottom of the document. At the bottom, you’ll find comments that show Comet Cache stats and information. You should also notice that page-to-page navigation is lightning fast compared to what you experienced prior to installing Comet Cache.
There is NOT one! Comet Cache is a MUST HAVE for every WordPress® powered site. In fact, we really can’t think of any site running WordPress® that would want to be without it. To put it another way, the WordPress® software itself comes with a built in action reference for an advanced-cache.php file, because WordPress® developers realize the importance of such as plugin. The /wp-content/advanced-cache.php file is named as such, because the WordPress® developers expect it to be there when caching is enabled by a plugin. If you don’t have the /wp-content/advanced-cache.php file yet, it is because you have not enabled Comet Cache from the options panel yet.
To understand how Comet Cache works, first you have to understand what a cached file is, and why it is absolutely necessary for your site and every visitor that comes to it. WordPress® (by its very definition) is a database-driven publishing platform. That means you have all these great tools on the back-end of your site to work with, but it also means that every time a Post/Page/Category is accessed on your site, dozens of connections to the database have to be made, and literally thousands of PHP routines run in harmony behind-the-scenes to make everything jive. The problem is, for every request that a browser sends to your site, all of these routines and connections have to be made (yes, every single time). Geesh, what a waste of processing power, memory, and other system resources. After all, most of the content on your site remains the same for at least a few minutes at a time. If you’ve been using WordPress® for very long, you’ve probably noticed that (on average) your site does not load up as fast as other sites on the web. Now you know why!
In computer science, a cache (pronounced /kash/) is a collection of data duplicating original values stored elsewhere or computed earlier, where the original data is expensive to fetch (owing to longer access time) or to compute, compared to the cost of reading the cache. In other words, a cache is a temporary storage area where frequently accessed data can be stored for rapid access. Once the data is stored in the cache, it can be used in the future by accessing the cached copy rather than re-fetching or recomputing the original data.
The cache files are stored in a special directory: /wp-content/cache/comet-cache. This directory needs to remain writable, just like the /wp-content/uploads directory on many WordPress® installations. The /comet-cache/cache directory is where cache files reside. These files are stored using an intutive directory structure that named based on the request URL (HTTPS/HTTP_HOST/REQUEST_URI). See also: Dashboard -› Comet Cache -› Cache Directory/Expiration Time for further details.
Whenever a request comes in from someone on the web, Comet Cache checks to see if it can serve a cached file; e.g. it looks at the HTTPS/HTTP_HOST/REQUEST_URI environent variables, then it checks the /comet-cache/cache directory. If a cache file has been built already, and it matches an existing HTTPS.HTTP_HOST.REQUEST_URI combination; and it is not too old (see: Dashboard -› Comet Cache -› Cache Directory/Expiration Time), then it will serve that file instead of asking WordPress® to regenerate it. This adds tremendous speed to your site and reduces server load.
By default, Comet Cache does NOT serve cached pages to users who are logged in, or to users who have left comments recently. Comet Cache also excludes administrative pages, login pages, POST/PUT/DELETE/GET(w/ query string) requests and/or CLI processes. That being said, the Pro version of Comet Cache DOES make it possible to cache pages even when users ARE logged-in; adding even more speed! This is particularly helpful on membership sites; e.g. sites that run plugins like s2Member™ for instance.
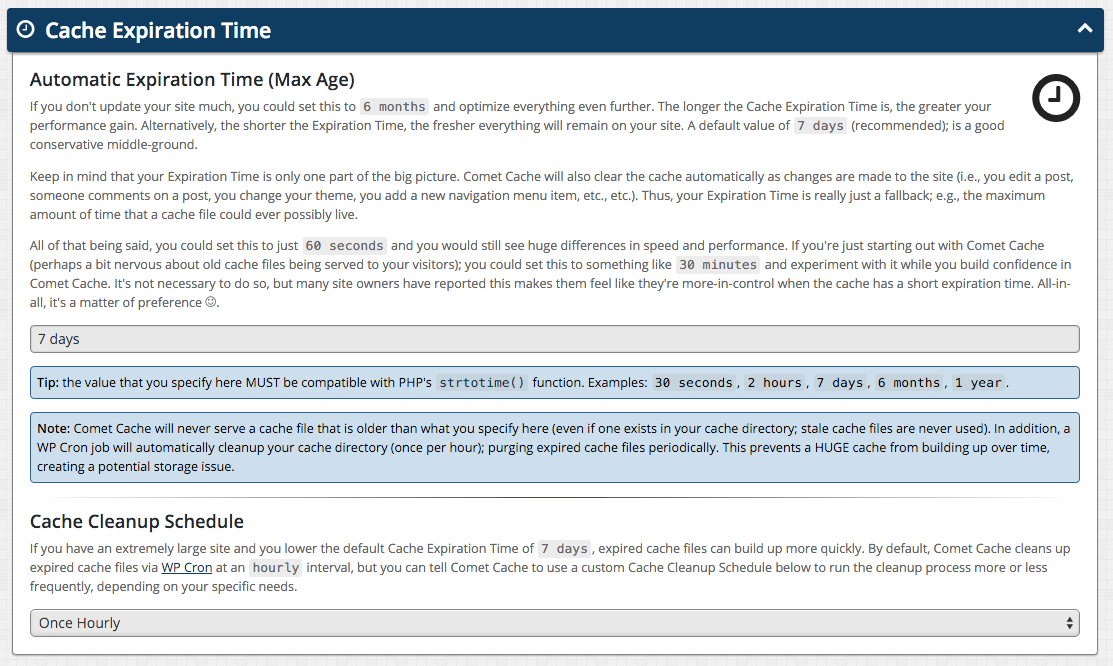
It depends on your configuration of Comet Cache. There is an automatic expiration system (the garbage collector), which runs through WordPress® behind-the-scene, according to your Expiration setting (see: Dashboard -› Comet Cache -› Cache Directory/Expiration Time). There is also a built-in expiration time on existing files that is checked before any cache file is served up, which also uses your Expiration setting. In addition; whenever you update a Post or a Page, Comet Cache can automatically prune that particular file from the cache so it instantly becomes fresh again. Otherwise, your visitors would need to wait for the previous cached version to expire.
By default, Comet Cache does NOT serve cached pages to users who are logged in, or to users who have left comments recently. Comet Cache also excludes administrative pages, login pages, POST/PUT/DELETE/GET(w/ query string) requests and/or CLI processes.
There is no need to use an .htaccess file with this plugin; caching is handled by WordPress®/PHP alone. That being said, if you also want to take advantage of GZIP compression (and we do recommend this), then you WILL need an .htaccess file to accomplish that part. This plugin fully supports GZIP compression on its output. However, it does not handle GZIP compression directly. We purposely left GZIP compression out of this plugin, because GZIP compression is something that should really be enabled at the Apache level or inside your php.ini file. GZIP compression can be used for things like JavaScript and CSS files as well, so why bother turning it on for only WordPress-generated pages when you can enable GZIP at the server level and cover all the bases!
If you want to enable GZIP and your site is running on the Apache web server, visit Dashboard -> Comet Cache -> Apache Optimizations -> Enable GZIP Compression?; or to enable GZIP compression manually create an .htaccess file in your WordPress® installation directory (or edit the one that’s already there) and put the following few lines in it. That is all there is to it. GZIP is now enabled!
<IfModule deflate_module> <IfModule filter_module> AddOutputFilterByType DEFLATE text/plain text/html AddOutputFilterByType DEFLATE text/xml application/xml application/xhtml+xml application/xml-dtd AddOutputFilterByType DEFLATE application/rdf+xml application/rss+xml application/atom+xml image/svg+xml AddOutputFilterByType DEFLATE text/css text/javascript application/javascript application/x-javascript AddOutputFilterByType DEFLATE font/otf font/opentype application/font-otf application/x-font-otf AddOutputFilterByType DEFLATE font/ttf font/truetype application/font-ttf application/x-font-ttf </IfModule> </IfModule> If your installation of Apache does not have mod_deflate installed. You can also enable gzip compression using PHP configuration alone. In your php.ini file, you can simply add the following line anywhere: zlib.output_compression = on
<?php
define(‘COMET_CACHE_ALLOWED’, FALSE); // The easiest way.
// or $_SERVER[‘COMET_CACHE_ALLOWED’] = FALSE; // Also very easy.
// or define(‘DONOTCACHEPAGE’, TRUE); // For compatibility with other cache plugins.
When your script finishes execution, Comet Cache will know that it should NOT cache that particular page. It does not matter where or when you define this Constant; e.g. define('COMET_CACHE_ALLOWED', FALSE); because Comet Cache is the last thing to run during execution. So as long as you define this Constant at some point in your routines, everything will be fine.
Comet Cache also provides support for define('DONOTCACHEPAGE', TRUE), which is used by the WP Super Cache plugin as well. Another option is: $_SERVER['COMET_CACHE_ALLOWED'] = FALSE. The $_SERVER array method is useful if you need to disable caching at the Apache level using mod_rewrite. The $_SERVER array is filled with all environment variables, so if you use mod_rewrite to set the COMET_CACHE_ALLOWED environment variable, that will end up in $_SERVER['COMET_CACHE_ALLOWED']. All of these methods have the same end result, so it’s up to you which one you’d like to use.
If you don’t update your site much, you could set this to 6 months; optimizing everything even further. The longer the cache expiration time is, the greater your performance gain. Alternatively, the shorter the expiration time, the fresher everything will remain on your site. A default value of 7 days (recommended expiration time), is a good conservative middle-ground.
Keep in mind that your expiration setting is only one part of the big picture. Comet Cache will also purge the cache automatically as changes are made to the site (i.e. you edit a post, someone comments on a post, you change your theme, you add a new navigation menu item, etc., etc.). Thus, your expiration time is really just a fallback; e.g. the maximum amount of time that a cache file could ever possibly live.
That being said, you could set this to just 60 seconds and you would still see huge differences in speed and performance. If you’re just starting out with Comet Cache (perhaps a bit nervous about old cache files being served to your visitors); you could set this to something like 30 minutes and experiment with it while you build confidence in Comet Cache. It’s not necessary, but many site owners have reported this makes them feel like they’re more-in-control when the cache has a short expiration time. All-in-all, it’s a matter of preference 🙂
Ordinarily you can just deactivate Comet Cache from the plugins menu in WordPress. However, if you’re having a more serious issue, please follow the instructions here.
- Log into your site via FTP; perhaps using FileZilla.
- Delete this file:
/wp-content/advanced-cache.php - Delete this directory:
/wp-content/plugins/comet-cache/ - Remove this line from your
/wp-config.phpfile:define('WP_CACHE', TRUE);
Comet Cache is now completely uninstalled and you can start fresh 🙂
Changelog
v170220
- New Feature: Comet Cache can now be configured to automatically clear the cache for date-based archive views whenever any single post is cleared due to changes in content, title, etc. See: Dashboard Comet Cache Plugin Options Automatic Cache Clearing Auto-Clear “Date-Based Archives” Too?. See also: Issue #724.
- New Pro Feature: Apache Optimizations now include a new option that allows site owners to enforce an exact host name for all requests. See: Dashboard Comet Cache Pro Plugin Options Apache Optimizations Enforce an Exact Host Name?. See also: Issue #101.
- Bug Fix: Apache detection sometimes inaccurate. So instead of using default WP core globals for server detection, Comet Cache now uses it’s own set of Apache/Nginx/IIS detection functions. And, this release enhances our Apache and Nginx detection routines; making them smart enough to catch additional edge cases; i.e., to further reduce the likelihood of there being a false-positive. See Issue #748.
- Bug Fix: Some XML-RPC and REST API requests were being cached inadvertently. See Issue #855.
- Bug Fix: Broken textarea field due to
white-space:nowrapin Firefox. See Issue #866. - Bug Fix: This release resolves empty directories being left in the cache folder, in some scenarios. See Thread #866.
- Bug Fix (Pro): Some REST requests were being redirected incorrectly whenever Apache Optimizations were enabled. See Issue #855.
- Compatibility Bug Fix: Some Jetpack API calls were being cached inadvertently. See Issue #855.
- Enhancement: Notes in HTML source now indicate fully functional on first load for improved clarity. See Issue #860.
- Enhancement: Enhancing security by removing
basename(__FILE__)from direct access notices.
v161227
Note: This is a Comet Cache Pro maintenance release.
- Bug Fix (Pro): Resolves an issue with the previous Pro maintenance release (v161226) where
admin-bar.min.csswas missing, which caused issues with the Admin Bar buttons. This was due to a glitch in our build system. See Issue #864.
v161226
Note: This is a Comet Cache Pro maintenance release.
- Bug Fix (Pro): Resolves error
Unable to determine UA info directory locationwhen upgrading to latest release. See Issue #862. - Bug Fix (Pro): Enhancing compatibility with InfiniteWP, ManageWP, and other remote management tools for WordPress. See Issue #862.
- Bug Fix (Pro): Incorrect time calculations whenever load average checks are enabled in Comet Cache configuration options. See Issue #853.
- Cleanup: Removed an old API call that checked for a newer lite version. No longer necessary.
v161221
- Bug Fix: Improving PHP OPcache detection. Now considering the INI option
opcache.restrict_api. Comet Cache is now smart enough to avoid generating the PHP Warning: PHP Warning: Zend OPcache API is restricted by “restrict_api” configuration directive. See Issue #733. - New Feature (Pro): Mobile Mode. This release adds a new feature that is designed to improve compatibility with Adaptive themes for mobile devices. To learn more, please see: Dashboard Comet Cache Pro Plugin Options Mobile Mode. See also: Issue #471.
- Enhancement: Auto-Clearing Author Page Cache. This release makes Comet Cache smart enough to detect when a user is deleted (or removed from a child blog in a Network), at which time the Author page for that user will be cleared from the cache so it can be regenerated automatically. See Issue #304.
- Enhancement: Multibyte Compatibility. This release improves support for WordPress Permalinks that contain UTF-8 symbols (or emojis) in them. More specifically, this release adds the
/uflag to allpreg_*()calls in cache clearing routines that generate cache paths from Watered-Down Regex patterns entered by a site owner. See: Issue #611. - Enhancement: Widget Change Detection. Comet Cache can now detect when Appearance Widgets are added/edited/removed, and Comet Cache will automatically clear the cache so that your site remains up-to-date. See Issue #411.
- Enhancement (Pro): Static CDN Filters and
srcset. This release enhances Static CDN Filters in Comet Cache Pro. Static CDN Filters are now smart enough to filter all image sources included in ansrcset=""attribute that is generated by WordPress. See Issue #660. If you’d like to learn more aboutsrcset="", see this article at WordPress.org. - Enhancement (Pro): Automatic Background Updates. It is now possible to enable automatic background updates that occur quietly in the background whenever new features, bug fixes, or security issues are addressed by our developers. See: Dashboard Comet Cache Pro Config. Options Update Credentials. See also: Issue #827.
- Enhancement (Pro): HTML Compressor + Accelerated Mobile Pages (AMP). Updated to the latest available release of the HTML Compressor (v161208) with improved support for Accelerated Mobile Pages. See: Issue #695. See also: HTML Compressor v161208 changelog.
- Enhancement (Pro): HTML Compressor / AMP Compatibility. Improved compatibility with Accelerated Mobile Pages. There is a new HTML Compressor option that is enabled by default and it makes Comet Cache smart enough to auto-detect and selectively disable portions of the HTML Compressor that are incompatible with the AMP spec; i.e., routines that are not necessary when serving APMd pages. In short, if the URI being compressed ends with
/amp/, or the document contains a top-level<html ⚡>tag (<html amp>is accepted as well), then features which are incompatible with Accelerated Mobile Pages will be disabled accordingly. - Compatibility: Avoid deprecated
wp_get_sites()and useget_sites()instead. See Issue #848. - Documentation: Added Watered-Down Regex documentation notes to the inline documentation (in the software) about the use of
^and$in some places where these special characters are not fully supported. Also adding the same notes to the Watered-Down Regex KB Article. See also: Issue #611.
v161119
- Bug Fix: Avoid browser autocomplete in configuration fields by adding
autocomplete="off"to all form tags in Comet Cache menu pages. See Issue #832. - Bug Fix: Fixed a broken link to the Static CDN Filters tutorial for MaxCDN integration. Props @kristineds. See Issue #842.
- Bug Fix: Multisite installations inside a subdirectory were broken by Apache Optimizations via
.htaccessin some scenarios. Fixed in this release. See Issue #798. - Bug Fix: Don’t enqueue
Chart.jsunnecessarily in lite version of the software. See Issue #830. - Bug Fix: Enhancing WooCommerce integration by listening to the
woocommerce_product_set_stock_statushook in addition to thewoocommerce_product_set_stockhook. See Issue #674. - Bug Fix (Pro): Automatically dismiss any persistent update notifications whenever a new version of the software is recompiled; i.e., don’t continue to show an upgrade notice whenever the software has just been updated by a site owner. See Issue #806.
- Enhancement: This version enhances the HTML comments left in the source code (HTML Debug Notes). When debug notes are enabled (i.e., HTML comments) they are now broken down into key/value pairs and tabulated for a cleaner display and easier debugging. See Issue #790.
- Performance Enhancement: For sites configured to allow query string variables into the cache, those variables are now sorted by key name internally to avoid duplicate cache files; i.e., whenever the order of query string variables changes from request to another, but with the same exact values. In short, Comet Cache now knows how to serve the same underlying cache file; i.e., from a previous request that may have had the same query string, just in a slightly different order. See Issue #639.
- UI Enhancement: The Comet Cache UI is now fully Responsive with an improved UI on laptop and mobile devices. Props @renzms. See Issue #699.
- UI Enhancement: This release improves the toggle link that allows you to see additional details whenever Comet Cache automatically clears more than one facet of the cache. See Issue #837 and Issue #831.
- UI Enhancement (Pro): Following improvements to the update API in a previous release of Comet Cache that made it possible to update both the lite and pro versions of the software through normal WordPress update mechanisms, this release removes some clutter from the menu pages for Comet Cache. In short, now that we have a tighter integration with WordPress core, it’s no longer necessary for Comet Cache to display update notifications in a custom way. See Issue #829.
- UI Enhancement (Pro): On pro version activation, display a notice that reminds site owners to configure their Pro Update Credentials so they’ll be notified by WordPress about new versions of the pro software. See Issue #477.
- New Pro Feature: In the pro version it is now possible to define a list of GET request variable names that should be ignored entirely by Comet Cache. See: Dashboard Comet Cache Plugin Options GET Requests List of GET Variable Names to Ignore. As an example, this new feature makes it possible for site owners to pass query string variables associated with Google Analytics (i.e.,
utm_*variable names) without incurring a cache performance hit. See Issue #639. - Nonce Support (Pro): In the pro version, when logged-in user caching is enabled, Comet Cache is now capable of intelligently caching pages that contain Nonce values (numbers used once). This allows for pages containing the WordPress Admin Bar to be cached without issue. It also improves compatibility with plugins like bbPress and BuddyPress, resulting in better performance and faster speeds for logged-in users. See Issue #793.
- RevSlider Compat.: This release includes a built-in exclusion rule for the HTML Compressor to allow for improved compatibility with the popular RevSlider plugin for WordPress. The new built-in exclusion rule looks for and automatically bypasses an important style tag that must be preserved for the RevSlider plugin to work in all scenarios; i.e.,
<style id='rs-plugin-settings-inline-css'. See Issue #614. - i18n Compat. (Lite): This release makes all pro preview labels translatable by moving the labels that were previously defined in CSS only into HTML attribute values. See Issue #808.
v160917
- New Feature (Lite): The Clear Cache button is now available in the Admin Toolbar for the Lite version of Comet Cache.
- New Feature (Pro): Comet Cache Pro is now fully compatible with WordPress Automatic Background Updates. If you enable automatic background updates for plugins, and you save valid Comet Cache Pro License Credentials in the Comet Cache Pro Plugin Options Update Credentials panel, you will automatically receive Pro plugin updates. Props @jaswsinc. See Issue #289.
- Bug Fix: In some scenarios Comet Cache might produce a false-positive “Warning: mkdir(): File exists” message when checking if the cache directory exists. Comet Cache now calls
clearstatcache()and usesfile_exists()instead ofis_dir()to help make this check more robust. See Issue #786. - Bug Fix: Fixed a bug where the Comet Cache PHP requirements check would fail and produce a fatal error when upgrading from a version of Comet Cache that did not require an extension that is now required by newer releases. This would occur when, for example, the required PHP
mbstringextension was missing. Props @jaswsinc for finding the bug. See Issue #817. - Bug Fix: Fixed a bug where upgrading from v160521 would result in the Client-Side Cache option being reset to the default (disabled). If you enabled the Client-Side Cache at some point, now is a good time to double-check that it’s still enabled. This bug fix also improves the reliability of all version upgrade routines that Comet Cache runs during upgrades. See Issue #807.
- Compatibility / Bug Fix: The automatic Clear Cache routines that cleared the entire cache automatically whenever WordPress Dashboard Settings General was updated, were being too aggressive and not taking into consideration other plugins that might also be using the same
options-general.phpURL. As a result, the entire cache was being unnecessarily cleared when the settings for those other plugins were saved. Props to @futtta from Autoptimize for reporting. See Issue #825. - UI Enhancement: Adjusted option page font styles for WordPress v4.6 to better match existing style. See Issue #271.
- ManageWP Compatibility (Pro): Comet Cache Pro is now compatible with ManageWP, a service that allows remote management of multiple WordPress sites. Comet Cache Pro Plugin Updates will now appear in the ManageWP dashboard and, assuming you have saved valid license credentials in Dashboard Comet Cache Pro Plugin Options Update Credentials, you will be able to upgrade Comet Cache Pro remotely from the ManageWP Dashboard. Props @jaswsinc. See Issue #465.
- InfiniteWP Compatibility (Pro): Comet Cache Pro is now compatible with InfiniteWP, an application that allows you to manage multiple WordPress sites from a single location. Comet Cache Pro Plugin Updates will now appear in the InfiniteWP dashboard and, assuming you have saved valid license credentials in Dashboard Comet Cache Pro Plugin Options Update Credentials, you will be able to upgrade Comet Cache Pro remotely from the InfiniteWP Dashboard. See Issue #394.
- Rewritten Pro Plugin Updater: The Comet Cache Pro Plugin Updater has been redesigned to use the built-in WordPress plugin updater system. When a Comet Cache Pro update is available, it now appears in the WordPress Updates section and in the Plugins list, like other WordPress plugins and can be updated normally like other WordPress plugins, as long as you have saved valid Comet Cache Pro license details in the new “Update Credentials” options panel. Props @jaswsinc. See Issue #272.
- Code Style: The
WP_CACHEline that gets inserted into thewp-config.phpfile to enable caching now follows the WordPress PHP Code Standards. Props @szepeviktor. See Issue #799. - Compatibility (Pro): When the Autoptimize plugin is active, the Comet Cache Pro HTML Compressor panel now shows a friendly notice explaining that both the HTML Compressor and Autoptimize should not be enabled at the same time because they both address the same performance improvements. The rest of Comet Cache works great alongside Autoptimize and whether you use the HTML Compressor or Autoptimize is a matter of preference. Props to @futtta from Autoptimize for the continued collaboration.
v160709
- Bug Fix (Pro): Fixed a bug in the Auto-Cache Engine that was introduced by the previous release (v160706). The bug produced an error whenever the Auto-Cache Engine ran: “PHP Fatal error: Call to undefined method applyWpFilters()”. This had no visible affect on the front-end of the site or in the WordPress Dashboard, but it prevented the Auto-Cache Engine from working behind the scenes. Props @Peter-FB for reporting. See Issue #795.
v160706
- New Feature! Apache Optimizations. This release includes a completely new option panel for Apache Performance Tuning. Current options for Apache tuning include GZIP Compression, Leverage Browser Caching, Enforce Canonical URLs, and Send Access-Control-Allow-Origin Header (for Static CDN Filters). These options automatically add or remove from your
.htaccessfile the appropriate configuration based on the options you enable or disable (all options are disabled by default, so your.htaccessfile is not modified unless you say so). If you prefer to update your.htaccessfile manually, the necessary configuration can be viewed beneath each option. Props @jaswsinc, @renzms. See Issue #789. - New Feature! A new “Enable GZIP Compression” option has been added to the new Apache Optimizations panel. This option will automatically add the appropriate configuration to your
.htaccessfile to enable GZIP compression. This option is disabled by default. The old “GZIP Compression” panel has been removed in favor of the new option inside Apache Optimizations. Props @renzms, @jaswsinc. See Issue #764. - New Feature! Multisite Host Exclusion Patterns. It’s now possible to exclude entire sites from the cache in a Multisite Network environment. Domain mapping is also supported! See Comet Cache Plugin Options Host Exclusion Patterns. If you’re running a Multisite Network with Sub-Directories, you can exclude sites using the existing URI Exclusion Patterns feature. Props @kristineds. See Issue #754.
- New Feature (Pro)! A new “Leverage Browser Caching” option has been added to the new Apache Optimizations panel. This option will automatically add the appropriate configuration to your
.htaccessfile to enable Browser Caching. This option is disabled by default. Props @renzms, @jaswsinc. See Issue #764. - New Feature (Pro)! A new “Enforce Canonical URLs” option has been added to the new Apache Optimizations panel. This options adds the appropriate
.htaccesscode to enforce the correct canonical URLs according to your WordPress Permalink settings (Comet Cache detects if the Permalink Structure ends with a trailing slash, or without a trailing slash). Props @renzms, @jaswsinc. See Issue #554. - Bug Fix: In some scenarios the Cron Event that cleans up expired cache files (
_cron_comet_cache_cleanup) would never run, or the Next Run time would constantly reset to 1 minute away from running every time a page was reloaded. We suspect this is a race condition and in attempt to work around this issue we now skip all of our Cron-related checks if Cron is currently in the middle of running a process. Props @xberg and @lkraav for help reporting. See Issue #653. - Bug Fix: If your site uses aliased domains, Comet Cache now properly considers all possible domain variations when it clears the cache on WP Standard installations. Props @kristineds, @jaswsinc, @yoffe, and @VR51. See Issue #608.
- Bug Fix (Pro): Fixed a bug where Comet Cache would appear to prevent WordPress from redirecting Permalinks that don’t include a trailing slash, to the URL that does include a trailing slash. This was due to the fact that Comet Cache loads very early on (for caching purposes) and as a result the WordPress
redirect_canonical()function never gets run. This was fixed by adding an option to the new Apache Optimizations panel that allows you to Enforce Canonical URLs. Props @renzms, @jaswsinc. See Issue #554. - UX Bug Fix (Pro): If you had your WordPress Dashboard login details saved by your browser, the browser autofill would automatically fill in the Pro Plugin Updater fields with those details, which then needed to be replaced with your actual Pro license details. The browser autofill has been disabled for those fields (tested in Chrome, Firefox, and Safari). Props @renzms. See Issue #741.
- Enhancement: Added links the Options Page for the Comet Cache Twitter and Facebook accounts. Props @renzms. Issue #771.
- Enhancement: Added full support for UTF-8 (multibyte strings). This release adds full support for UTF-8 throughout the Comet Cache codebase, greatly enhancing Comet Cache’s ability to deal with file paths and URLs that may contain UTF-8 characters. Props @jaswsinc. Issue #703.
- UI Enhancements: Improved the Logged-In Users and the Client-Side Caching options panels to dim additional options when the feature is disabled. Additionally, the “Enable HTML Compression for Logged-In Users?” option has been relocated from the HTML Compressor option panel to the more appropriate Logged-In Users option panel. See Issue #768.
- UX Enhancement: Improved the inline docs for Auto-Clear List of Custom URLs to clarify that full URLs must be provided. Props @renzms. See Issue #781.
- Enhancement (Pro): The Pro Plugin Updater has been improved to allow for better compatibility with hosting platforms that use Apache’s ModSecurity. In some cases, site owners were seeing a 404 error when attempting to update the Pro version using the Pro Plugin updater because certain ModSecurity rules were blocking the Pro Updater requests. The Pro Plugin Updater now uses WP Transients to store the necessary metadata, which works around the issue with ModSecurity. Props to @seozones for reporting and @jaswsinc for help fixing this. Issue #416.
- Enhancement (Pro): When Static CDN Filters are enabled, it’s now possible to disable the automatic insertion of rules into your
.htaccessfile that are designed to prevent issues with CORS. See Apache Optimizations Send Access-Control-Allow-Origin Header? See Issue #787. - Enhancement (Pro): The HTML Notes added to the bottom of a cached page now specify if the page was cached as the result of an HTTP Request or if it was cached by the Auto-Cache Engine. Props @kristineds. See Issue #292.
- Enhancement (Pro): The Auto-Cache Engine now supports a fallback to cURL using the WP HTTP API. If your PHP configuration has
allow_fopen_url=0, the Auto-Cache Engine will use the fallback to download the XML Sitemap and parse it from a temporary file. If you want to force the use of this fallback even whenallow_fopen_url=1, you can use a filter. See Issue #440. - UI Enhancement (Pro): A second button has been added to the bottom of the Pro Plugin Updater page that allows you to “Save and Update Comet Cache Pro” in one step. Props @renzms. See Issue #741.
- UI Enhancement (Pro): The “Cache Stats” button in Admin Bar is now linked to the Cache Stats page. Instead of hovering over the button and then clicking “More Info” inside the popup panel, you can now just click the “Cache Stats” button to go directly to the Cache Stats page. Props @Presskopp, @renzms. See Issue #780.
- Comment Mail Compatibility: Improved compatibility with the Comment Mail plugin by automatically clearing the cache whenever Comment Mail options are changed. Many of the Comment Mail options affect front-end portions of the site, so it’s important that the cache is cleared whenever Comment Mail options change. See Comment Mail Issue #278.
- PHP Compatibility: Improved compatibility back to PHP 5.2 (the lowest version allowed by WordPress). Comet Cache still requires PHP 5.4+, but if you install Comet Cache on a site running PHP 5.2, it will now fail gracefully with a Dashboard notice indicating PHP 5.4+ is required, instead of producing a fatal error. See Issue #784.
- WP-CLI Compatibility: Fixed a bug with deactivating Comet Cache using WP-CLI. Doing so was producing a “Invalid argument; host token empty!” error message. This has been resolved. Props @MarioKnight @jaswsinc @renzms. See Issue #728.
- Renamed
COMET_CACHE_ALLOW_BROWSER_CACHEconstant toCOMET_CACHE_ALLOW_CLIENT_SIDE_CACHE. Backwards compatibility has been maintained. - Renamed
allow_browser_cacheplugin option toallow_client_side_cache.
For older changelog history going back more than 7 years, please see CHANGELOG.md.