
Cloudinary – Deliver Images and Videos at Scale Plugin
Boost the performance of your WordPress site by optimizing your images and videos with the Cloudinary WordPress Plugin. WordPress developers, content …
Boost the performance of your WordPress site by optimizing your images and videos with the Cloudinary WordPress Plugin. WordPress developers, content creators, and administrators can efficiently create, manage and deliver images and videos. The plugin scales from individual blogs to enterprise sites that deliver hundreds of thousands of images and videos and that need to be accessed across a variety of devices.
What can Cloudinary do for you?
- Automatically optimize and transform all your new and existing images and videos through best-in-class algorithms that improve site performance and SEO rankings. Check out some examples!
- Rapidly edit assets, via AI, that deepen engagement through capabilities such as smart cropping, thumbnail generation, automated transcoding, and more.
- Deliver dynamically created responsive images across various devices and different resolutions.
- Utilize lazy loading and customizable placeholders to load images that are viewed by your users.
- Support both headless and UI-based WordPress deployments, maintaining flexibility in website development.
- Maintain compatibility with popular page builders.
- Provide end-to-end support for the WooCommerce plugin.
- Stream videos using the Cloudinary Video Player, featuring advanced capabilities to enhance user engagement.
- Present a responsive and interactive Product Gallery for creating captivating visual experiences.
About
Cloudinary’s award-winning plugin makes automating your image and video workflows easy, offering a variety of features. Supporting nearly two million developers and over 10,000 customers, Cloudinary enables companies to manage, transform, optimize and deliver image and video assets. The Cloudinary Plugin supports all these capabilities, providing users with a true plug-and-play solution. Getting started takes only minutes using the intuitive onboarding wizard.
Learn more about the plugin with the Cloudinary Academy – Introduction to Cloudinary for WordPress Administrators
After deployment, users can access a dashboard that provides insights into optimization metrics and data usage. The Cloudinary Plugin is based on an architecture that supports any type of site including business, enterprise and personal.
Optimize your site performance and user experience by achieving faster page load times and implementing advanced auto-responsive delivery. This not only improves your Google page rankings but also enhances Core Web Vitals, and Lighthouse scores. By leveraging features such as video and image optimization, advanced responsive design, customizable lazy loading, and built-in CDN support, you can publish content faster while consistently delivering engaging user experiences. The Plugin supports both headless and UI-based development models, and allows you to customize development and extend functionality with the Cloudinary Plugin actions and filters. Moreover, you can create engaging visual experiences with automated quality and encoding settings, video and image resizing and cropping via AI, comprehensive transformations and effects, and seamless delivery to any device in any resolution or pixel density.
Getting Started
To use the Cloudinary Plugin and all the functionality that comes with it, you will need to have a Cloudinary Account. If you don’t have an account yet, sign up now for a free Cloudinary Programmable Media account. You’ll start with generous usage limits and when your requirements grow, you can easily upgrade to a plan that best fits your needs. Upon account creation you can plug in your account credentials and customize your configurations as desired. That’s it.
About Cloudinary
Read more about Cloudinary:
Installation
Install from within WordPress
- Visit the plugins page within your dashboard and select
Add New. - Search for
Cloudinary. - Select
Cloudinary – Image and Video Optimization, Manipulation, and Deliveryfrom the list. - Activate
Cloudinaryfrom your Plugins page. - Go to
Setting upbelow.
Install Cloudinary manually
- Upload the
Cloudinaryfolder to the /wp-content/plugins/ directory. - Activate the
Cloudinaryplugin through thePluginsmenu in WordPress. - Go to
Setting upbelow.
Setting up
- Once the plugin is activated, go to the
Cloudinarysettings. - You’ll be prompted to
Add your Cloudinary URL. - Enter your
Cloudinary environment variable URL, the format should becloudinary://{API_Key}:{API_Secret}@{Cloud_Name}and can be found in theAccount Detailssection of theCloudinary Console Dashboard, then click save. - After saving, additional settings tabs will be available.
Note
If you have two factor authentication configured for your account, you will need to open the Cloudinary Console and login before you can use the Cloudinary plugin.
Your site is now setup to start using Cloudinary.
Screenshots

Streamline your creative workflow
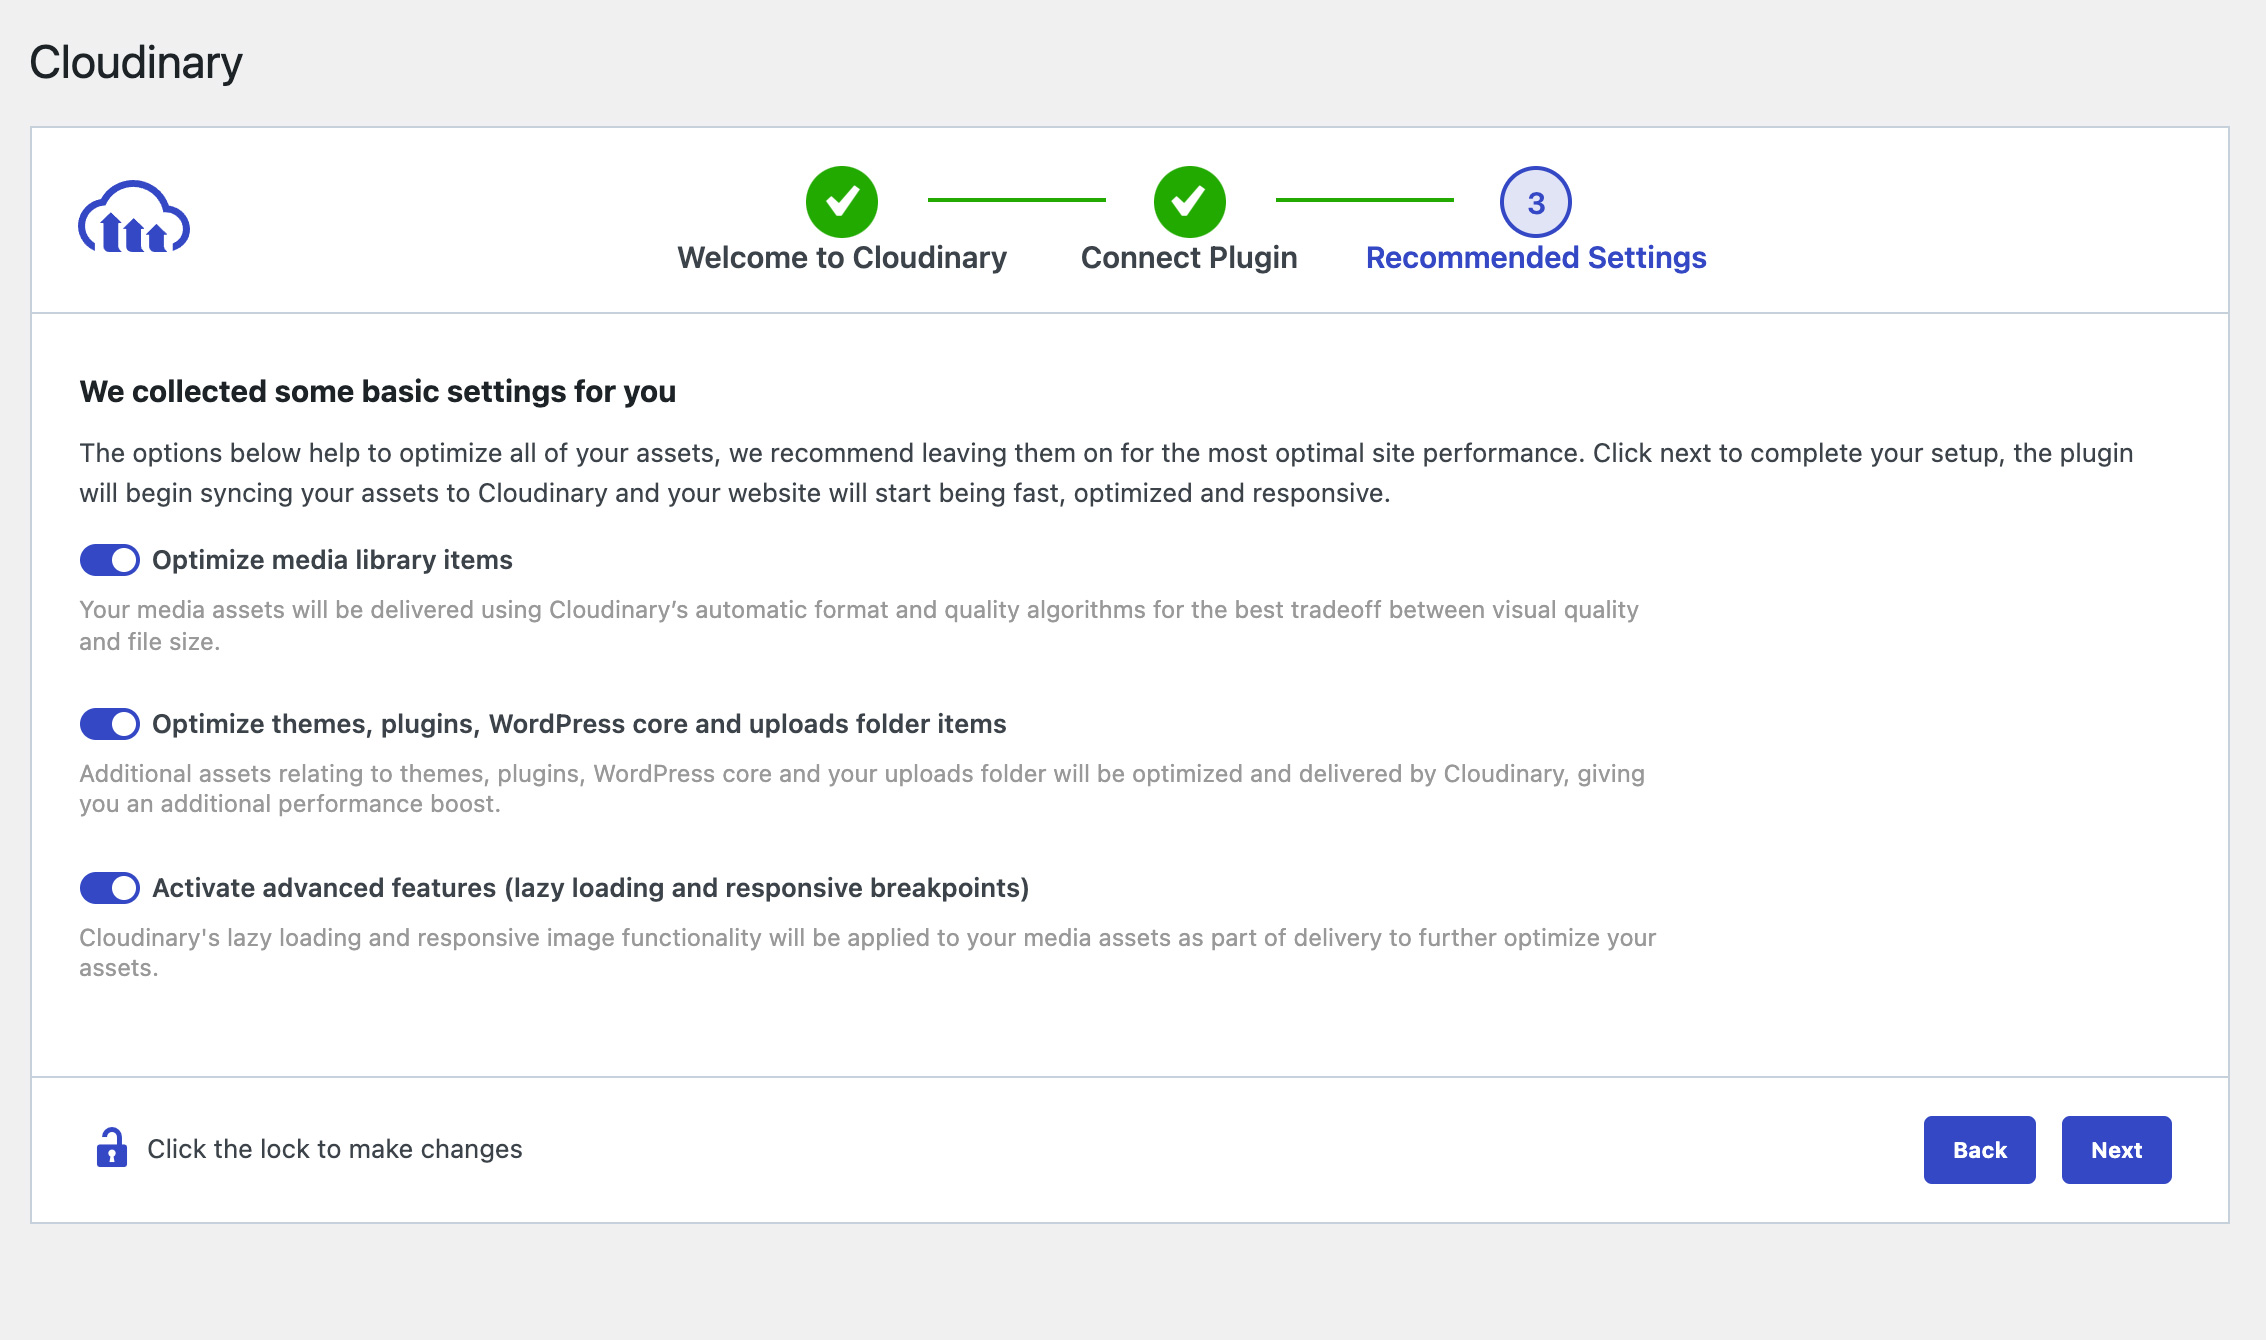
Optimize your site in a two-step wizard
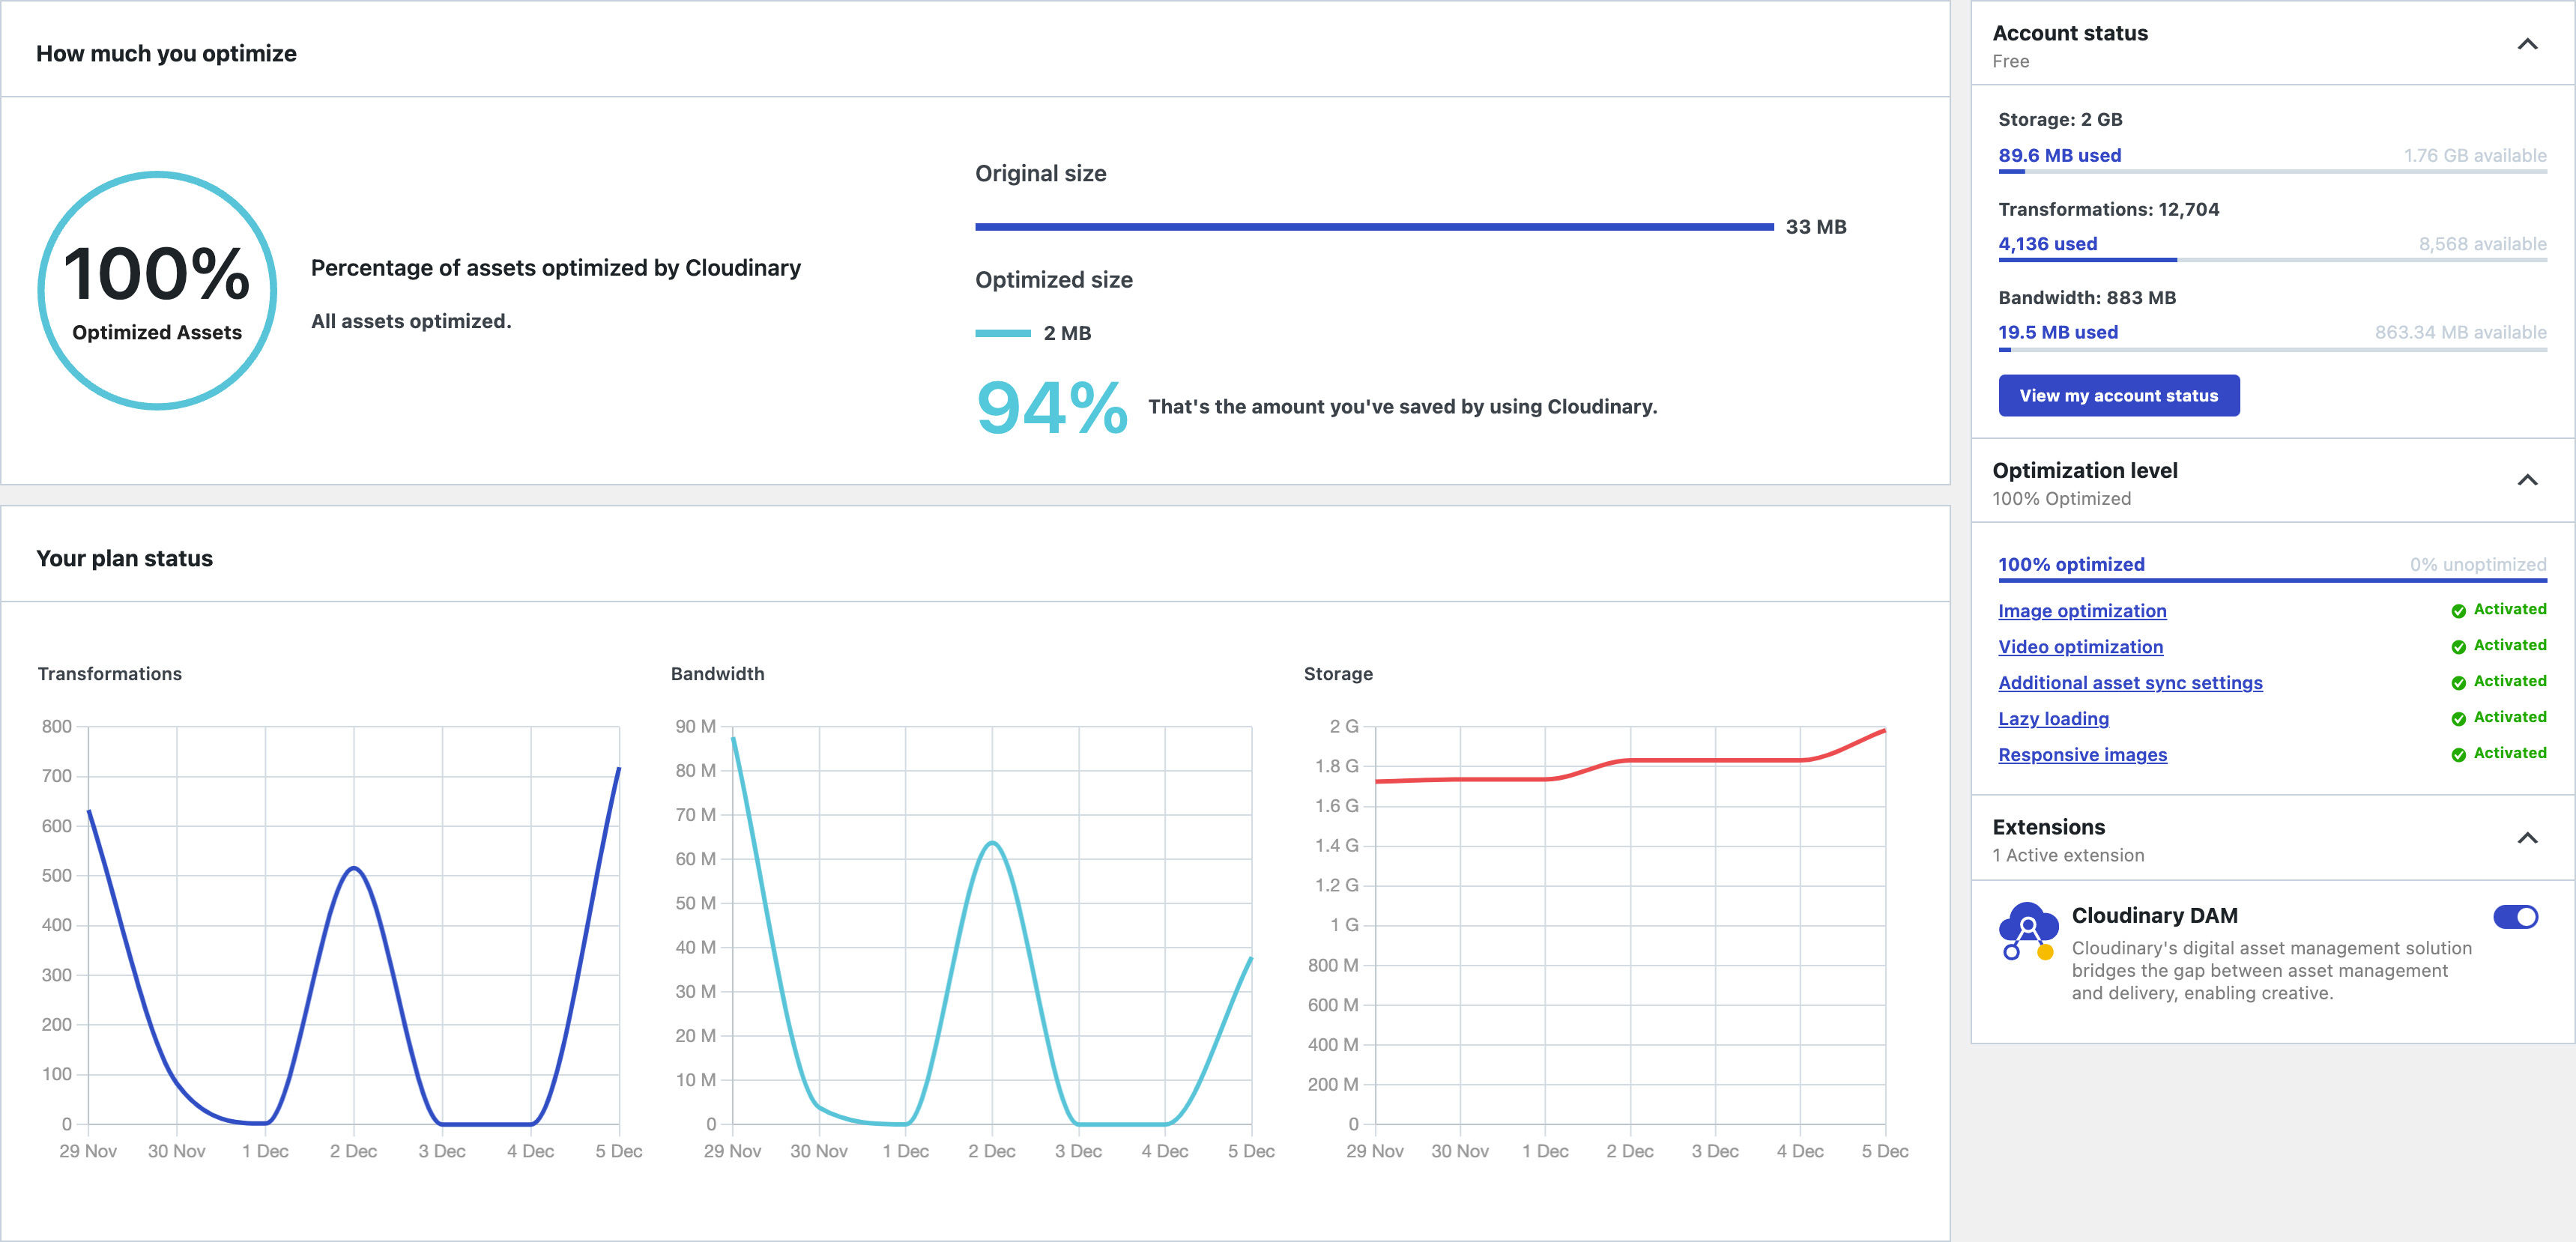
Gain insight into how your assets are performing
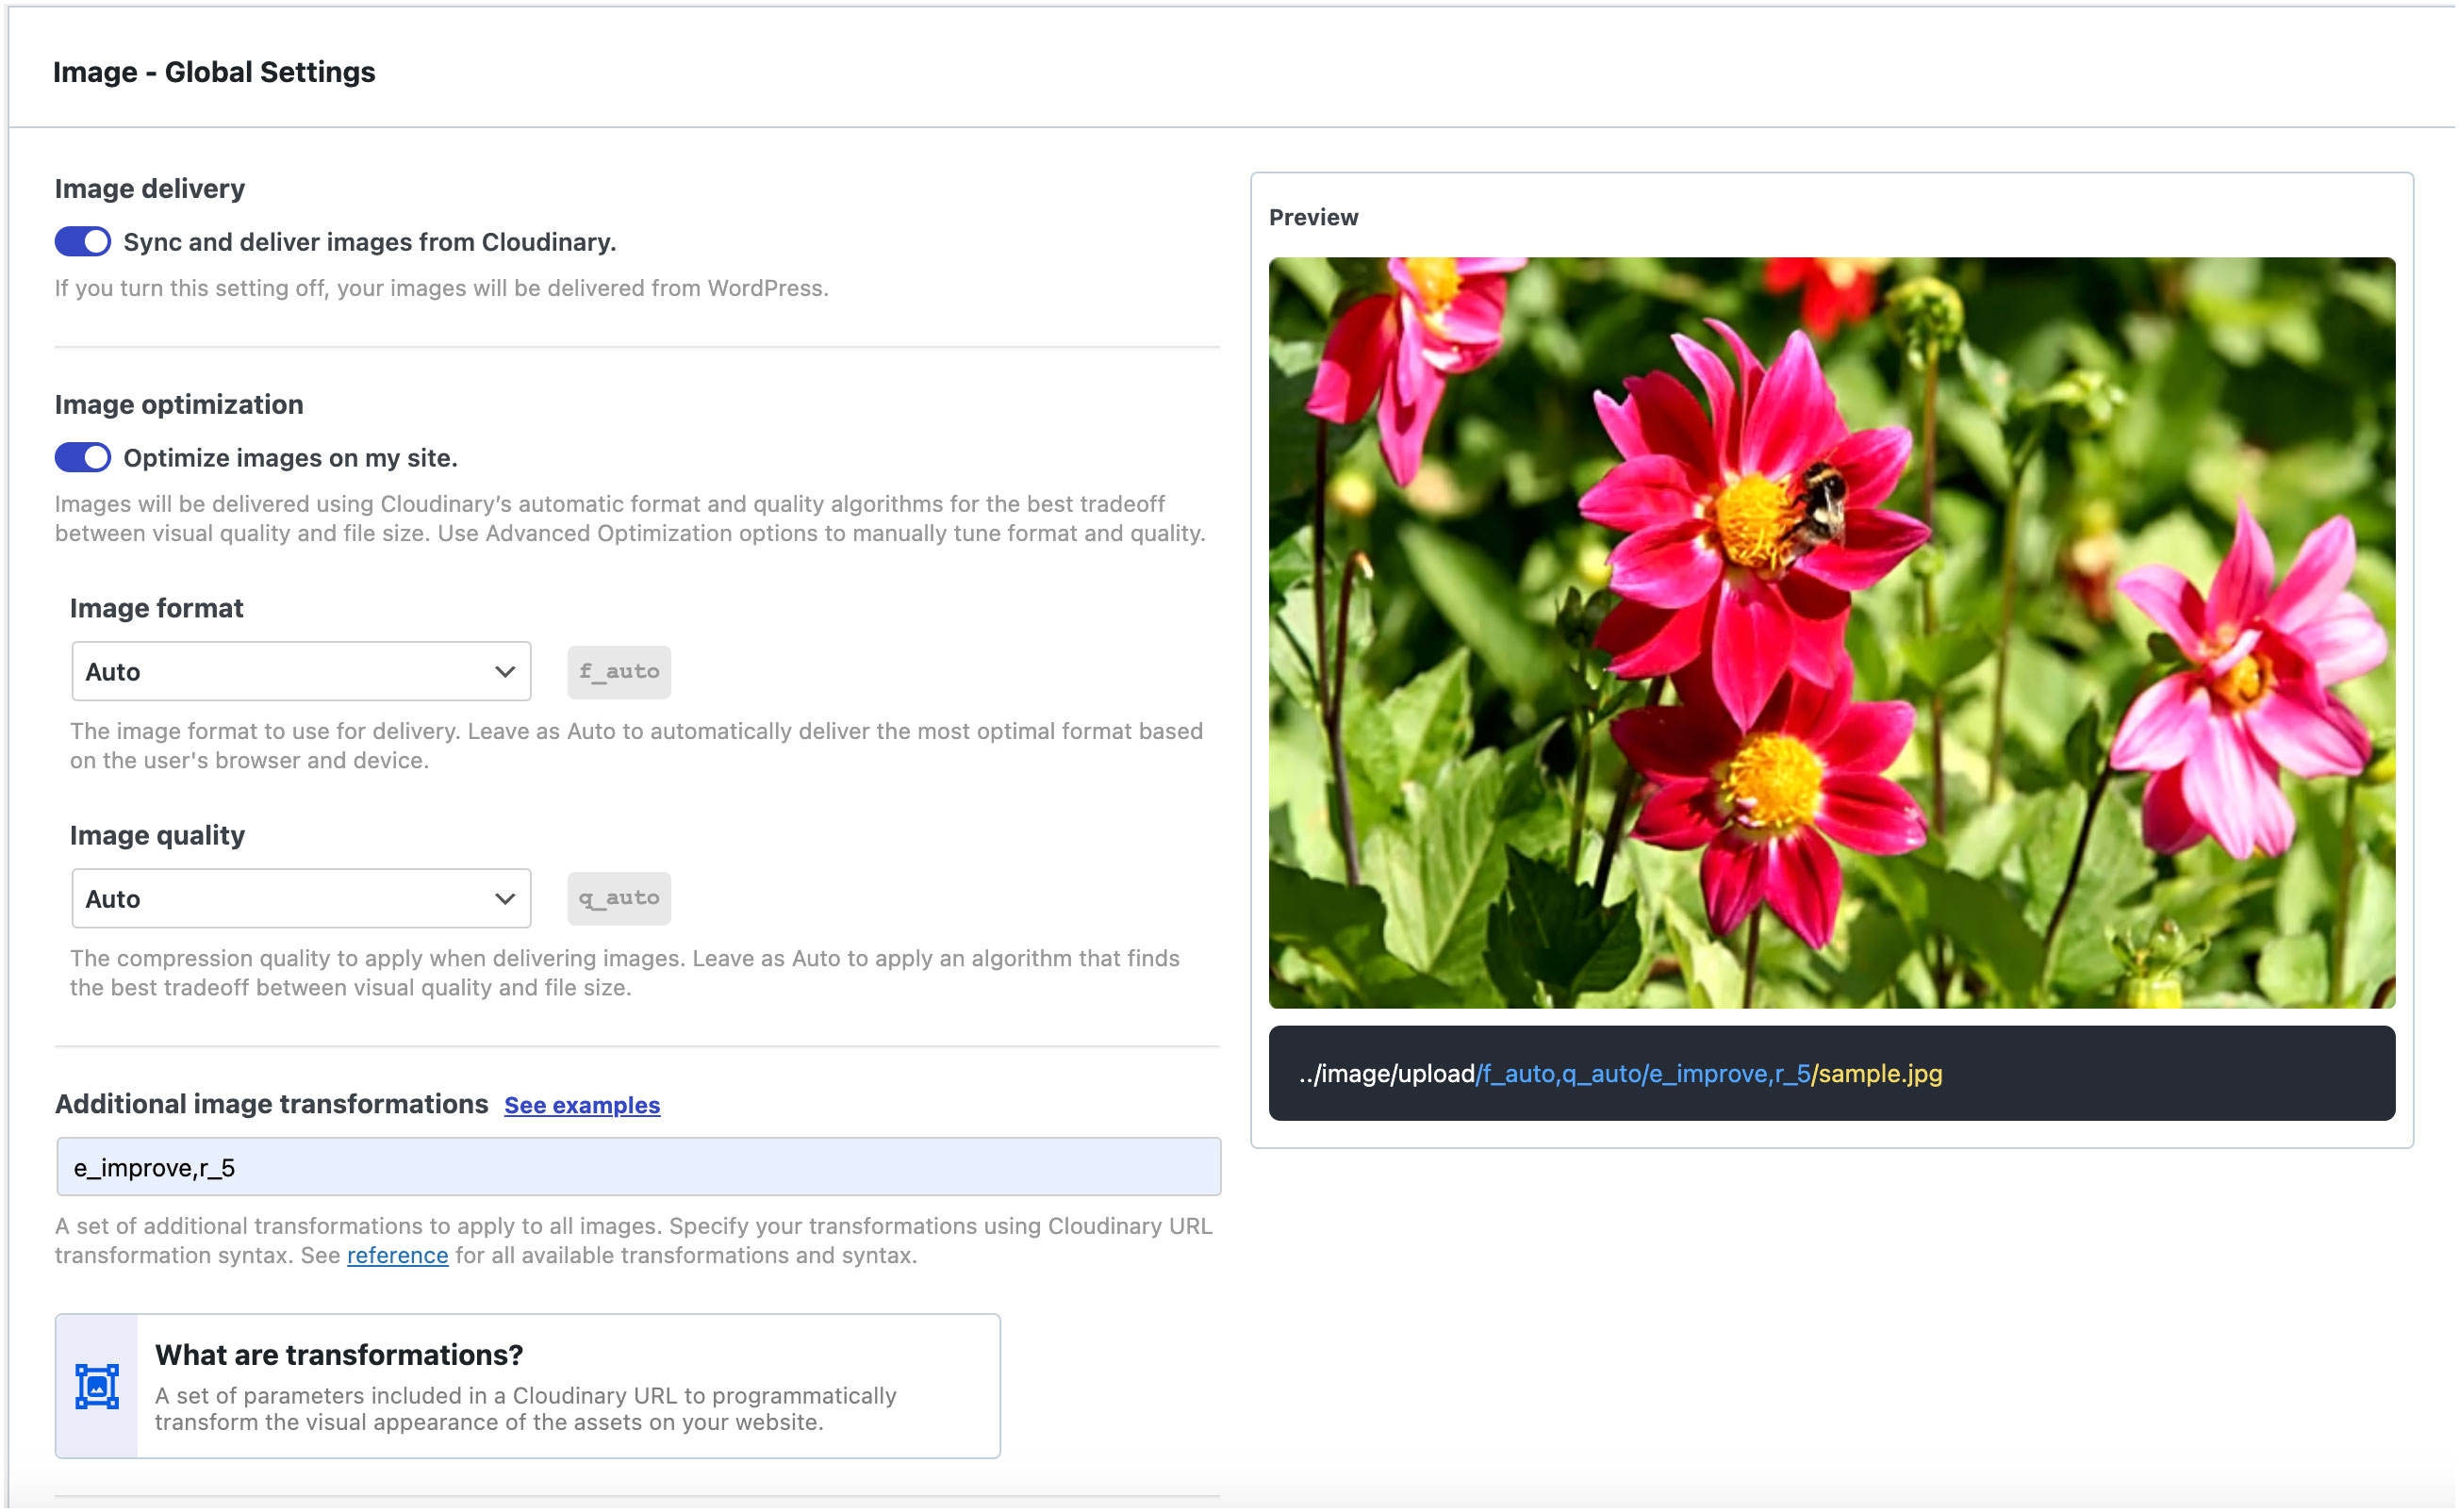
Global Image Transformation settings
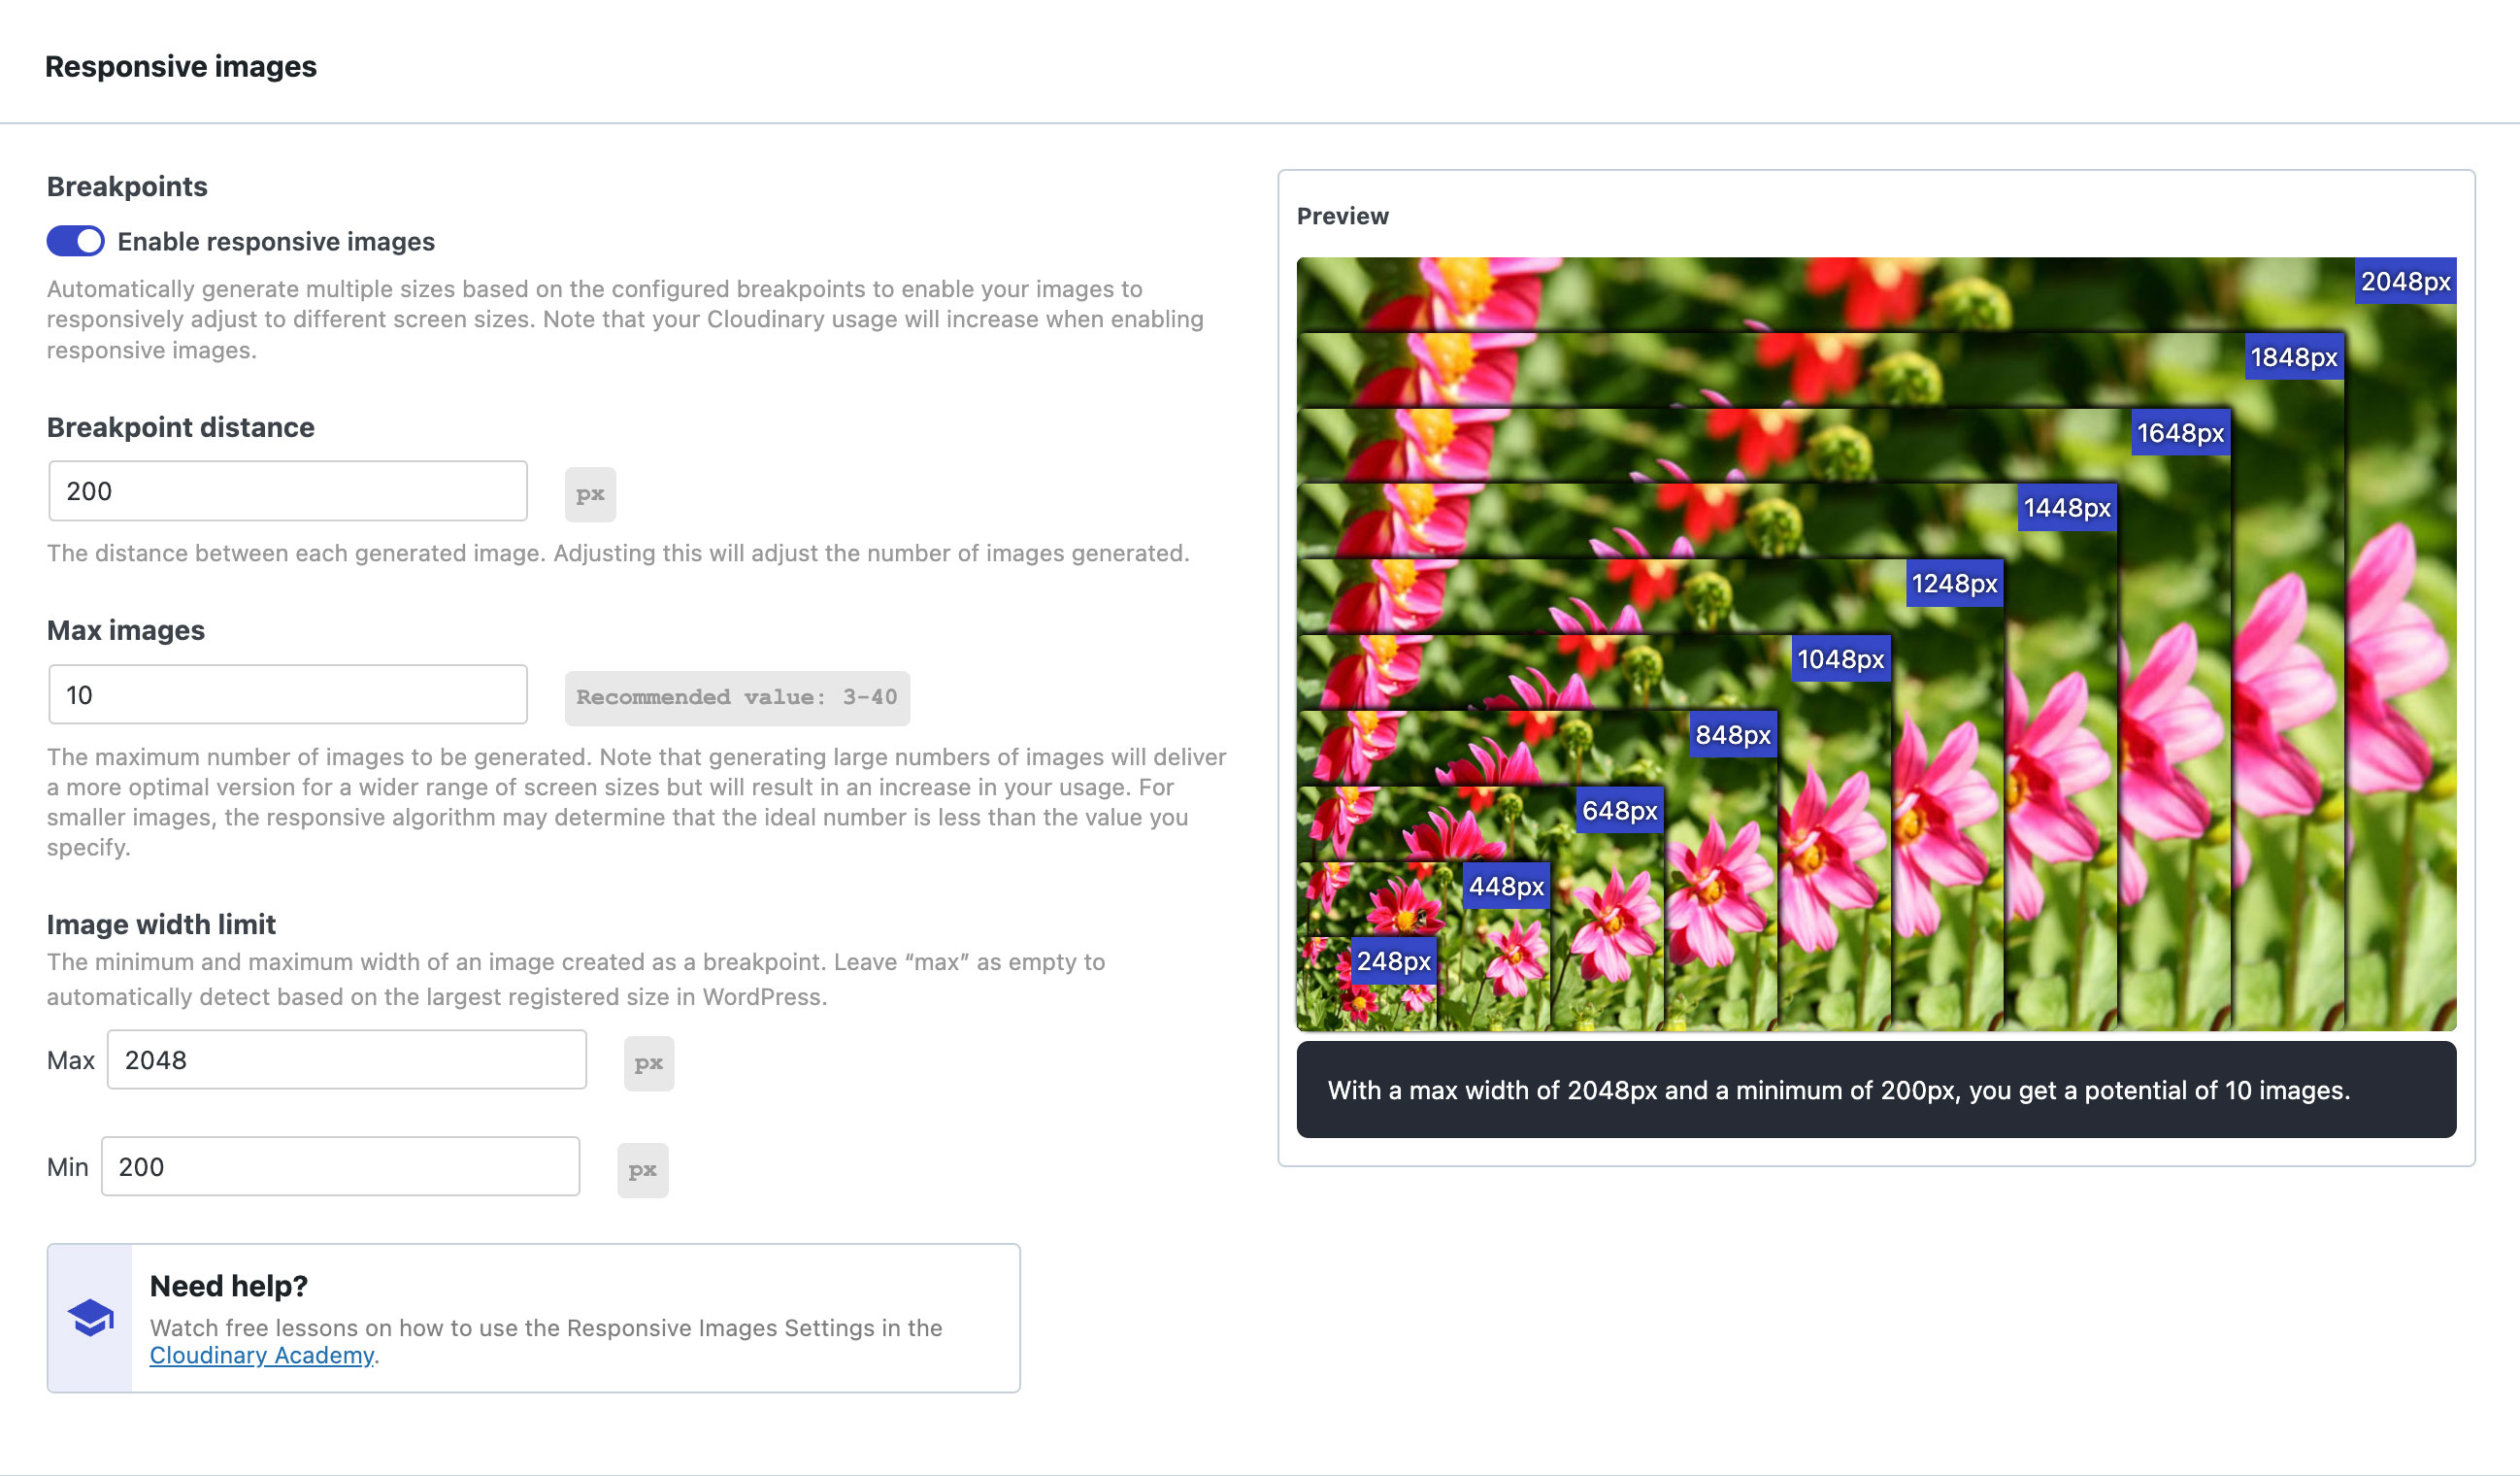
Automatically deliver Responsive Images

Improve web performance with Lazy Loading assets

Cloudinary video player settings

Display assets in a customizable and responsive product gallery
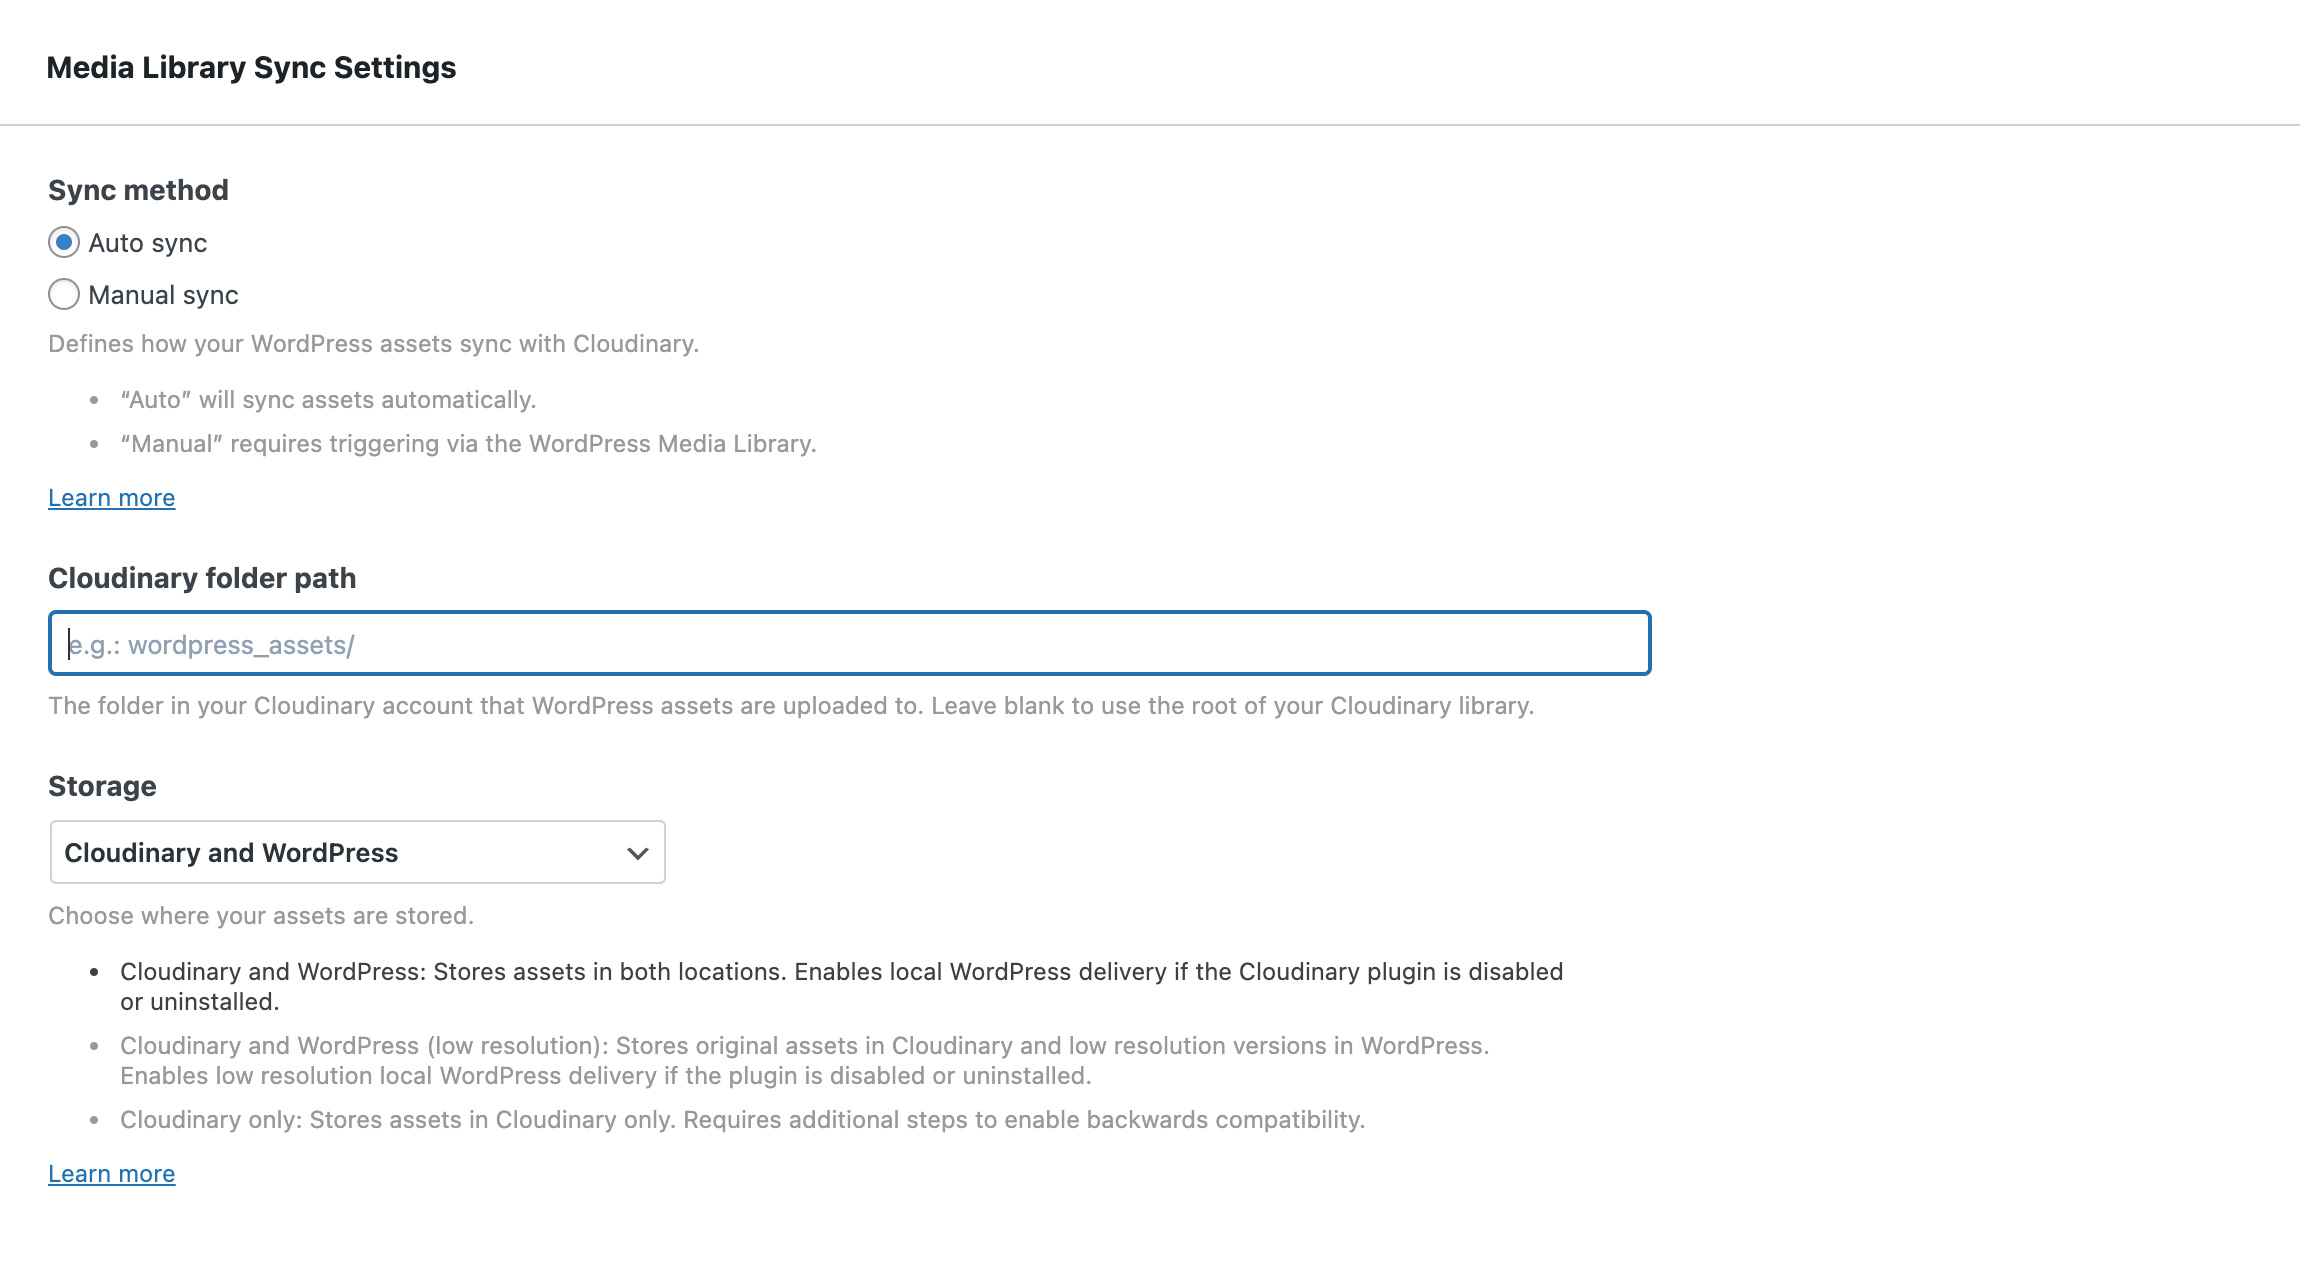
Folder and Syncing Settings

Need help? We’ve got you covered
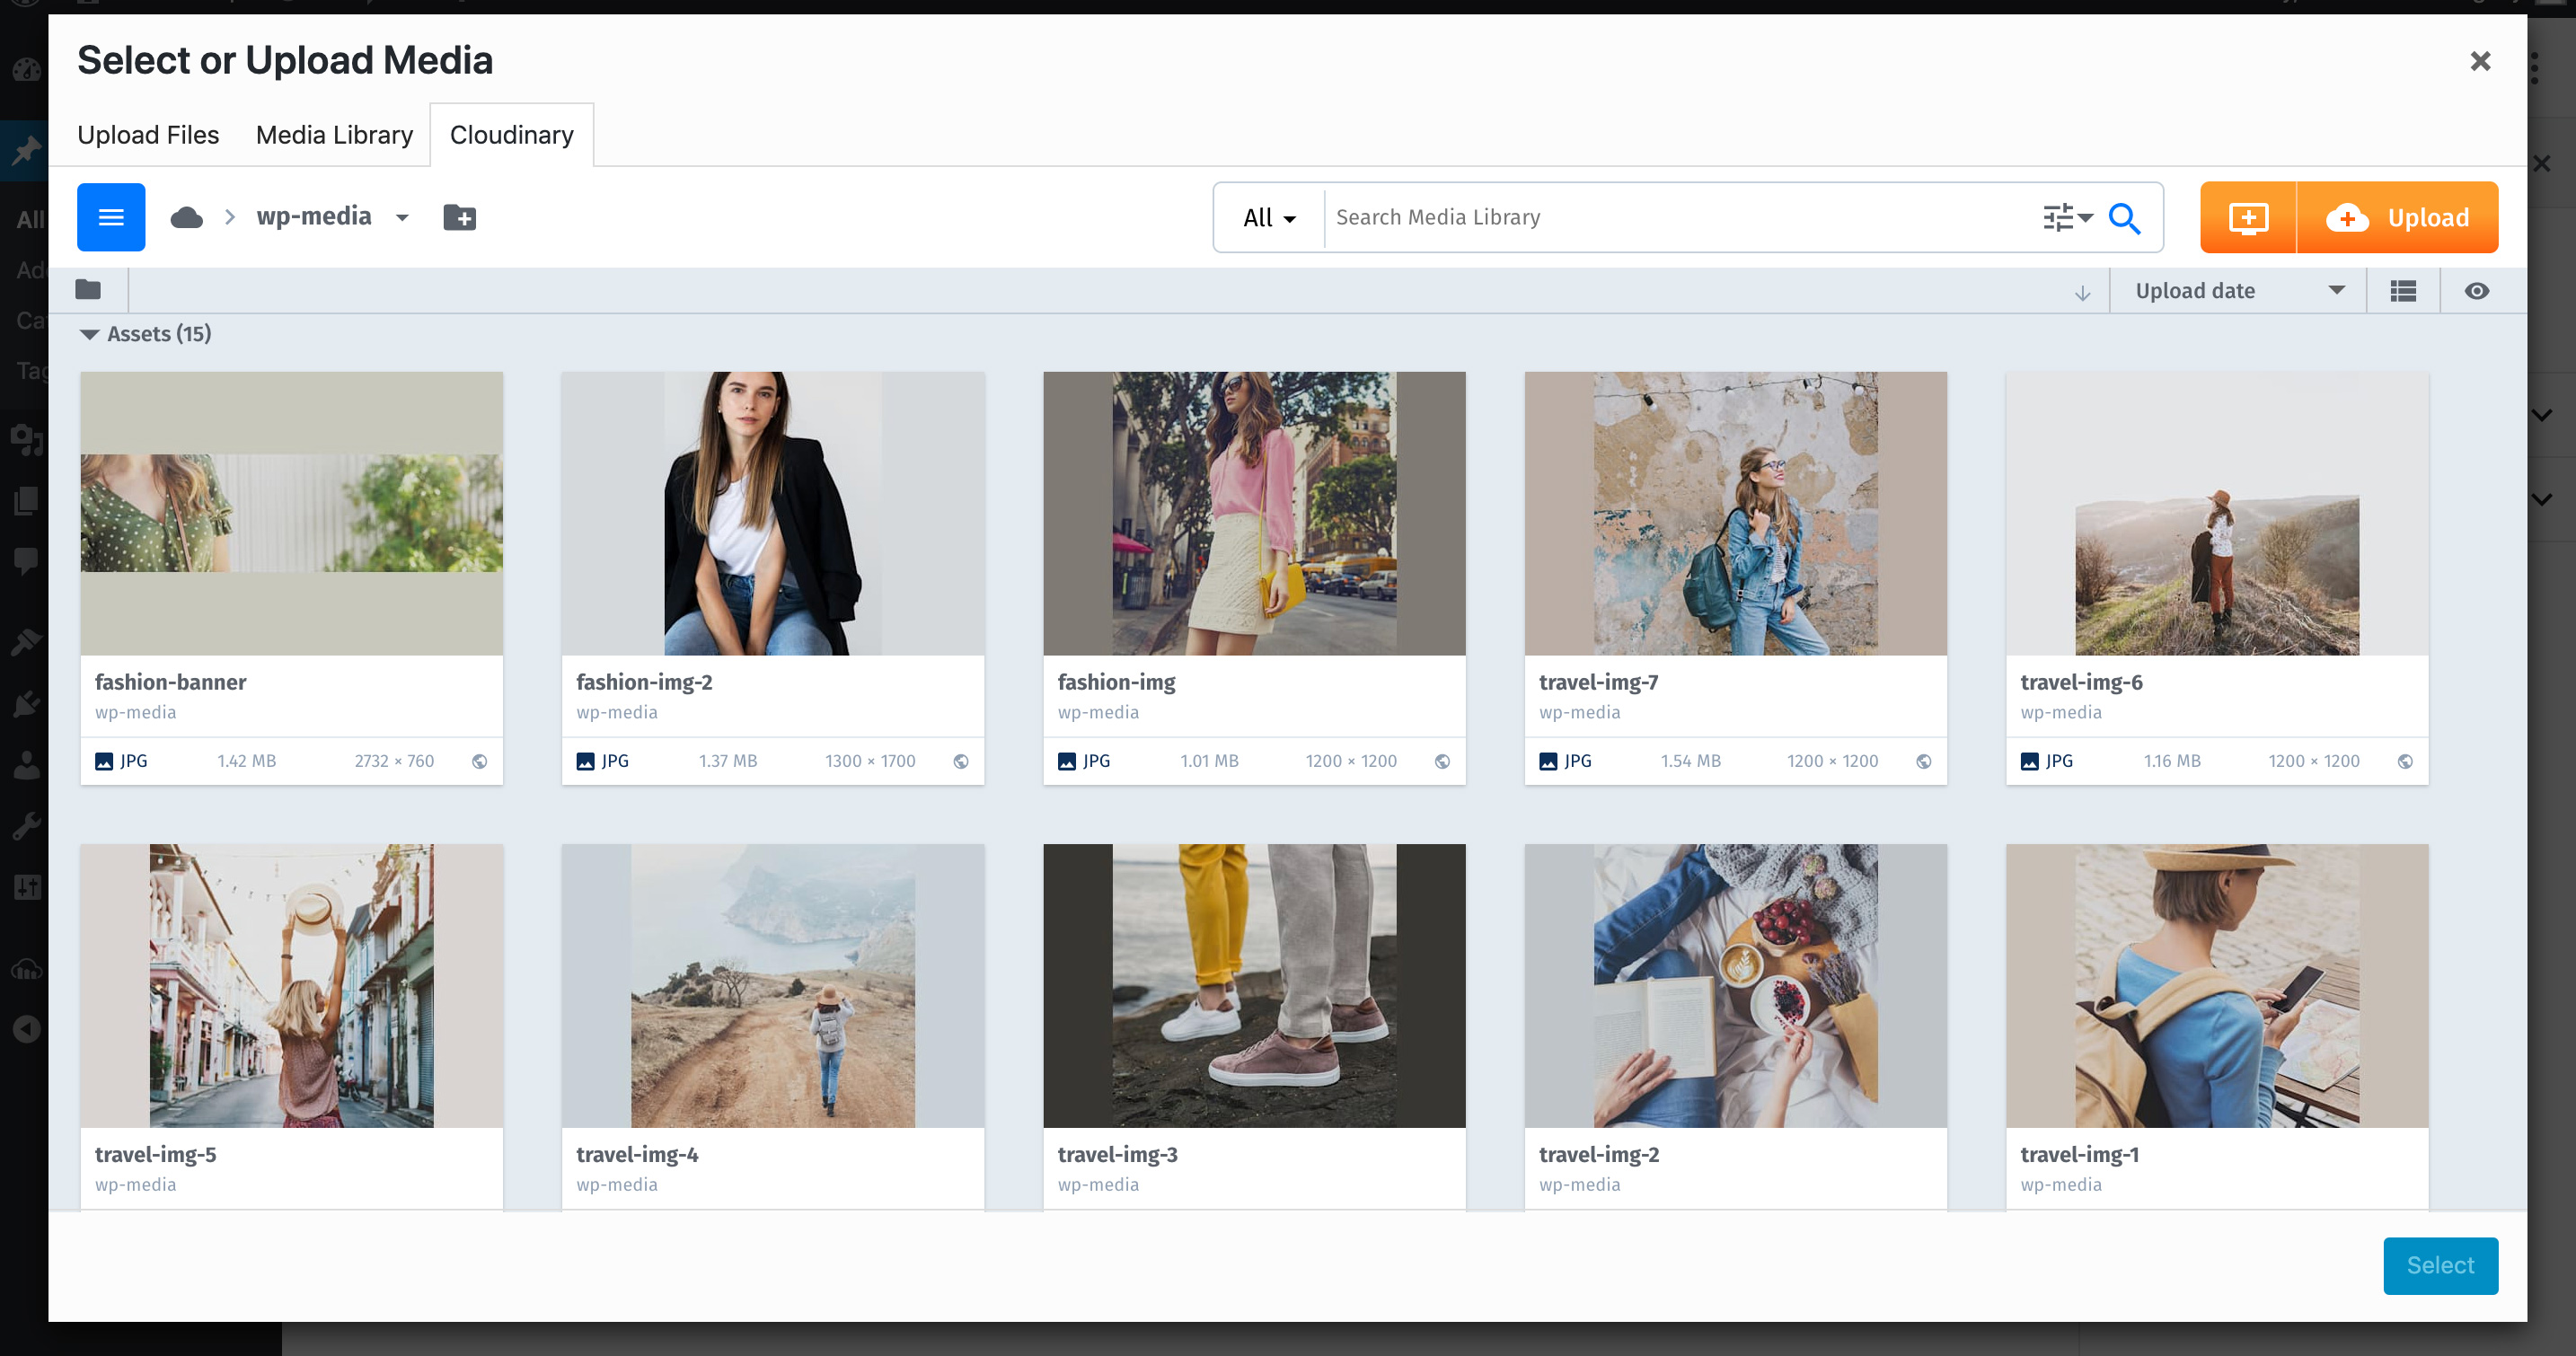
DAM-Powered Media Library

Configure your assets to be automatically optimized out-of-the-box
FAQ
To use the Cloudinary plugin and all the functionality that comes with it, you will need to have a Cloudinary Account. If you don’t have an account yet, sign up now for a free Cloudinary Programmable Media account. You’ll start with generous usage limits and when your requirements grow, you can easily upgrade to a plan that best fits your needs.
If you left all the settings as default, all your current media will begin syncing with Cloudinary. Once syncing is complete, your media will be optimized and delivered using Cloudinary URLs and you should begin seeing improvements in performance across your site.
Most common media files are supported for optimization and delivery by Cloudinary. For free accounts, you will not be able to deliver PDF or ZIP files by default for security reasons. If this is a requirement, please contact our support team who can help activate this for you.
To deliver additional file types via Cloudinary, you can extend the functionality of the plugin using the actions and filters the plugin exposes for developers
To function correctly, the Cloudinary plugin requires an active WordPress REST API connection. Ensure your WordPress setup, including multisite or headless configurations, has the REST API enabled and active for seamless plugin operation.
For more information, see WordPress’s REST API Handbook.
We’re compatible with most other plugins so we expect it to work absolutely fine. If you do have any issues, please contact our support team who will help resolve your issue.
Yes, the Cloudinary plugin has full support for WooCommerce. We also have additional functionality that allows you to add a fully optimized Product Gallery.
Your images may be loading locally for a number of reasons:
- The asset has been selected to be delivered from WordPress. You can update this for each asset via the WordPress Media Library.
- Your asset is stored outside of your WordPress storage.
- The asset is not properly synced with Cloudinary. You can find the sync status of your assets in the WordPress Media Library.
The Cloudinary lazy loading scripts must be loaded in the page head. Ensure your site or any 3rd party plugins are not setup to move these scripts.
Changelog
3.1.8 (25 March 2024)
Fixes and Improvements:
- Added the Cloudinary for WordPress Administrators course as part of the plugin need help section
- Added individual “Need Help? Watch Lessons Here!” call-outs at the top of every section as a tool tip, pointing to specific lessons where that section is covered
- Updated the FAQ section
- Upgraded the Cloudinary Video Player to v1.11.1
- Fixed Cloudinary\tmpfile() undefined error log when importing assets from Cloudinary
- Fixed md5() method deprecation warning in PHP 8.2
3.1.7 (21 February 2024)
Fixes and Improvements:
- Upgraded the Cloudinary Video Player to v1.10.1
- Added support for video analytics
- Fixed
Uncaught Error: Call to undefined method Cloudinary\Delivery::clean_url()error message - Fixed individual transformations lost when upgrading the plugin version
3.1.6 (17 JANUARY 2024)
Fixes and Improvements:
- Added support for video adaptive bitrate streaming protocols, HLS and MPEG-DASH
- Implemented eagerly generating transformations for auto_formats to ensure faster delivery for both images and videos
- Enable the Cloudinary video player when using a video URL in the video block
- Fixed syncing and delivery of SVG files to Cloudinary
- Resolved the issue of failure in fetching local data as it should appear on the plugin dashboard
- Fixed a missing comma in the
sizesattribute - Fixed the problem of extra query calls when no frontend URLs are detected
- Fixed the extension being removed while using f_auto for video delivery
- Resolved the issue of pushing staging assets to production, resulting in a full resync of the assets
- Fixed invalid data in the additional settings block when editing the Cloudinary product gallery widget
- Added a filter for extending eagerly generating transformations formats –
cloudinary_upload_eager_formats - Added a filter for supporting different headless frontend domain –
cloudinary_delivery_searchable_url - Added a filter for supporting different content URLs –
cloudinary_content_url
3.1.5 (11 OCTOBER 2023)
Fixes and Improvements:
- Added a filter for allowing RAW URLs for images –
cloudinary_bypass_seo_url - Added a filter for better control of the SEO URL –
cloudinary_seo_public_id - Fixed Cloudinary gallery compatibility issue with WooCommerce v7.8 and up
- Fixed the double extension on RAW files
3.1.4 (23 AUGUST 2023)
Fixes and Improvements:
- Fixed PHP warnings related to version 8.X
3.1.3 (19 JUNE 2023)
Fixes and Improvements:
- Added filters to allow extended metadata sync from Cloudinary to WordPress
- Added a filter to extend the limit of imported assets in a bulk from Cloudinary to WordPress
- Added a beta feature by the use of filters in order change the Crop and Gravity controls
- Fixed plan status in the Cloudinary dashboard page
- Fixed saving the taxonomy transformations
3.1.2 (29 MARCH 2023)
Fixes and Improvements:
- Fixed support for special characters as (^) causing a broken thumbnail
- Fixed Cloudinary URLs for all non-media library assets
- Fixed PHP error caused by transformations on unsupported file types
3.1.1 (06 MARCH 2023)
Fixes and Improvements:
- Fixed the Add transformation on the media library for newly added assets
- Fixed PHP warning in error log after upgrading to PHP 8/8.X
3.1 (22 FEBRUARY 2023)
Fixes and Improvements:
- Added proactive mechanism that improves the support of synced assets using a cron job
- Improved the very first initialisation of the setup wizard
- Fixed the warning message when adding multi page PDFs
- Fixed the Cloudinary status from the WP admin bar
- Fixed the DivisionByZeroError Fatal error message
3.0.9 (25 OCTOBER 2022)
Fixes and Improvements:
- Added support to bypass lazy-loading above-the-fold
- Added flag to easily spot synced/un-synced assets via Media endpoint on REST API
- Improved SVG support
- Improved compatibility with older versions of WordPress
- Fixed a post featured image Lazy-load conflict error
- Fixed Fetched URLs being switched to URL of unsyncable/broken assets
- Fixed taxonomy term ordering
- Fixed deprecated warnings on PHP 8.1
3.0.8 (13 SEPTEMBER 2022)
Fixes and Improvements:
- Added filters for capabilities checks
- Fixed WebP being converted to gif when pulling assets from Cloudinary
- Fixed Conflict with WP Rest API Cache where the plugin is ignoring Cloudinary URL
- Fixed Lazy Loading breaks loading of images rendered from the headless source – WPGraphQL
- Fixed PHPCompatibiltyWP missing from PHPCS config file
- Improved PHP 8.X plugin compatibility
- Improved Front-end JS compatibility issues originating from other media-related plugins
- Improved Lazy Loading and general sliders compatibility issues
3.0.7 (01 August 2022)
Fixes and Improvements:
- Fixed issue of transformations being lost while pulling an asset from Cloudinary
3.0.6 (25 July 2022)
Fixes and Improvements:
- Fixed PHP Illegal string offset warning
- Fixed Uncaught Error: Call to undefined function Cloudinary\Media\get_current_screen()
- Fixed[WPGraphQL] Inconsistent media URLs in response
- Fixed the alt-text on the initial import from Cloudinary
- Improved Product gallery widget color palette compatibility with various themes
- Moved asset transformations to relationship table
- Added Support for upload_prefix in URLs
- Updated the plugin deactivation screen
3.0.5 (29 June 2022)
Fixes and Improvements:
- Add support for Cloudinary Dynamic Folders mode
- Fixed Elementor compatibility issue – We’re sorry about that!
- Fixed UTF-8 in Portuguese using Elementor
- Fixed ACF encoding issue
3.0.4 (31 May 2022)
Fixes and Improvements:
- Added an Overwrite Global Transformations checkbox on Add media modal, making it compatible with most page builders;
- Image breakpoints page is now called Responsive images
- Improved the location for DPR settings now under the Lazy Loading section
- Improved the location for SVG settings now under the Additional image transformations field
- Improved the UX when adding a domain for External Asset Sync Settings
- Fixed Multisite environment PHP warning when plugin network activated
- Fixed calling wp_calculate_image_srcset() in a multisite environment breaking the srcset
- Fixed issue with get_the_post_thumbnail_url()
- Fixed assets URLs stored on metadata
- Fixed rendering responsive Cloudinary images by attachment id with cld_params on top of the global transformations
- Fixed duplicate transformations and cld_params applied to URLs
- Fixed images loaded via AJAX missing lazy-loading/responsive features
- Fixed warning message when an image is deleted from the WordPress Media Library but still referenced in a Product Gallery Widget block
- Fixed wp_get_attachment_*() functions returning the local path
- Fixed header URLs not being replaced
- Fixed issue with responsive Images when size-* class is not added
- Fixed Cloudinary video player not working on CNAME cloud accounts
3.0.3 (26 April 2022)
Fixes and Improvements:
- Updated Cloudinary video player to v1.9.0
- Added a new filter for Unsynced assets in WordPress Media Library
- Updated WP-CLI with
--verboseand--exportflags - Updated the Wizard screen with the new Cloudinary developer dashboard
- Added an i=AA param at the end of a URL when using Cloudinary video player
- Image nodes is now returning a Cloudinary URL when querying with WPGraphQL
- Fixed error on a server running PHP 8.1.1
- Fixed WooCommerce blurred images
- Fixed referencing Cloudinary images after deleting plugin while using Divi theme
- Fixed inconsistencies with headers and cover images aspect ratios
- Fixed Media Library error when adding attributes product images via ACF + WooCommerce
- Fixed Cloudinary video player fails to work on CNAME based cloud accounts
3.0.2 (08 March 2022)
Fixes and Improvements:
- Improved system report error handling
- Fixed compatibility issue with the FooGallery plugin
- Fixed video dimensions attributes for imported video assets
- Fixed the
CLDBind not definederror message - Fixed WooCommerce gallery links
- Fixed support for images with double extensions
- Added support for the Brizy page builder
- Added support for Querying raw HTML content with WPGraphQL – content only
- Better handling UTF-8 characters
3.0.1 (18 January 2022)
Fixes and Improvements:
- Added SVG support (beta)
- Improved custom HTML for Featured images
- Fixed extra request handling on faulty ‘srcset’
- Improved how the plugin handles image cropping functionality
- Fixed the URL where in some cases the delivery URL was wrong
- Fixed db errors related to wp_cloudinary_relationships table
- Fixed “Uncaught TypeError: Cannot read properties of undefined (reading ‘length’)” error
- Fixed System report missing data
3.0.0 (06 December 2021)
Release of a new major version of the plugin
- Entire new look and feel
- New set-up wizard for a quick and simple configuration
- New Dashboard displaying the optimization level of your site’s assets
- New improved section of the dashboard displaying your Cloudinary’s plan details
- New levels of optimization settings across the plugin screens
- New asset sync settings which allows to sync additional media files such as themes & plugins
- New External Asset Sync settings from specific external sources with Cloudinary
- Cloudinary DAM as a new extension of the plugin
- New lazy loading controls with built in simulation!
- Added a preview to the Responsive images settings which now includes new DPR control
- Granular control of asset transformations within the WordPress media library
- New Cloudinary status as an extra information overlay on the frontend – images only
- Brand new Help Centre screen
2.7.7 (11 October 2021)
Fixes and Improvements:
- General improvement of the Cloudinary only storage
- Improved the compatibility with future Gutenberg versions
- Introduced filter support for external domains assets upload
- Moved Cloudinary logs to it’s own meta key
- Fixed the explicit delivery image file format
- Fixed the grid view thumbnail sizes on WordPress media library
2.7.6 (16 August 2021)
Fixes and Improvements:
- Added context to Cloudinary scripts to prevent conflict with other plugins
- Fixed raw files delivery duplicating the file extension
- Fixed typo when upgrading from v1 to v2 of the plugin
- Fixed Cloudinary Only storage where image pulled from Cloudinary are saved locally
2.7.5 (20 July 2021)
Fixes and Improvements:
- Decoupling Cloudinary metadata from attachment metadata
- Fixed the duplicated suffix when re-syncing assets to Cloudinary
- Added a query parameter to the requested URL’s
2.7.4 (23 June 2021)
Fixes and Improvements:
- Improved the re-sync asset mechanism speed
- Fixed compatibility issue with WP Webhooks plugin
- Fixed invalid transformation message on the preview screen
- Fixed the ordering of scaled transformations
- Fixed legacy core compatibility issue on WP version prior to 5.3
- Fixed the override the transformation of featured image
- Fixed the system report which now includes Cloudinary’s configurations
2.7.3 (26 May 2021)
Fixes and Improvements:
- Added support for setting the connection string as a constant
- Fixed the asset suffix being duplicated in the metadata while asset is syncing
- Fixed the default meta key on get_post_meta
- Fixed the display of the “Uninitialized string offset: 0” notice
2.7.2 (11 May 2021)
Fixes and Improvements:
- Fixed overriding files with the same name
2.7.1 (20 Apr 2021)
Fixes and Improvements:
- Fixed support for syncing assets’ caption metadata
- Added system report to the deactivation form
- Product gallery scripts are now loaded only when needed
- Fixed manual sync of a single asset
- Fixed issues related to “Cloudinary only storage” option
- Fixed delivery of fetched/other special image types from Cloudinary
- Fixed an error when using the “Twenty Twenty” theme
2.7.0 (15 Mar 2021)
New Features:
- All WordPress Media Library file types are now syncable to Cloudinary
- Added system report for better support experience
- Added bottom option into the product gallery main carousel parameter
- Added Pad modes into the product gallery main viewer parameter
- Added Fill modes into the product gallery main viewer parameter
- Video player loading performance was improved
Fixes and Improvements:
- Updated Cloudinary video player to version 1.5.1
- Fixed product gallery in case of adding unsynced asset
- Fixed WordPress Media Library error when editing an asset already synced to Cloudinary
- Fixed sync failure for media added as an external URL by other plugins
2.6.0 (01 Feb 2021)
New Features:
- Added a “wp cloudinary analyze” CLI command which returns the synchronization state of the assets
- Added a “wp cloudinary sync” CLI command which triggers the synchronization of all pending assets
Fixes and improvements:
- Sync process improvements
- Sync process 1000 asset limitation was removed
- Folder path now supports forward slashes
- Deleting media on the WordPress media library will now delete them on Cloudinary
- Fixed an infinite loading issue when using videos
- Fixed compatibility issues with Smush plugin
- Fixed compatibility issues with using the Cloudinary tab in ACF plugin
- Minor cosmetic updates
2.5.0 (20 Jan 2021)
New Features:
- Brand new user interface!
- Introducing the Cloudinary Product Gallery (beta feature):
- We added a new ‘Cloudinary Gallery’ block to the Gutenberg Editor
- When using WooCommerce, you can now use the ‘Cloudinary Gallery’ as your default product gallery
- Added a rate-us link. Please rate us! 😉
- Added support for conditional transformations
Fixes and improvements:
- Improve the REST API capabilities for better integrability
- Bug fixes
2.4.1 (07 Jan 2021)
Fixes and improvements:
- Improved server calling efficiency
- More fixes
2.4.0 (10 Nov 2020)
New Features:
- Added breakpoints support for featured images
- Global transformations on both Categories and Tags pages are now collapsible
- On plugin deactivation, we will ask you to share with us the reason. It’s important to us 🙂
Fixes and improvements:
- Fixed an issue with syncing a deleted asset
- Improved the mechanism for removing the Cloudinary account
- The warning message for exceeding the annual unit plan was revised
- Improved the Alt text synchronization from Cloudinary to WordPress
- Fixed WPBakery error when inserting an image by the WordPress editor
- Fixed AMP plugin conflict issue
2.3.0 (05 Oct 2020)
New Features:
- Added a poster image for video asset
Fixes and improvements:
- Re-sync assets to user specified folder instead of root
- Store the original uploaded image to cloudinary
- Fixed ‘Resource not found’ error when changing credentials
- Fixed incompatibility with text media block
2.2.1 (30 Sep 2020)
Fixes and Improvements:
- Fixed an error when toggling ‘featured image overwrite’ on a custom post type
2.2.0 (08 Sep 2020)
New Features:
- You can now off-load all assets from WordPress to Cloudinary!!
- Automatically convert unsupported media file types (such as INDD, PSD, TIFF, etc) to WordPress supported file types
- Synchronization mechanism was re-built and now exposes a more granular status updates
- Lazy load polyfills for outdated browsers
- Add the ability to overwrite the global transformation to a feature image
- High quota usage alert is now dismissible
- Updated Cloudinary brand
Fixes and Improvements:
- Sync tab UI improvements
- Various performance improvements
- Fixed an issues where excessive transformations being created due to breakpoints not disabling
- Sync assets to allow for unique naming, to prevent overwriting existing items
2.1.9 (04 Aug 2020)
Fixes and Improvements:
- Upgraded the Cloudinary video version
- Added two new synced icons: Downloading and Syncing meta data
- Minor UI improvements
- Bug fixes:
- Fixed the $wpsize_!_cld_full! param that can be observed in the Cloudinary URL
- Fixed wrong calculation of quota credits vs percentage
- Fixed Upload error on files over 100mb from the previous version
- Fixed the Ability of Changing the Public Id
- Fixed Interaction with code blocks with filters that might cause “invalid content”
- Fixed Overwrite transformations on videos
- Fixed excessive backslash stripping
2.1.2 (09 Jun 2020)
Fixes and Improvements:
- Fixed cases where the image size were added to the URL.
- Added support to dashes (‘-‘) in the connection string.
- Added an option to re-sync a single asset to Cloudinary.
2.1.1 (01 Jun 2020)
New features:
- We now provide several options for the WPCloudinary sync, allowing you to better control your media:
- Bulk-sync – Will sync all assets with Cloudinary in a click-of-a-button.
- Auto-sync – Will sync new uploaded assets in an on-demand manner.
- Manual – Added a
push to Cloudinarybutton to the Media Library bulk actions that allows syncing selected assets to Cloudinary.
- Global Transformations are now being applied to Featured Images.
- Added an
Account Statusto the dashboard tab, displaying the account usage, quota and metrics.
Fixes and Improvements:
- Improved the sync mechanism.
- General bug fixes and performance improvements.
- Improved error handling.
2.0.3 (03 Apr 2020)
- Fix migration issue
2.0.0 (31 Mar 2020)
- Release of a new major version of the plugin