Appointment Hour Booking – WordPress Booking Plugin Plugin
Appointment Hour Booking is a plugin for creating booking forms for appointments with a start time and a defined duration over a schedule.
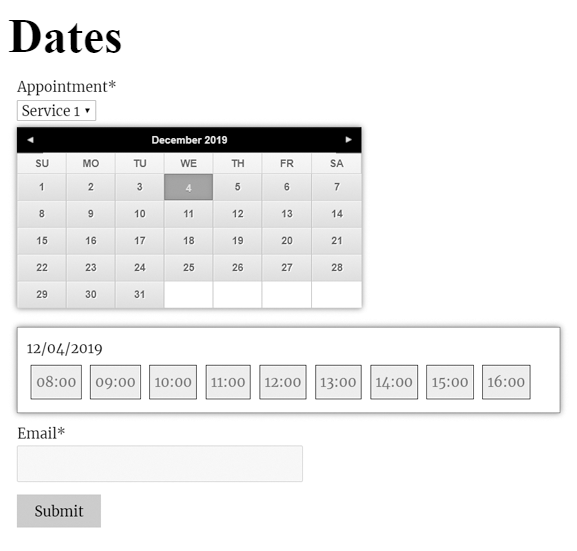
Appointment Hour Booking is a WordPress plugin for creating booking forms for appointments with a start time and a defined duration over a schedule. The start time is visually selected by the end user from a set of start times calculated based in the “open” hours and service duration. The duration/schedule is defined in the “service” selected by the customer. Each calendar can have multiple services with different duration and prices.
This plugin is useful for different cases like booking of medical services where services with different duration and prices may be available, for personal training sessions, for booking rooms for events, for reserving language classes or other type of classes and other type of services/resources booking where start times are selected and the availability is automatically managed using the defined service duration to avoid double-booking (the booked time is blocked once the booking is completed).
Main Features:
- Easy visual configuration of calendar data and schedules
- Working dates, invalid/holiday dates and special dates can be defined
- Supports restriction of default, maximum and minimimum dates
- Open hours can be defined for each date
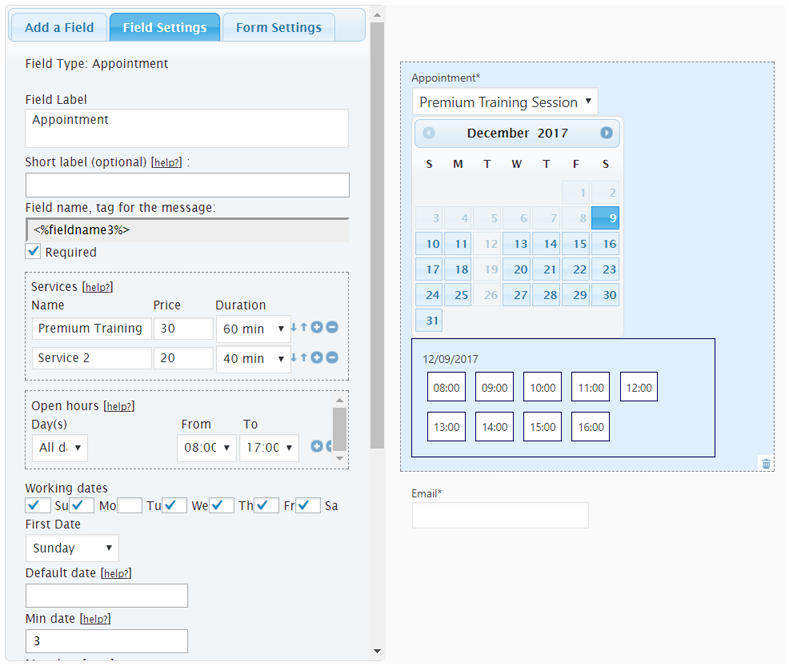
- Each calendar can have multiple services defined
- Each service can have its own price and duration
- Start-times are calculated automatically based in the open hours and service duration
- Available times are managed automatically to avoid double-booking
- Multiple services can be selected on each booking
- Services can have multiple capacity
- Automatic price calculation
- Customizable email notifications for administrators and users
- Form validation and built it anti-spam captcha protection
- Manual and automatic CSV reports
- iCal addon with iCal export link and iCal file attached into emails
- Calendar available in 53+ languages
- Multiple date formats supported
- Blocks for Elementor and Gutenberg
- Multi-page calendars
- Printable appointments list
Features in commercial versions:
- Visual form builder for creating the booking form fields
- Booking form can be connected to payment process (Ex: PayPal Standard, PayPal Pro, Stripe, Skrill, Authorize.net, TargetPay/iDEAL, Mollie/iDEAL, SagePay, Redsys)
- Payments are SCA ready (Strong Customer Authentication), compatible with the new Payment services (PSD 2) – Directive (EU)
- Addons for integration with external services: reCaptcha, MailChimp, SalesForce, WooCommerce and others
- Addons with additional features: appointment cancellation addon, appointment reminders addon, clickatell and twilio SMS add-ons, signature fields, iCal synchronization, Google Calendar API, Zoom Meetings …
Appointment Hour Booking can be used for:
Booking services or resources: Define schedule, open hours, services, prices and durations and let the calendar plugin manage the schedule.
Sample cases: Medical services, personal training, resource allocation, booking rooms, classes, etc…
The services can have a maximum capacity (example: number of persons that can book/attend the service at the same time). The default capacity is 1. If the service capacity has been set to 1 the time-slot will be blocked for new bookings after getting one booking. If the service capacity has been set to a greater number (example: service with capacity 10) the time-slot will be blocked after filling the capacity (example: after getting bookings for a total of 10 persons). This feature is described in detail at https://apphourbooking.dwbooster.com/blog/2019/01/24/bookings-for-multiple-persons/
The Troubleshoot Area
Use the troubleshot if you are having problems with special or non-latin characters. In most cases changing the charset to UTF-8 through the option available for that in the troubleshot area will solve the problem.
You can also use this area to change the script load method if the booking calendar isn’t appearing in the public website.
The Notification Emails
The notification emails with the appointment data entered in the booking form can sent in “Plain Text” format (default) or in “HTML” format. If you select “HTML” format, be sure to use the BR or P tags for the line breaks into the text and to use the proper formatting.
Exporting Appointments to CSV / Excel Files
The appointment data can be exported to a CSV file (Excel compatible) to manage the data from other applications. That option is available from the “bookings list”, the appointments can be filtered by date and by the text into them, so you can export just the needed appointments to the CSV file.
Other Versions and Features
The free version published in this WordPress directory is a fully-functional version for accepting appointments as indicated in the plugin description. There are also commercial versions with additional features, for example:
- Ability to process forms/appointments linked to payment process (PayPal, Stripe, Skrill, …)
- Form builder for a visual customization of the booking form
- Addons with multiple additional features
Payments processed through the plugin are SCA ready (Strong Customer Authentication), compatible with the new Payment services (PSD 2) – Directive (EU) that comes into full effect on 14 September, 2019.
Please note that the pro features aren’t advised as part of the free plugin in the description shown in this WordPress directory. If you are interested in more information about the commercial features go to the plugin’s page: https://apphourbooking.dwbooster.com/download
Installation
To install Appointment Hour Booking, follow these steps:
- Download and unzip the Appointment Hour Booking calendar plugin
- Upload the entire appointment-hour-booking/ directory to the /wp-content/plugins/ directory
- Activate the Appointment Hour Booking plugin through the Plugins menu in WordPress
- Configure the settings at the administration menu >> Settings >> Appointment Hour Booking.
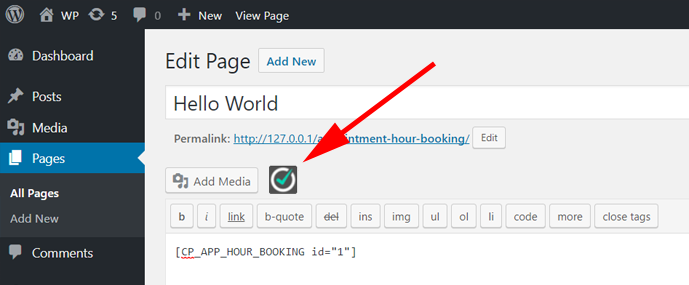
- To insert the appointment hour booking calendar form into some content or post use the icon that will appear when editing contents
Screenshots
FAQ
A: The product’s page contains detailed information about each appointment calendar field and customization:
https://apphourbooking.dwbooster.com
A: You can publish appointment booking forms on pages and posts. The shortcode can be also placed into the template. The commercial versions of the plugin also allow publishing it as a widget.
A: Please check complete instructions in the following page: https://apphourbooking.dwbooster.com/faq#q82
A: Into the form editor click a field and into its settings there is one field named “Additional CSS Class“. Into that field you can put the name of a CSS class that will be applied to the field.
There are some pre-defined CSS classes to use align two, three or four fields into the same line. The CSS classes are named:
column2
column3
column4
For example if you want to put two fields into the same line then specify for both fields the class name “column2“.
A: You should use a custom class name. All fields include the attribute “Additional CSS Class”, you only should enter through this attribute a custom class name (the class name you prefer), for example myclass, and then define the new class in a css file of your website, or add the needed styles into the “Customization area >> Add Custom Styles” (at the bottom of the page that contains the list of calendars):
.myclass{ display:none; }
If you are using the latest version of the plugin, please enter in the “Additional CSS Class” attribute, the class name: hide, included in the plugin’s distribution.
A: Into the form builder in the administration area, click the “Form Settings” tab. That area is for editing the form title and header text.
It can be used also for different alignment of the field labels.
A: In addition to the possibility of editing the email contents you can use the following tags:
%INFO%: Replaced with all the information posted from the form
%itemnumber%: Request ID.
%formid%: ID of the booking form.
%referrer%: Referrer URL if reported.
%additional%: IP address, server time.
%final_price%: Total cost.
%fieldname1%, %fieldname2%, …: Data entered on each field
A: Use the tag %itemnumber% into the email content. That tag will be replaced by the submission item number.
A: If you want send an image in the notification emails, like a header, you should insert an IMG tag in the “Email notification to admin” and/or “Email confirmation to user” textareas of form settings, with an absolute URL in the SRC attribute of IMG tag:
A: If you are using the HTML format in the notification emails, you should insert the BR tags for the changes of lines in the emails content:
A: If the form doesn’t appear in the public website (in some cases only the captcha appear) then change the script load method to direct, this is the solution in most cases.
That can be changed in the “troubleshoot area” located below the list of calendars/items.
A: Try first using a “from” email address that belongs to your website domain, this is the most common restriction applied in most hosting services.
If that doesn’t work please check if your hosting service requires some specific configuration to send emails from PHP/WordPress websites. The plugin uses the settings specified into the WordPress website to deliver the emails, if your hosting has some specific requirements like a fixed “from” address or a custom “SMTP” server those settings must be configured into the WordPress website.
A: Use the “throubleshoot area” to change the character encoding.
A: A list with the appointments set on the calendar can be displayed by using this shortcode in the page where you want to display the list:
[CP_APP_HOUR_BOOKING_LIST]
… it can be also customized with some parameters if needed, example:
CP_APP_HOUR_BOOKING_LIST from=”today” to=”today +30 days” fields=”DATE,TIME,email” calendar=”1″]
… the “from” and “to” are used to display only the appointments / bookings on the specified period. That can be either indicated as relative days to “today” or as fixed dates.
The styles for the list are located at the end of the file “css/stylepublic.css”:
.cpabc_field_0, .cpabc_field_1, .cpabc_field_2, …
Clear the browser cache if the list isn’t displayed in a correct way (to be sure it loads the updated styles).
You can also add the needed styles into the “Customization area >> Add Custom Styles” (at the bottom of the page that contains the list of calendars):
A: Yes, for this purpose you can use the plugin CP Referrer and Conversion Tracking that already includes the automatic integration with this plugin.
A: In all plugin versions you can turn off IP tracking to avoid saving that user info. Full GDPR compliant forms can be built using the commercial versions of the plugin.
Changelog
1.3.78
- Admin intf update
1.3.79
- Language fixes
1.3.80
- PHP 8 compatibility
1.3.81
- Min-date/max-date fix
1.3.82
- New design theme
1.3.83
- PHP warning fix
1.3.84
- Dashboard add-on update
1.3.85
- Elementor integration update
1.3.86
- Improved load speed
1.3.87
- Add-ons engine update
1.3.88
- iCal Export add-on updates
1.3.89
- Form builder updates
1.3.90
- Max date rule fix
1.3.91
- PHP 8 fix
1.3.92
- iCal update
1.3.93
- CSS fixes
1.3.94
- Add-on improvements
1.3.95
- Better iCal integration
1.3.96
- PHP 8 fixes
1.3.97
- SQL query updates
1.3.98
- PHP 8 fix
1.3.99
- Compatible with WordPress 6.2
1.4.01
- Code improvements
1.4.02
- Query updates
1.4.03
- Fix to reports
1.4.04
- PHP 8 update
1.4.05
- WP 6.2 update
1.4.06
- New add-ons
1.4.07
- iCal add-on update
1.4.08
- iCal improvements
1.4.09
- Add-ons update
1.4.10
- Fix to stats section
1.4.11
- PHP 8 fix
1.4.14
- Misc improvements
1.4.15
- Fixed captcha issue
1.4.16
- Removed old code
1.4.17
- Improved speed
1.4.18
- Fixed cache
1.4.19
- Support for new addons
1.4.20
- CSS template update
1.4.21
- Custom list emails link
1.4.23
- Compatible with WP 6.3
1.4.24
- New overbooking verification
1.4.25
- List improvement
1.4.26
- Overbooking features
1.4.27
- New add-on
1.4.28
- PHP update
1.4.29
- PHP 8 update
1.4.30
- New add-on Single Days Selection Interface
1.4.31
- Single Days Selection Interface update
1.4.32
- Database update
1.4.33
- Code improvements
1.4.34
- New help section
1.4.35
- form title fix
- Square Checkout add-on
1.4.36
- New add calendar
1.4.37
- Fixed CSS conflicts
1.4.38
- Theme CSS improvements
1.4.39
- Compatible with WP 6.4
1.4.40
- Interface fixes
1.4.41
- CSS update
1.4.42
- Language fixes
1.4.43
- Support for new add-ons
1.4.44
- Misc improvements
1.4.45
- New attributtes allowed
1.4.46
- Captcha anti-spam update
1.4.47
- Admin layout fix
1.4.48
- Better language support
1.4.49
- Max date calculation fix
1.4.50
- Date format in stats
1.4.51
- Speed optimization
1.4.52
- Better lang support
1.4.53
- Max date improved
1.4.54
- Reports update
1.4.55
- Listing updates
- Previous inc: service,sessions,events,reservation,classes,teaching and training
1.4.56
- Dashboard events speed/cache
1.4.57
- Fixed captcha security issue
1.4.58
- Compatible with WP 6.5
1.4.59
- CSV Export fix
1.4.60
- Script optimizations
1.4.61
- Add-ons update
1.4.62
- iCal update
1.4.63
- Fix calendar view
1.4.64
- Captcha fix
1.4.65
- Fixed DB bug
1.4.66
- Minor PHP update
1.4.67
- Multi-view calendar update
1.4.68
- Add-ons update
1.4.69
- Better Single Days Selection Interface add-on
1.4.70
- Code improvements
1.4.71
- Base class fixes
1.4.72
- Date formatting in Schedule Liew View
1.4.73
- New Schedule List View options
1.4.74
- Compatible with WP 6.6
1.4.75
- Translation output fix
1.4.76
- Multiple status change in bookings list


